GC Image Users' Guide
Image Input and Output
GC Image represents each pixel value with a double-precision, 64-bit,
floating-point number that provides much higher precision than most
standard digital image formats.
For this reason and to support storage of ancillary data, the GC Image
software employs special file formats for representing GCxGC images.
For each GCxGC image, there are two files:
- A GCI file with .gci extension stores ancillary data about
the image (e.g., its size, color mapping, etc.) in
plain text format tagged using an eXtensible Markup Language (XML)
schema for GCxGC images.
- A binary file with .bin extension stores the binary image
data in time order with each value stored as an IEEE double-precision,
floating-point number with big-endian byte order.
GC Image uses a different binary format, described in chapter
GCxGC-MS Data, for GCxGC-MS data.
The File menu in the GC Image Image Viewer provides access
to utilities for image input and output, including:
-
opening and saving images in the GC Image file formats,
-
importing and exporting images in other file formats, and
-
printing images.
As illustrated in Figure 1, there are several File menu options
for input and output.
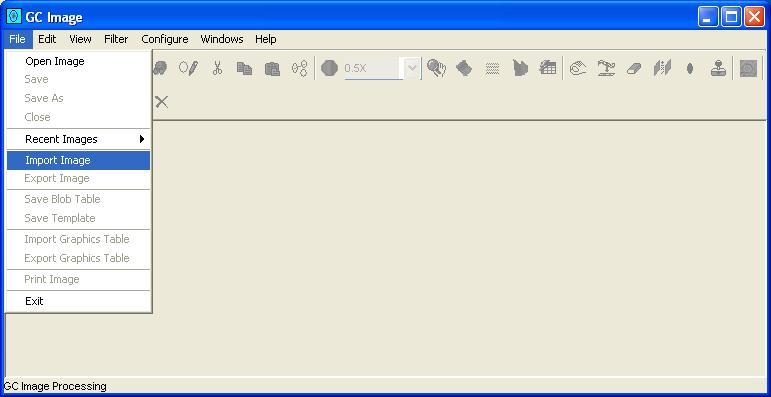
Figure 1: The File menu of the Image Viewer,
with the Import Image option selected.
Specifically, the image input and output options are:
-
File->Open Image launches a file-system browser to open an image
file in GC Image format. The user specifies the folder and GCI .gci
filename. GC Image also expects a binary .bin file in the same
folder and with the same filename root. If there is a currently open image,
another GC Image process is initiated.
-
File->Save saves the current open image to the GCI .gci and
binary .bin files from which it was opened or to which it was last
saved (whichever is more recent). The image remains open. This menu
option is not available if no image is open.
-
File->Save As launches a file-system browser to save the current
image to a file specified by the user. The user specifies the folder
and GCI .gci filename and GC Image also saves a binary .bin
file in the same folder and with the same filename root.
The current open image remains open, but the associated file location
is changed (e.g., for subsequent Save operations).
This menu option is not available if no image is open.
-
File->Close closes the image without saving. If the image has
been altered since the last Save or Save As operation,
the user is prompted whether or not to save the image before closing.
It is best to save the image, if that is desired, before requesting the
image be closed. This menu option is not available if no image is open.
-
File->Recent Images provides a sub-menu list of the most recently
opened images.
An image file in the list can be opened by simply selecting the file
name from the list.
If there is a currently open image, another GC Image process is initiated.
-
File->Import Image provides a pop-up dialog box for importing
an image in a foreign file format (i.e., not GC Image format)
and opening the imported image. If there is a currently open image,
another GC Image process is initiated to import the image.
When imported, the image is converted from the foreign file format
to the GC Image format and stored in the folder and file location
specified by the user. The user can invoke a file-system browser to
help specify the source location of the foreign-format file and the
destination location of the GC Image format file. The determination
as to the source image file type is made on the basis of the file name
extension, so files to be imported should be named with the proper
extension. For the destination, the user specifies the folder and GCI
.gci filename. GC Image also saves a binary .bin file
in the same folder and with the same filename root.
GC Image can import images in a variety of file formats.
| Extension |
Format |
| .csv, .txt |
CSV - Comma-Separated-Values in text format;
each line is "<time>, <value>" or each line
has "<value>" only, without time or comma. |
| .bin |
Binary - big-endian, IEEE, single-precision, floating-point;
optional byte-swapping supports little-endian format. |
| .bmp |
Bitmap - common Microsoft Windows format. |
| .cdf |
CDF - NSSDC Common Data Format. |
| .gif |
GIF - Graphics Interchange Format. |
| .jpg |
JPEG - Joint Photographic Experts Group format. |
| .png |
PNG - Portable Network Graphics format. |
| .tif |
TIFF - Tagged Image File Format. |
Most of these formats do not provide sufficient precision for scientific
work. Color images may yield unexpected results when the values are
extracted. The most common import formats for GCxGC images are CSV and
binary. The most common import format for GCxGC-MS images is CDF.
Additional binary and plain-text formats will be supported in the future.
-
File->Export Image launches a file-system browser for exporting
an image in a foreign file format (i.e., not GC Image format).
When exported, the currently open image is converted from the GC Image
format to the external file format and stored in the folder and file
location specified by the user. The user may choose to attach or not
to attach axes to the exported image. This menu option is not available
if no image is open.
GC Image can export to a variety of image formats:
| Extension |
Format |
| .bmp |
Bitmap - common Windows format. |
| .jpg |
JPEG - Joint Photographic Experts Group. |
| .png |
PNG - Portable Network Graphics. |
| .pnm |
PNM - Portable Anymap File Format. |
| .tif |
TIFF - Tagged Image File Format. |
Most foreign image file formats do not support the high-precision
representation used by GC Image, so exported images may have significantly
degraded precision. However, relatively little precision is required
for viewing, printing, and other simple purposes.
Additional binary and plain-text formats will be supported in the future.
-
File->Print Image launches a print dialog to print an image,
shown in Figure 2.
The user can preview the printed page at varying magnifications;
can control margins, orientation, and alignment; can stretch the image
to a full page (changing aspect ratio); and can choose to attach or
not to attach axes.
This interface is still being developed to provide more extensive
printing choices. Additionally, individual windows can be copied
to a buffer with the <ALT>-<PrtSc> keys and then
pasted into presentation software.
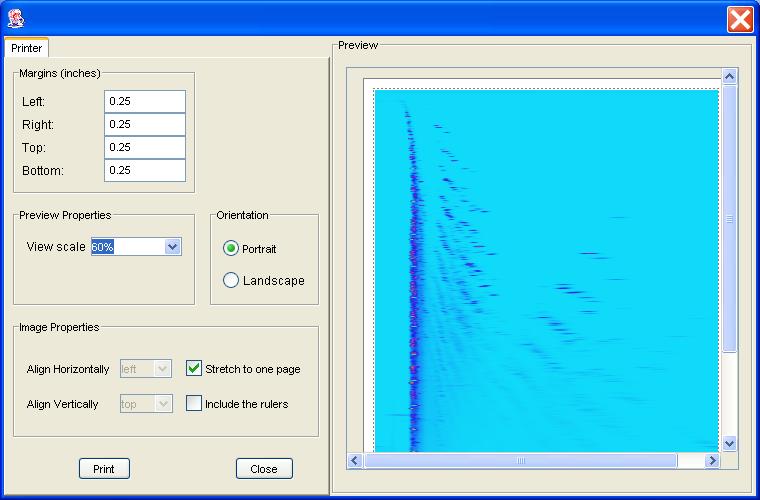
Figure 2: The Print Image popup.
The File menu also provides options for reading and writing
image-related data:
-
Save Blob Table - save blob peak table as text in
comma-separated-file (.csv) format.
-
Save Template - save blob peak template as text in
XML format.
-
Import Graphics - import a graphics table.
-
Export Graphics - import a graphics table.
and an option to exit:
-
Exit - terminate the program.
The options for saving blob peak tables and templates are described
in chapter Analysis.
The options for importing and exporting graphics tables are described
in chapter Graphics.
When the exit action is selected, the currently open image is discarded.
If an image is open and has been altered since the last Save or
Save As operation, GC Image prompts the user whether or not the
image is to be saved before exiting. It is best to save changed images
that are to be retained when they are changed to prevent the loss of
unsaved work (e.g., in the event of a system crash or power
failure) and before requesting the program to exit.
Contents
Previous: Image Viewer
Next: Visualizing Image Data
GC Image™ Users' Guide © 2003, 2002, 2001 by GC Image LLC and the University of Nebraska.