|
|
CXP-Powered I-MINDS Capabilities 2.0 |

QuestionAnswering
2.0
This QuestionAnswering
capability was completed in December 2005 and revised in May 2006. This capability has two views: an instructor
application and a student application.
The person in charge of the Q&A session (e.g., an instructor) can
pick and choose questions to answer. The
application helps manage the questions.
The users asking questions (e.g., a student) can review their questions
and answers. They can also ask questions.
This capability
also has agent intelligence. The
instructor application scores each question based on keywords and also “machine
learns” from the instructor about what keywords are important
behind-the-scenes, without interfering with the instructor’s actions. This allows the capability to learn to score
each question more accurately over time.
As this is one
of our intelligent capabilities (which are usually significantly complex than
our other capabilities), here we provide a detailed discussion of the features
and requirements, including installation guideline.
1. Capability
1.1.
Introduction
The Question and
Answering capability is based on the basic chat capability that comes with
Conference XP. It uses the communication
protocols common to all capabilities to multicast messages to all participants
in the Venue. These messages are strings
containing pertinent information such as the identifier who sent the message
bound between xml-style tags which we have defined. This simplifies the process of parsing the
messages when they are received.
The Question and
Answering capability is designed to run in either the I-MINDS or the CXP
Client. There are actually two separate
versions of the capabilities which look the same to CXP—the teacher and student
versions. These versions differ in many
ways, the most significant being their capability forms and the teacher version
connecting to a server-side database.
The database is discussed in more detail below although it is worth
pointing out that some tables are updated by the I-MINDS Client. This means that some tables which should be
updated are not when Q&A is run using the CXP client. These have minimal impact on the Q&A
client and are summarized in table 1.1.
Screenshots for the Student and the Teacher version of Q&A can be
found in figure 1.1 and 1.2 respectively
1.2.
Student Flow of Control
Students using
Question Answering can ask the teacher a question by entering the question into
the box at the bottom of the Student form (see figure 1.2) and pressing the
Send button. The question is then
encapsulated into using the question answering tags described below. The resulting string is then multicast using
the SendObject method to the rest of the classroom. In affect, the student version broadcasts the
question to all the other instances of the Question Answering capability (both
teacher and student) running on other machines.
The teacher version will be listening for such questions.
The student
version also listens for responses sent by the teacher version. Whenever a response is received the
identifier is checked against the identifier for the local participant. If a match is found then the response is
being sent to this student version. The
actual response content is displayed along with the original question in the
‘Recent Answer’ and ‘Recent Question’ boxes.
They are also added to the ‘Prior Messages’ table. Figure 1.3 shows how the student version
looks after it has received a response.
Students can resend questions to the teacher by right-clicking on the
question or answer and pressing ‘Resend’ on the popup menu.
1.3.
Teacher Flow of Control
Teachers using
the Question Answering capability will see the Teacher form shown in figure
1.1. The Teacher form displays all the
questions that have been previously asked by Students. Questions that have already been answered or
discarded will appear in the appropriate tables. Questions that are still waiting for a
response will appear in the ‘Received Questions’ table, sorted by score. When the teacher right-clicks on a message in
the ‘Received Questions’ table he or she has the option of either answering or
discarding the question. If the teacher
chooses to answer the question the sender’s identifier will appear in the send
to label. The teacher can then write a
response to this question and press send.
The answer is then encapsulated into using the question answering tags
described below. The resulting string is
then multicast using the SendObject method to the rest of the classroom. When the teacher answers or discards the
question the question answering agent will modify the weights of the keywords
it contains. See the Question Answering
Agent section.
As mentioned
above, the teacher version listens for questions asked by students. When such a question is received the question
answering agent first determines what score the question should receive. This is done by first parsing and tokenizing
each word in the question. For more
information please consult the Question Answering Agent section below. The question immediately appears in the
‘Received Questions’ table and is available to the teacher. As this table is sorted by score, good
questions will appear higher on the table while bad questions might not even
appear on the table unless the teacher scrolls down.
1.4. Question Answering Group Tags
The student question uses the following
format:
<to>toTeacher variable</to>
<question>question
string</question>
<from>sender
identifier</from>
The teacher response uses the following
format:
<to> student identifier</to>
<question>question
string</question>
<response>response
string</response>
<from>sender
identifier</from>
In Question Answering, the toTeacher
variable is used instead of a specific identifier. It is the responsibility of the teacher
version of the capability to filter the messages received. For the teacher version the toTeacher variable
indicates that the string contains a question asked by a student. The student versions will ignore messages
containing the toTeacher variable and messages containing an identifier that
does not match their local identifier.
1.5. Intelligent
Agent
The teacher
version of the question answering capability contains an intelligent agent
whose purpose is to aid the teacher in deciding which questions to answer. It does this by assigning a score to each
question as it is received from the student.
This score is determined by the length of the question and the weights
of the keywords it contains. When a
question is first received it is tokenized and stemmed by a natural language
processing program. The stems are
checked against the keywords stored in the database. If a match is found the weight of the keyword
is added to a running total. This total
is then normalized along with the length of the question to determine the
score.
The intelligent
agent also adjusts the keyword weights up or down. This is done when the teacher decides to
answer or discard a question. When the
teacher answers a question the question is once against tokenized and
stemmed. The weights for keywords found
in the question are increased. Stems
that are not found in the keywords table are added as keywords with a low
weight. When the teacher discarded a
question the weights for the keywords found in that question are
decreased.
The natural
language processing program we are using is called “combiner.exe”. It maintains a taboo list of certain common
words. All keywords are automatically
normalized by the intelligent agent to fit a certain range. This prevents the weight associated with a
common keyword from getting so large that it dominates the rest.
- The first of these is that the
sessionID for messages stored will not accurately reflect the session
when the message was received.
Instead the most current session will be used or 0 if no sessions
are found.
- Because the student and teacher
identifiers are not stored in Q&A it is possible that a sender
identifier for a message stored will not be found in either table.
- The StudentsInSession table will
not be populated at all so no record of which students join the classroom
(Venue) will be kept.
Table 1.1:
Several minor ramifications of using Q&A with the I-MINDS client.
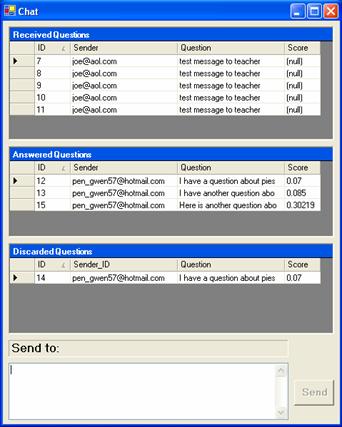
Figure 1.1: Screenshot
of teacher version of Q&A

Figure 1.2:
Screenshot of student version of Q&A
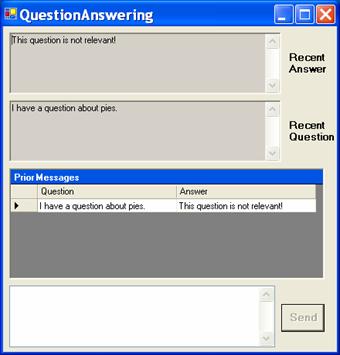
Figure 1.3: Student version receiving a response.
2. Teacher Options
To further
assist the teacher we have developed the Virtual Classroom and Statistics
Charts modules. These modules can be
started from the Options menu.
2.1.
Virtual Classroom
The Virtual
Classroom form is very useful for teachers.
It displays information about each student, message, and topic from a
classroom. Students are represented by
small pie charts, with each chart split into five pieces. Each piece corresponds to a different
statistics category. The pieces are
colored blue if the student is at or above the thresholds for those statistics
(as set by the teacher) and colored red if the student falls below the set
thresholds. These thresholds are stored
in the database so the teachers can just “set it and forget it”, rather than
worry about their levels. The statistics
are computed for the last number of sessions specified at the bottom left
corner of the screen.
The messages and
topics for the classroom are displayed in list views on the right hand side of
the screen. All information tracked
about each message/topic by I-Minds is displayed in these panes. Also, just like in Database Search, a message
can be right clicked on, bringing up a “Message Tree” option. Choosing this option causes a tree describing
the thread containing that message/topic to be drawn for the user to work with.
Finally, this
form can also be used to find out specific information about individual
students and buddy groups in the classroom.
A student’s pie chart can be right clicked to display all the messages
by just that one student, or to find out information about their buddy
groups. If the “Buddies” option is
chosen, just that student’s buddies are displayed along with their messages and
topics. Additionally, there are check
boxes for each student which can be checked to get overlapping buddy
groups. For example, say a teacher
wanted to find out information about all the buddies that both student A and
student B share. Their check boxes can
be selected and then the teacher can click on the Buddies button at the bottom
of the form to display information about the overlapping buddies.
2.3.
Statistics Charts
The Statistics
Charts form is used to display statistics information about students in
graphical form. A teacher can choose to
display all the statistics of any individual student or the ratings of each
student for an individual statistic, both in bar chart form. Once again, statistics that fall at or above
the thresholds set by teachers are shown in a blue color and those that fall
below thresholds are shown as a red color.
The thresholds are the same ones recorded in the database by the Virtual
Classroom form, and any change to the thresholds is propagated in both
forms. There is also the option of
displaying a legend for the statistics by clicking on the Legend button. Once again, the stats are computed for the
number of sessions specified in the bottom left corner of the screen, which is
also tied to the corresponding option in Virtual Classroom.
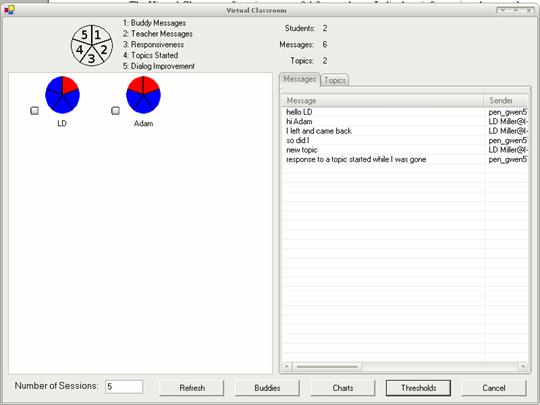
Figure 2.1: A Virtual Classroom Form displaying info
about two students
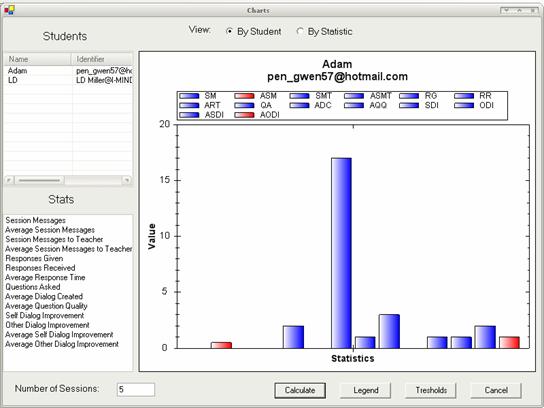
Figure 2.2: A Statistics Charts Form displaying a
student’s stats in graphical form
3. Database
The I-MINDS
database is currently running MySQL version 4.1. In the future we intend to switch over from
MySQL to SQL Server or something similar.
The basic structure should easily transfer over to any relational
database. The database was designed
using a combination of DBDesigner4, an open source designer from fabForce, and
phpMyAdmin-2.6.3. For an illustration of
the I-MINDS database consult figure 3.1 below.
The mysqldump textfile of the database can be found in the same folder
as the source code.
On the C# side,
the database hook is contained in the ComponentTestLibrary.dll. This dll, whose source is provided, consists
of a ComponentModel class called DatabaseWrapper and another class called
DatabaseMethods, along with the dataset schema DataSet1.xsd. The DatabaseWrapper class consists of
numerous DataAdapters designed with the form editors. The dataset schema was generated from these
DataAdapters using the wizard.

Figure 3.1:
The DBDesigner model for the I-MINDS database
Wherever
possible we have tried to conform to the C# database connection model, filling
the dataset from multiple DataAdapters.
The tables in the dataset can then be hooked to DataGrids or DataViews
for display. We use OdbcCommand builders
to generate both the update and insert queries with two exceptions. We the Keyword_Ranking and Message DataAdapters
we experienced numerous DatabaseConcurrency exceptions which claimed that 0
rows were updated. Despite much
experimentation we were unable to lock down this exception. Our solution was to write our own Update and
Insert queries and run them on each row in the DataTables based on row
states. This seemed to eliminate the
problem.
4. Installation
This section
leads you through the installation for ConferenceXP and our capabilities. The first program to install is the
mysql-connector-odbc-3.51 driver. We
have included this with our source code.
Next, if you have not already done so download the CXP Client version
3.2. Before you install it make sure
that the Microsoft Journal Viewer has been installed. Please consult the ConferenceXP client
installation guide for more information.
We provide the
database dump file so that users can upload the I-MINDS database to their local
server. The installation is relatively
straight forward assuming you have access to MySQL server version 4.1 or
higher. Table 4.1 gives the console
command. If your machines do not have
access to the internet you will need to install your own venue service on one
of your machines. The Venue Service can
be downloaded from the ConferenceXP website.
mysql –uusername –ppassword <
iminds.sql
Table 4.1:
console command to upload database
Alternatively,
you could connect to the I-MINDS database running on cse.unl.edu. The user name and password are given in Table
4.2. A word of caution though, the I-MINDS database on CSE is our test bed and
is subject to design revisions which could break previous versions of Q&A
or Buddy Group.
Site: cse.unl.edu; Database: lmille;
MySQL user: lmille; MySQL password: GNEZWS
Table 4.2: connection
information for the I-MINDS database on CSE
To run either
capability you must first create an ODBC data source in Windows XP. This data source is what the C# code will use
to connect to the database. To do this,
open Administrative Tools/Data Sources (ODBC).
Add a new System DNS with the above information (see figure 4.1). If you are running your own MySQL server the
Server, User and Password entries may change from figure 4.1.
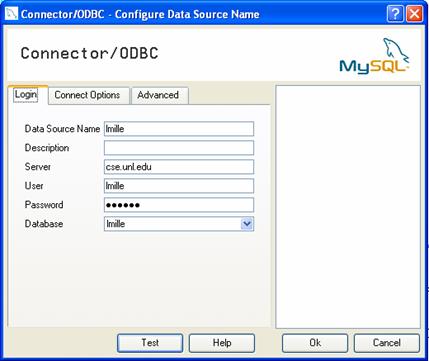
Figure 4.1: Data Source for
the I-MINDS database.
The Buddy Group
or Question Answering capabilities should be pasted into the CXPClient folder
in the manner of all capabilities. You
should also paste the ComponentTestLibrary.dll into the same folder. The Stemmer folder containing combiner.exe
and the licenseI-MINDS rtf file should each be pasted into the CXPClient
folder. Remember that there are two
separate versions of the Q&A capability (teacher and student). The Question Answering capability uses the
xApplication4 payload type while Buddy Group uses the xApplication5 payload
type.
5. Change Log
This section
covers the changes the I-MINDS team has made to the BuddyGroup capability with
version 2. These changes include
additional features, bug fixes, and database structure changes. None of these changes break the functionality
described above.
5.1.
Data Adapters
One significant
change we made in this version is how the database is accessed by our source
code. In v1 most of our source code in
Question Answering used C# DataAdapters to access the database. In brief, DataAdapters select all the records
in a table and populate a C# DataTable with the results. This can be very convenient because once the
DataTable is populated you can manipulate the data (add, remove, update
records) without querying the database.
However, we encountered some concurrency problems with the
implementation. While these were not as
bad as those encountered by Buddy Group, the decision was made to remove all
the DataAdapters and replace them with SQL queries.
5.2. Adding
Keywords
In v1, there was
no way to add additional keywords to the database without writing the queries
yourself. This was an oversight on our
part, in the old I-MINDS client we had a form for adding new keywords and
weights. When we made the decision to
use the CXP Client, this was a feature that somehow got left out. In v2, this feature is back. The teacher can at any time select the Add
Keyword item from the Options menu. This
brings up a form containing a DataGrid with all the keywords and weights stored
in the database. The user can delete
existing keywords by clicking on the row and pressing delete. New keywords can be added by clicking on the
star row at the bottom. Existing
keywords can be updated by selecting their entries and typing in a new
weight. To save the changes simply press
the Update button. See figure 5.1 for
more information.
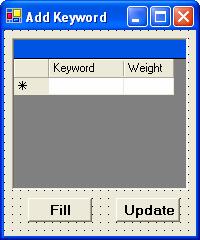
Figure 5.2:
Add Keyword Form
5.3. Virtual
Classroom
The Virtual
Classroom form is very useful for teachers.
It displays information about each student, message, and topic from a
classroom. Students are represented by
small pie charts, with each chart split into five pieces. Each piece corresponds to a different
statistics category. The pieces are
colored blue if the student is at or above the thresholds for those statistics
(as set by the teacher) and colored red if the student falls below the set thresholds. These thresholds are stored in the database
so the teachers can just “set it and forget it”, rather than worry about their
levels. The statistics are computed for
the last number of sessions specified at the bottom left corner of the screen. The Virtual Classroom form is accessible from
the Options menu, in the teacher version.
5.4. Statistics
Charts
The Statistics
Charts form is used to display statistics information about students in
graphical form. A teacher can choose to
display all the statistics of any individual student or the ratings of each
student for an individual statistic, both in bar chart form. Once again, statistics that fall at or above
the thresholds set by teachers are shown in a blue color and those that fall
below thresholds are shown as a red color.
The thresholds are the same ones recorded in the database by the Virtual
Classroom form, and any change to the thresholds is propagated in both
forms. There is also the option of
displaying a legend for the statistics by clicking on the Legend button. Once again, the stats are computed for the
number of sessions specified in the bottom left corner of the screen, which is
also tied to the corresponding option in Virtual Classroom. The Student Charts form is accessible from
the Options menu, in the teacher version.