|
|
CXP-Powered I-MINDS Capabilities 4.0 |

BuddyChat
and StructuredChat 4.0
3.1. Introduction
In version 2,
buddy group was its own capability modified from the chat capability included
with ConferenceXP, which allowed users to choose a group of buddies that they
wished to converse with. In CXP+I-MINDS
version 3, buddy group became a capability mode of merged capability. Along with the additions of advanced chat
functionality it included a buddy manager from which students could alter who
is and who is not included in their buddy group. In version 4, the options menu from which to
access ‘Display Statistics’, ‘Database Search’ and ‘Manage Buddy’ were moved to
the main CXP+I-MINDS form. Also, with
the addition of moderator assigned structured groups, a new communication mode
was added named Structured Chat. The functionality is nearly identical, with
the exceptions that users cannot change their structured group members, and if
their structured group is changed by the administrator, the user will receive
the current topics being discussed in the new group they enter. Because of their marked similarities, we will
only describe the functionality of Structured Group Chat, although the
description applies to both.
3.2. Flow of Control
Unlike the question answering mode in
merged capability, there is only one version of each of the chat modes. These modes are designed to be used by both
teachers and students simultaneously.
Participants can send messages to each other by using these modes. It is important to mention that only
participants running the chat modes in merged capability who are in the
sender’s classroom will receive the message and only participants in the
student’s group will display it.
In a Chat capability, it is possible to
select a previously received message by just clicking on it in the message text
box. The selected message is added to
the response text box. While the
response text box contains a message, any new messages sent by the user will be
'in response' to this message. To clear the message just right-click the
response text box to bring up the menu and select 'Clear'. To view the Message Tree for the previously
received message just select 'History' from popup menu. This will cause the MessageTree form to
become visible, displaying the tree view for the message tree (Figure 3.3).
For Chat capabilities we introduce the
concept of Message Trees. Message Trees
provide the ability for one message to initiate an expanding flow of
dialog. A Message Tree starts with a
single topic started by one of the students (Figure 3.2). This topic forms the root of the Message
Tree. Topics with unseen messages are
displayed in bold in the topics field of the form (Figure 3.1). When another student responds to a topic,
this linkage is stored on the CXP+I-MINDS database. New messages can respond to
either the original topic or any previous response. The tree of a conversation can be viewed by
right clicking in the Respond to: panel and selecting History. By using a recursive algorithm on the
CXP+I-MINDS database the stored messages are extracted and added to a tree view
data object to facilitate display.

Figure 3.1: The Structured
Group Chat Form

Figure 3.2: Creating a new topic in
Structured Chat

Figure 3.3: Message Tree for a Conversation
3.3. Intelligent Features
In order to better support users, we have
begun adding intelligent functionality to both BuddyChat and
StructuredChat. To accomplish this, the
user agents monitor each topic the user is involved in. If the user has many unread messages in a topic,
the agent notices this condition and notifies the user, asking them if they
would like to view the unread messages.
If a user’s contribution level is low in a topic, the agent encourages
the user to increase their participation, and offers to display the topic if it
is not the one currently focused on.
Also, in BuddyChat, if the agent sees that a nonbuddy is contributing
heavily to a topic started by a buddy and the user has extra room to add new
buddies, the agent recommends adding the nonbuddy to the user’s buddy
list. However, we know that not all
users will want to be bothered by such messages, so we added reinforcement
learning to the agents so they will stop notifying the user of these different
conditions based on the user’s reaction to the notifications. Whenever the agent notifies the user, it
remembers the user’s response and is increasingly less likely to notify the
user again if the user chooses to ignore the agent’s alert.
For users and moderators who join
sessions that have already begun or are dropped because of a bad network
connection and rejoin, we have also added functionality to allow the agents to
request any existing messages from other participants. For BuddyChat, the user agent asks the agents
of the user’s buddies for all messages in topics either the buddy or they
themselves started. The agents then
respond with such messages, and the user’s agent rebuilds its collections and
displays all existing topics. Similarly,
for StructuredChat, the agents request all messages from group members and
display those as well. Because
moderators can chat with anyone, user agents also ask for topics created by
moderators, and moderators ask for topics from everyone. Finally, when moderators modify existing
structured groups, the agents also work together to insure that all members of
each group after the change have all of the messages previously sent within the
group.
3.4. Buddy Group Manager
Figure 3.4 shows
a screenshot of the buddy manager form.
The buddy manager becomes visible whenever the user selected ‘Manage
Buddy Form’ from the main CXP+I-MINDS form.
The buddy manager form shows all the participants who are currently
stored in the CXP+I-MINDS database and indicates whether they are on or
offline. There are two checkboxes for
each participant, one for adding the participant as a buddy and the other for
adding her as a temporary buddy. Temp
buddies are counted as buddies for purposes of receiving messages, but the
relationship is asymmetric rather than symmetric.
Maintaining the
symmetric relationship between buddies requires a handshaking procedure between
the two participants and the CXP+I-MINDS database. Because of the requirement of symmetric buddy
relationships, you can only add a buddy if that participant is currently
online. When you check the Buddy box for
a participant, your agent sends a message to your potential buddy. When the message is received, her agent will
popup a confirmation box asking her if she would like to add you as a
buddy. Based on her decision, her agent
sends one of the following three responses: (1) she has added you as a buddy,
(2) she has declined your offer of being a buddy, or (3) she cannot become your
buddy because her buddy group is full.
Because removing a buddy does not require such handshaking, students are
able to remove a buddy whether they are online or offline. When that student
logs in next, the buddy manager will simply show the two are no longer
buddies.
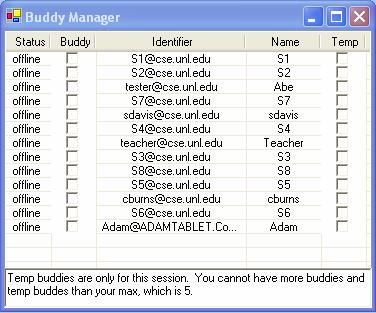
Figure 3.4:
Buddy Manager Form
3.5. Structured Group
Manager
To facilitate
the formation of structured groups, a new component has been added to version 4
called Structured Group Manager. This
powerful utility allows moderators to create sets of Structured Groups which
can then be used in collaborative quizzes and structured chat. When the groups are set up, a moderator can
save those groups as a set of groups. This allows the moderator to keep a list
of possible group combinations to assign for a particular assignment or time
period.
Group assignment
begins with the moderator creating a new set described above by entering a name
in the new set field then clicking ‘Create new Set’ (Figure 3.5).
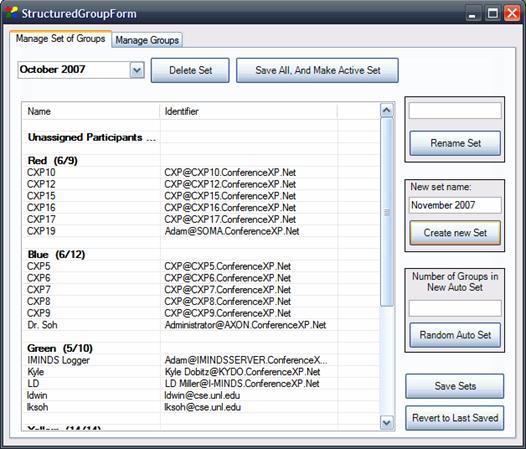
Figure 3.5:
Structured Group Manager: Set Manager Tab
This will create
an empty set of groups with all students in the ‘Unassigned Participants’
category. Groups are then set up using
the ‘Manage Groups’ tab, which allows for the creation of new groups, the
editing and deleting of old groups, and the moving of students between groups.
·
To
create a new group, the name and size of groups must be specified in the new
group text fields. Then clicking ‘Add Group’ will add this new empty group to
the current set.
·
Once
a group has been created, you can edit the name and size by bringing up the
group in the ‘Group B’ drop down menu, checking which attribute you would like
to edit in the edit panel, entering the new name or size, and clicking ‘Edit
Group B’.
·
To
delete a group, select the group in the ‘Group B’ drop down menu, then click
‘Delete Group’, which places all members of the group to the unassigned
students category, and removes this group from the set.
·
Members
can be moved between groups by selecting the two groups involved in the drop
down menus, highlighting the participants to be moved, and then clicking the
arrow indicating the direction to be moved. Not only can you move students
between groups but also from the Unassigned Participants category into a new
group.
·
Another
option for group formation is filling the group with randomly selected
participants from the unassigned list. To do this, a group is selected from the
‘Group B’ combo box, then click ‘Random Fill Group B’ which adds random members
from the unassigned list up to the size of the group.
At each step,
the moderator has the option of saving the changes to the set, or reverting the
set to the last saved state.
The Set Manager
tab has many convenient tools to manage structured groups. Any saved set can be selected in the set drop
down box in the top left of the window.
A list of the groups in that set with the members of each group is then
displayed. The selected set can also be renamed by entering the new name in the
rename set text box, then clicking ‘Rename Set’. Groups can also be created and assigned in
one fell swoop by specifying the number of groups desired in the Auto Set text
box, then clicking ‘Random Auto Set’. This creates that number of even sized
groups, and randomly places all of the students into the groups evenly. This
allows for fast group set creation and assignment. Finally when the editing on
the set is completed, click the ‘Save All, and Make Active Set’. This will save
all changes and then make the selected Set the ‘Active’ set, or the set used in
collaborative assignments and Structured Group Chat.

Figure 3.6:
Structured Group Manager: Group Manager Tab