|
|
CXP-Powered I-MINDS Capabilities 2.0 |

BuddyGroup
2.0
This BuddyGroup
capability was completed in February 2006 and revised in May 2006. It has advanced message management,
statistics display, and student group support.
All messages are tracked and themed using a message tree, allowing
I-MINDS to track in fine resolution every group discussion. It also computes statistics on the fly,
allowing a student to monitor how his or her buddies (peers) have been doing in
the group.
This capability
is the “bread-and-butter” of I-MINDS: it collects and analyzes data
automatically for our student agents.
This also provides wonderful opportunities as a testbed for educational
research studies.
As this is one
of our intelligent capabilities (which are usually significantly complex than
our other capabilities), here we provide a detailed discussion of the features
and requirements, including installation guideline.
1. Buddy Group
1.1.
Introduction
This capability
was originally modified from the Chat capability included with
ConferenceXP. It has the same text boxes
for displaying received messages and entering new messages. This capability also retains the Send button
from the original. Improvements to Chat
include an additional text box where message you are responding two is
displayed. This text box includes a popup menu with
two items: ‘History’ and ‘Clear’, whose functionality is described in the next section. This capability also contains
an ‘Options’ menu with two items: ‘Display Statistics’ and ‘Manage Buddy’, each
described in the next section. See figure 1.1 for an example of the Buddy
Group capability form.
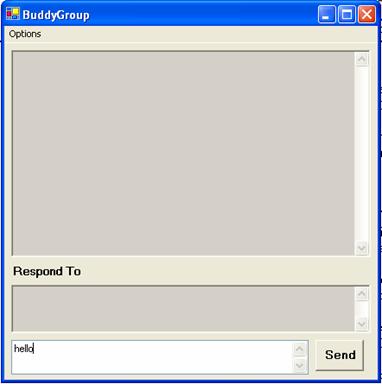
Figure 1.1. The Buddy Group
capability form
1.2. Flow of Control
Unlike our QuestionAnswering capability,
there is only one version of BuddyGroup.
This capability is designed to be used by both teachers and students
simultaneously. All instances of
BuddyGroup require a connection to the I-MINDS database. Students can send messages to each other by
using the chat capability. These
messages are composed into message strings by using the buddy group tags
described below. These message strings
are then multicast using the SendObject method to the rest of the
classroom. It is important to mention
that while several participants might be using BuddyGroup simultaneously, only
messages from students who are in your Buddy Group will be displayed.
In the BuddyGroup capability, it is
possible to select a previously received message by just clicking on it in the
message text box. The selected message
is added to the response text box. While
the response text box contains a message, any new messages sent by the user
will be 'in response' to this message. To clear the message just right-click
the response text box to bring up the menu and select 'Clear'. To view the Message Tree for the previously
received message just select 'History' from popup menu. See figure 1.2 for an example. This will cause the MessageTree form to
become visible, displaying the tree view for the Message Tree (figure 1.3).
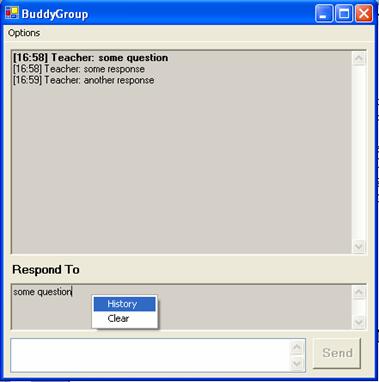
Figure 1.2. The popup menu for the Respond To field

Figure 1.3: Message Tree for [16:58] Teacher: some
question.
The BuddyGroup capability also tracks a
wide range of statistics based on student message traffic. These statistics can be viewed by students
for anyone in their buddy group by selecting the ‘Display Statistics’ item in
the ‘Options’ menu. This will cause the
Statistics form to appear. For more
information on the statistics tracked consult the documentation in the
Statistics form class.
The ‘Manage Buddies’ item in the Options
menu is actually a drop down list containing all the students in the Venue
(except yourself). This list is updated
when students join or leave the Venue.
Students who are already in your buddy group will have checks in front
of their identifiers. Clicking on a
student who is checked will uncheck the menu item and remove the student from
your buddy group. Recall, that you will
not receive messages from students unless they are in your buddy group. Checking a student does the opposite, adding
that student to your buddy group.
1.3. New Concepts
It is worth pointing out that messages
for this capability and questions for the QuestionAnswering capability are both
stored in the same table in the I-MINDS database. In fact, from a design point of view we
consider questions and messages to be the same thing. Said another way, each question is a message
in the I-MINDS database. Questions asked
to the teacher by students (in QuestionAnswering) have their recipient flag set
to 'TEACHER'. All messages sent by
BuddyGroup have their recipient flag set to 'BUDDIES'. In this way, we can guarantee backwards
compatibility with our QuestionAnswering capability.
For BuddyGroup we introduce the concept
of Message Trees. Message Trees provide
the ability for one message to initiate an expanding flow of dialog. According to our concept, a Message Tree
starts with a single message--a question asked by one of the students. This message forms the root of the Message
Tree. Questions are displayed in bold by
the BuddyGroup capability. When another
student responds to this question it this linkage is stored on the I-MINDS
database. New messages can respond to either the original message or any
previous response.
This leads to a tree-like data structure
and is why refer to them as Message Trees.
The above linkage is maintained in Message_Tree table in the I-MINDS
database. Because each message has a
unique Message_ID it is possible to construct a Message Tree at any time. The MessageTree class included in this
project file does just that. By using a
recursive algorithm on the I-MINDS database the stored messages can be
extracted and added to a tree view data object to facilitate display.
1.4. Buddy Group Tags
Each message uses the following format:
<to>toBuddies variable</to>
<message>message string</message>
<ID>message ID</ID>
<from>sender
identifier</from>
The Buddy Group capability uses the same
type of message passing architecture as Question Answering. The only addition is the ID tag. This tag stores the unique Message_ID from
the database. We felt that this was more
compact and efficient to send both the message and its ID through the
ConferenceXP sendObject method. In this
way the message content is available to the other instances of the capability
without having to query it from the database but the ID (primary key) is
available when and if it is needed. This
allows the entire record to be extracted from the database through a simple
select query.
In Buddy Group, the toBuddies variable is
used instead of a specific identifier.
It is the responsibility of the individual instances of the capability
to filter the messages received. This is
done by considering the sender identifier.
This identifier is compared to the list of identifiers in Buddy Group
for this participant. If a match is
found the message is displayed, otherwise it is ignored.
2. Statistics
2.1. Statistics Tracked
This class is designed to facilitate the
collection and display of the statistics that are tracked by the Buddy Group
capability. Currently, there are 14
statistics organized into 5 groups tracked by the Buddy Group capability. These are summarized below:
Buddy Messages Group
- The number of messages the student has sent this
session.
- The average number of messages the student has sent
over all sessions.
Teacher Messages Group
- The number of messages the student has sent to the
teacher this session.
- The total number of messages the student has sent to
the teacher.
Responsiveness Group
- The number of responses sent by each student. Here response is defined as a message
with a link to a previous message.
- The average amount of time it takes for the student to
respond to a question. This would
be measured by subtracting the timestamp of the response from that of the
question.
- The average number of responses each student receives
for each question.
Topics Started Group
- The number of questions asked by each student. Here question is defined as a message
with no link to a previous message.
- The average amount of dialogue each question asked by
the student creates. Here dialogue
is defined as sum of all messages all the messages nodes and leaves of the
message tree with each question as the root.
- The quality of the question if it were asked to the
teacher. Here quality is defined as
the score given to the question by the keyword ranking class based on its
keywords and length.
Dialog Involvement Group
- How involved each student is in dialogue for questions
they asked (both count and averages).
Here involved is defined as the number of messages found in the
message tree with each question as the root.
- How involved each student is in dialogue for questions
they did NOT ask (both count and averages). Here involved is defined as the number
of messages found in the message tree with each question as the root.
2.2.
Statistics Menu
The Statistics form contains two
Menus--'Statistics Visible' and 'Calculate'.
The first menu is nested and contains menu items for all the groups and
all the statistics tracked. Checking or
unchecking an item causes the column width for that item in the DataGrid to
toggle between visible and invisible.
There are 'select all' menu items at both the top and the group level. Checking 'select all' at the top level causes
all menu items to be selected, while unchecking 'select all' at the group
levels merely unchecks all the items for that group.
The Calculate menu contains four options
to determine how many sessions should be considered by the Statistics
queries. These options are--all, last 5,
last 10, last 20 Sessions. Choosing a
number of sessions other than all reduces the amount of time required to
compute the Statistics. If there are
fewer than X sessions, choosing last X is equivalent to choosing all
sessions. See figure 2.1 for an example
of the Statistics form.
2.3. Database Search
The Database
Search form can be used by both students and teachers to look up both messages
and users in the database. Messages are
searchable based on the message itself, the sender, the group they were sent
to, by score, by session, and also by time and date the messages were received,
answered, or discarded. Any combination
of these properties can be used at once thanks to intelligent querying. Students are searchable by name and
identifier.
In addition,
context menus are used to provide quick access to valuable data. If a user right clicks on a message, they can
choose the “Message Tree” option to bring up a form that displays a tree
describing the thread the message belongs to, showing how the message relates
to its topic. Similarly, if a user right
clicks on a student, they can choose between “Messages by Students” and
“Buddies” options. These search for all
messages by a student or the members of a student’s buddy group respectively.
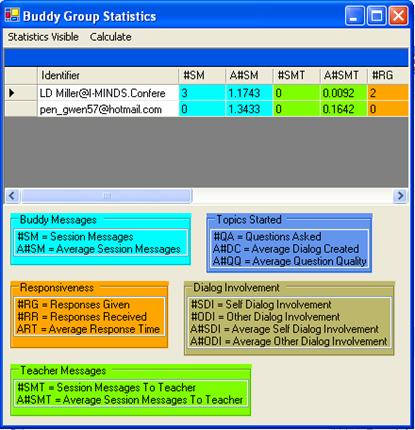
Figure 2.1:
Statistics form for Buddy Group
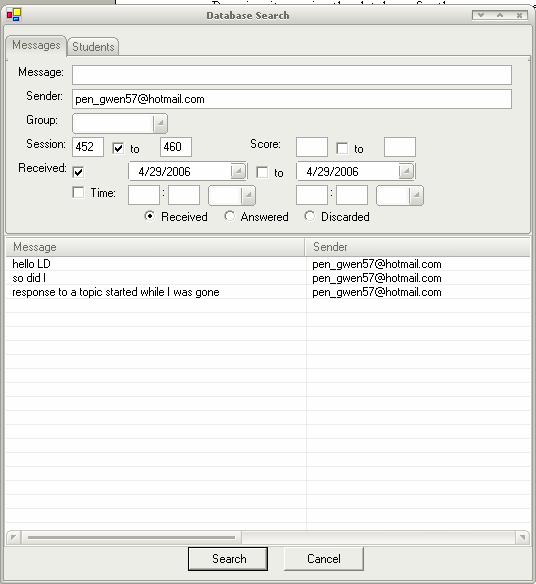
Figure 2.2 Database Search form for Buddy Group
3. Database
The I-MINDS
database is currently running MySQL version 4.1. In the future we intend to switch over from
MySQL to SQL Server or something similar.
The basic structure should easily transfer over to any relational
database. The database was designed
using a combination of DBDesigner4, an open source designer from fabForce, and
phpMyAdmin-2.6.3. For an illustration of
the I-MINDS database consult figure 3.1 below.
The mysqldump textfile of the database can be found in the same folder
as the source code.
On the C# side,
the database hook is contained in the ComponentTestLibrary.dll. This dll, whose source is provided, consists
of a ComponentModel class called DatabaseWrapper and another class called
DatabaseMethods, along with the dataset schema DataSet1.xsd. The DatabaseWrapper class consists of
numerous DataAdapters designed with the form editors. The dataset schema was generated from these DataAdapters
using the wizard.

Figure 3.1:
The DBDesigner model for the I-MINDS database
Wherever
possible we have tried to conform to the C# database connection model, filling
the dataset from multiple DataAdapters.
The tables in the dataset can then be hooked to DataGrids or DataViews
for display. We use OdbcCommand builders
to generate both the update and insert queries with two exceptions. We the Keyword_Ranking and Message
DataAdapters we experienced numerous DatabaseConcurrency exceptions which
claimed that 0 rows were updated.
Despite much experimentation we were unable to lock down this
exception. Our solution was to write our
own Update and Insert queries and run them on each row in the DataTables based
on row states. This seemed to eliminate
the problem.
4. Installation
This section
leads you through the installation for ConferenceXP and our capabilities. The first program to install is the
mysql-connector-odbc-3.51 driver. We
have included this with our source code.
Next, if you have not already done so download the CXP Client version
3.2. Before you install it make sure
that the Microsoft Journal Viewer has been installed. Please consult the ConferenceXP client
installation guide for more information.
We provide the
database dump file so that users can upload the I-MINDS database to their local
server. The installation is relatively
straight forward assuming you have access to MySQL server version 4.1 or
higher. Table 4.1 gives the console
command. If your machines do not have
access to the internet you will need to install your own venue service on one
of your machines. The Venue Service can
be downloaded from the ConferenceXP website.
mysql –uusername –ppassword <
iminds.sql
Table 4.1:
console command to upload database
Alternatively,
you could connect to the I-MINDS database running on cse.unl.edu. The user name and password are given in Table
4.2. A word of caution though, the I-MINDS database on CSE is our test bed and
is subject to design revisions which could break previous versions of Q&A
or Buddy Group.
Site: cse.unl.edu; Database: lmille;
MySQL user: lmille; MySQL password: GNEZWS
Table 4.2: connection
information for the I-MINDS database on CSE
To run either
capability you must first create an ODBC data source in Windows XP. This data source is what the C# code will use
to connect to the database. To do this,
open Administrative Tools/Data Sources (ODBC).
Add a new System DNS with the above information (see figure 4.1). If you are running your own MySQL server the
Server, User and Password entries may change from figure 4.1.
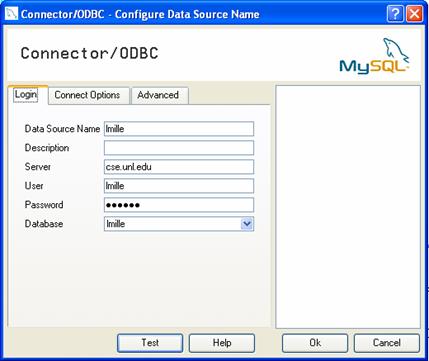
Figure 4.1: Data Source for
the I-MINDS database.
The Buddy Group
or Question Answering capabilities should be pasted into the CXPClient folder
in the manner of all capabilities. You
should also paste the ComponentTestLibrary.dll into the same folder. The Stemmer folder containing combiner.exe
and the licenseI-MINDS rtf file should each be pasted into the CXPClient
folder. Remember that there are two
separate versions of the Q&A capability (teacher and student). The Question Answering capability uses the
xApplication4 payload type while Buddy Group uses the xApplication5 payload
type.
5. Change Log
This section
covers the changes the I-MINDS team has made to the BuddyGroup capability with
version 2. These changes include
additional features, bug fixes, and database structure changes. None of these changes break the functionality
described above.
5.1.
Data Adapters
One significant
change we made in this version is how the database is accessed by our source
code. In v1 most of our source code
other than the statistics class used C# DataAdapters to access the
database. In brief, DataAdapters select
all the records in a table and populate a C# DataTable with the results. This can be very convenient because once the
DataTable is populated you can manipulate the data (add, remove, update
records) without querying the database.
However, we encountered horrible concurrency issues with this
implementation (see figure 5.1). Because
of the way capabilities work, it was very difficult to synchronize all the
DataAdapters. This led to all sorts of
bizarre errors relating to database concurrency. The decision was made to remove all the
DataAdapters and replace them with SQL queries throughout the BuddyGroup
codebase. This eliminated the
concurrency errors because all the students were dealing directly with the
database (see figure 5.2).
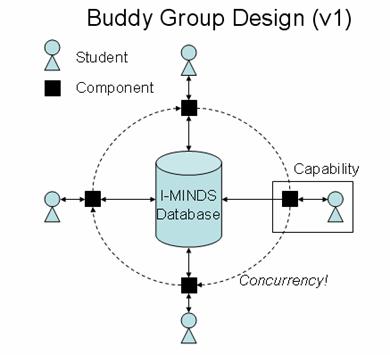
Figure 5.1: Buddy Group v1 Design
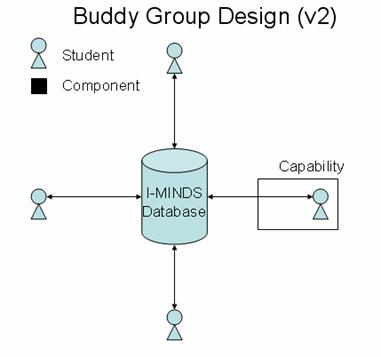
Figure 5.2:
Buddy Group v2 Design
5.2. MAX(Session_ID)
In v1, the
Session ID was determined by simply taking the MAX(Session_ID) from the
database. This worked well until we
started using Question Answering at the same time. A scenario occurred where Buddy Group was
started and students joined and queried for their Session ID. A Question Answering capability was then
started incrementing the Session ID. If
additional students join the Buddy Group they will no longer receive the correct
Session ID.
In v2, the
Session ID is determined once when the capability is created. It is then broadcast to each participant when
they join the capability. In affect, the
Session ID is “buffered” for all participants.
Because of this, when the participant who started the capability leaves
the Session ID is not lost. This also
solves the problem where a student accidentally starts up another Buddy Group
capability. Now Buddy Group and Question
Answering can coexist peacefully without corrupting the database.
5.3. Students_In_Buddy_Group
and Students_In_Session
In v1, both
these tables were N:M linking tables connecting two other tables. The limitation on N:M linking talbes is that
each pair of values is a unique primary key.
The database will not allow us to have the same student in the same
buddy group twice, for example. In
affect, we knew which students were in which Buddy Group or Sessions, but that
is all we knew. We wanted to be able to
track which students where in a buddy group during an interval of sessions and
when students joined and left a session.
This required more than just N:M linking tables.
Both the above
tables were replaced with triply-linked tables.
Students_In_Buddy_Group now links with the Session table as well as the
previous two. Students_In_Session now
has a timestamp key for when the student joins the session. To reduce the amount of records triply-linked
tables often produce we wanted to store intervals. This was accomplished by adding a fourth
column to each table which was not a primary key. When records were added to either table this
fourth column was initially null. When
the interval was completed this fourth column would be set. For example when a student is initially added
to Students_In_Buddy_Group a record similar to table 5.1 is added. When and if the student is removed from the
buddy group this record is updated and the Session_Removed value is set (table
5.2). From this one record we deduce the
student with the identifier lmille@cs.eunl.edu
was a member of Buddy Group 22 from session 356 to 412. This saves us 55 records in the database, not
too shabby.
|
Student_Identifer |
Group_ID |
Session_Added |
Session_Removed |
|
22 |
356 |
NULL |
Table 5.1: Students_In_Buddy_Group record
|
Student_Identifer |
Group_ID |
Session_Added |
Session_Removed |
|
22 |
356 |
412 |
Table 5.2:
Students_In_Buddy_Group record
5.4. Load
Messages
In v1, each
message was broadcast to each student immediately after it was added to the
database. This worked fine in practice,
but happens if one of your buddies arrives late? We decided it would be nice to have the
option to ask the database for the messages sent to your buddies for this
session. We added the “Load Messages”
menu item to the Options menu. Pressing
it queries the database for the messages sent during this session. This list is filtered by who your buddies
are. It will not return messages for
students who are not currently your buddies.
These messages are identically formatted to those received in real time.
5.5
MessageTree
The MessageTree
class was modified so that it has the ability to generate a full message tree
for any message regardless of its position in the tree. This is done by first determining the root
for message tree (the message ID which started the topic) and then generating
the full subtree from this message. This
reduces the complexity of some of the queries in the Statistics class
considerably. The MessageTree class can
be configured to only generate the subtree for the given message ID.
5.6 Statistics
It was
determined through testing that several of the statistics queries in v1 where
not returning exactly the results we wanted.
A minor change to the way we stored messages in the database
considerably reduced the complexity of some of the queries while increasing the
validity of their results. This was done
by storing whether or not the message was a topic-starter or response in the
Message table. The Recipient column now
contains the value “BUDDIES-TOPIC” or “BUDDIES-RESPONSE” where
appropriate.
The queries in
v1 for Dialog Involvement only looked at the responses and their parents. Thus they only worked only for message trees
of max height 2. In v2, we can query for
all the messages that are “BUDDIES-TOPIC” and use the full message tree feature
described above in MessageTree to compute the statistics for message trees of
any height. We were also able to clean
up some of the statistics queries in v2 such as those for ComputeAverageResponseTime. All queries now check the same session
interval. In v1, ComputeSessionMessages
and ComputeSessionMessageToTeacher (along with their averages) did not use this
session interval determined by the Calculate menu. This has been fixed in v2.
5.7 Database
Search
The Database
Search form can be used by both students and teachers to look up both messages
and users in the database. Messages are
searchable based on the message itself, the sender, the group they were sent
to, by score, by session, and also by time and date the messages were received,
answered, or discarded. Any combination
of these properties can be used at once thanks to intelligent querying. Students are searchable by name and
identifier. The Database Search form is
accessible from the Options menu.