CSCE 496/896: Robotics
Lab 1: Hovercraft Construction and ROS
Instructor: Carrick Detweiler
carrick _at_ cse.unl.edu
University of Nebraska-Lincoln
Spring 2011
Started: August 26, 2011
Lab 1 Checkpoint: September 9, 2011
Lab 1 Due Date: September 16, 2011
1 Overview
In this lab you will design, construct, and perform experiments with
the physical hovercraft. In addition, you will learn to use ROS
(www.ros.org+). This lab has a checkpoint. In lab on the date
of the checkpoint you will be responsible for showing the instructor
your progress. You are expected to complete up to (but not including)
Section 5 for the checkpoint, however, you should
probably have completed more than just up to the checkpoint by the
checkpoint date as there is not much time remaining after the
checkpoint to complete the lab.
Before starting you should read through the whole lab. Some parts can
be done in parallel, while some sections rely on the completion of
previous sections. You should discuss your plan of attack for the lab
in your group and decide how you will work together and divide the
work. Everyone, however, is responsible for knowing about all
sections of the lab. In addition to completing the lab report, on the
due date, you will demonstrate what you accomplished for the
instructor.
2 Materials
The main materials you will use in this part of the lab to construct
the hovercraft are:
- Sheet of 1.5 inch think rigid foam insulation
- 5mil plastic sheet
- Six GW/EDF40 Ducted Fans (thrusters)
- Wire, tape, brackets, screws, etc.
You will also use a various hand tools including knives, soldering
irons, power supplies, etc.
3 Safety
In this lab you will be using a number of tools and devices that can
be dangerous if mishandled. You should always follow instructions,
think twice, and ask for help if you are unsure what you are doing or
are unsure about safety. Please report any accidents to the course
staff and seek medical attention immediately if needed.
Reasonable precautions will prevent most accidents. Do not work in
the lab alone or when you are tired.
Throughout this course you will be using ducted fans for propulsion of
the hovercraft. These are relatively safe, but you should never put
your fingers or anything else inside of them. Along these lines, if
you have long hair, you should make sure to tie it back or cover it
while in the lab.
We will also be using power supplies and batteries in this course.
Make sure to follow instructions when using these devices as they can
be dangerous if misused. You should always be careful not to short
wires on batteries or power supplies and follow appropriate methods
for charging batteries.
In this lab you will also be using sharp knives and soldering
irons. These can cut or burn you or your classmates. Always be aware
of your surroundings when using these devices and never cut towards
yourself or anyone else.
We will be using high-power, two cell Lithium-Polymer (LiPo) batteries
to power the hoverboard. Please be extremely careful with these
batteries and recall the safety information we discussed in class and
lab. In particular, only use the designated chargers in the lab to
charge the batteries. The hoverboards will not turn on if the voltage
on the battery is too low, however, you should also be aware of the
use of your battery and never leave it connected to the hoverboard
when not in use (as this could dangerously discharge the battery). A
fully charged battery will have a voltage of 8.4V. A battery that is
about half charged will have a voltage of approximately 7.4V, and a
nearly discharged battery will have a voltage of around 7.0V. A
voltage below 6.0V can be dangerous, especially if you try to recharge
it. If this happens, please let the instructor know immediately.
With care, it is possible to revive an over discharged battery if it
is done quickly (but putting it on the charger is not the way to do it
and it is dangerous).
Unlike most programming, it is possible that a bug in your code could
physically damage your hovercraft or injure your classmates. Take
care when running testing your hovercraft to make sure that everyone
around you is aware of what is going on and that you are able to
quickly stop your hovercraft when it goes out of your control.
4 Hovercraft Design and Construction (25pts)
In this section you will design and construct your hovercraft. The
exact configuration will be left up to you. The only constraint is
that the hovercraft must be omni-directional (able to translate in any
direction) and it must have rotational control (ideally equal control
clockwise and counterclockwise).
One of your goals in designing and constructing your hovercraft is to
make it look nicer than mine. This shouldn't be too hard :)
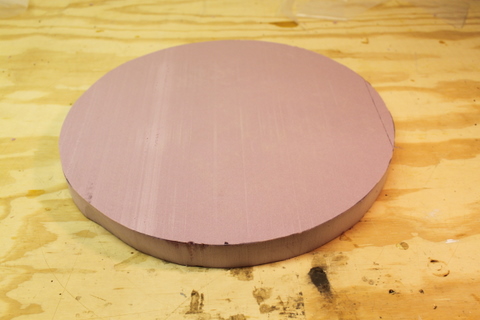 Figure 1: A foam circle cut out of the sheet of rigid foam.
For the base we will be using 1.5 inch rigid foam insulation. This is
a lightweight material that is easy to work with and relatively
inexpensive. There are a variety of circle templates that you can use
ranging from about 12 inches to 17 inches in diameter. You are free
to make your hovercraft whatever diameter you choose. The only
constraints are that it should be larger than 10 inches in diameter
and no more than 20 inches. You can also create other shapes,
although I suggest you cut a circle as it makes creating a good skirt
significantly easier.
To cut the foam, first lay your template circle on top of the foam.
Select a portion of the foam that will result in as little wasted foam
as possible. Trace a circle on the foam with a pen or marker. Remove
the template and then carefully cut the foam out using provided knife.
When using the knife extend the blade to a length slightly longer than
the width of the foam and then use the locking nut to lock the blade
in place. Make sure to keep the blade perpendicular the surface to
ensure a clean cut. Small sawing motions may be helpful. Note,
you should cut the foam over the plywood or off the edge of the
table so that you do not cut into the workbenches. Also, it may be
helpful to do a rough cut first (minimizing waste) so that you can
maneuver the piece of foam more easily.
Figure 1 shows the end result. Having a perfect
circle is not critical, but you should trim off any large errors. You
can always make a slightly smaller circle if you mess up the first
cut.
Question: What diameter hovercraft base did you decide to use? What was your reasoning?
Figure
Figure 2: A flexible walled skirt design. Air flows down into the skirt and inflates it. Most air remains inside and recirculates. A small amount of air leaks out and provides the air cushion (Image modified from original on wikipedia.org hovercraft entry).
The skirt is the most critical component of a hovercraft. There are
multiple types of skirts including bag skirts, wall skirts, and finger
skirts (roughly ranging from easiest to hardest to build). The goal
of all skirt designs is to provide a small cushion of air under the
hovercraft, while adapting and conforming to any irregularities in the
surface. If the surface were perfectly smooth (think about air-hockey
tables), you wouldn't need a skirt, you could just pump air under the
hovercraft and it would create a nice cushion. In practice most
surfaces are somewhat irregular, so the skirt needs to be flexible
enough to adapt to the surface, yet strong enough to hold in the air
pressure.
Figure 1: A foam circle cut out of the sheet of rigid foam.
For the base we will be using 1.5 inch rigid foam insulation. This is
a lightweight material that is easy to work with and relatively
inexpensive. There are a variety of circle templates that you can use
ranging from about 12 inches to 17 inches in diameter. You are free
to make your hovercraft whatever diameter you choose. The only
constraints are that it should be larger than 10 inches in diameter
and no more than 20 inches. You can also create other shapes,
although I suggest you cut a circle as it makes creating a good skirt
significantly easier.
To cut the foam, first lay your template circle on top of the foam.
Select a portion of the foam that will result in as little wasted foam
as possible. Trace a circle on the foam with a pen or marker. Remove
the template and then carefully cut the foam out using provided knife.
When using the knife extend the blade to a length slightly longer than
the width of the foam and then use the locking nut to lock the blade
in place. Make sure to keep the blade perpendicular the surface to
ensure a clean cut. Small sawing motions may be helpful. Note,
you should cut the foam over the plywood or off the edge of the
table so that you do not cut into the workbenches. Also, it may be
helpful to do a rough cut first (minimizing waste) so that you can
maneuver the piece of foam more easily.
Figure 1 shows the end result. Having a perfect
circle is not critical, but you should trim off any large errors. You
can always make a slightly smaller circle if you mess up the first
cut.
Question: What diameter hovercraft base did you decide to use? What was your reasoning?
Figure
Figure 2: A flexible walled skirt design. Air flows down into the skirt and inflates it. Most air remains inside and recirculates. A small amount of air leaks out and provides the air cushion (Image modified from original on wikipedia.org hovercraft entry).
The skirt is the most critical component of a hovercraft. There are
multiple types of skirts including bag skirts, wall skirts, and finger
skirts (roughly ranging from easiest to hardest to build). The goal
of all skirt designs is to provide a small cushion of air under the
hovercraft, while adapting and conforming to any irregularities in the
surface. If the surface were perfectly smooth (think about air-hockey
tables), you wouldn't need a skirt, you could just pump air under the
hovercraft and it would create a nice cushion. In practice most
surfaces are somewhat irregular, so the skirt needs to be flexible
enough to adapt to the surface, yet strong enough to hold in the air
pressure.
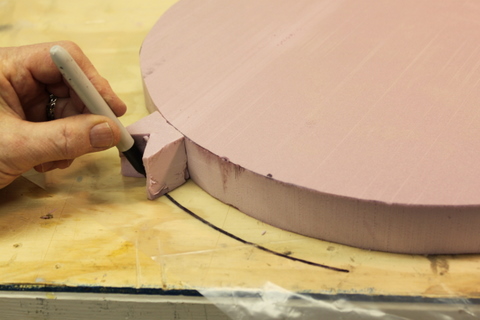
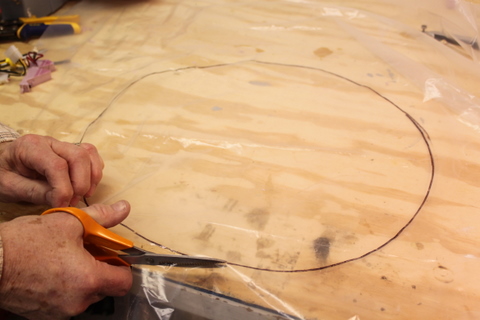 Figure 3: (left) Using a spacer to draw on the plastic. (right) Cutting the plastic.
A bag skirt is like putting an inner-tube under the hovercraft and
putting some holes in it on the bottom. Air flows out of the holes to
provide a cushion of air and the inner-tube conforms to the surface.
A wall skirt (the type we will be using, shown in
Figure 2) is basically a flexible wall going
around the hovercraft that keeps the air in and conforms to the
surface. A finger skirt consists of large number of small triangular
segments and is similar to the wall skirt except it is able to handle
a more varied terrain as each segment of the skirt is more flexible
and independent of the other segments.
To construct a wall skirt we will use 5mil plastic sheeting. Through
experimentation I found that this particular type and thickness
plastic resulted in a good skirt for this size hovercraft. Start by
laying the foam you cut on top of the plastic. Create a spacer out of
scrap foam to help you guide drawing a circle that is approximately
0.75 inches larger than foam circle as show in
Figure 3. Then cut out the plastic circle.
Figure 3: (left) Using a spacer to draw on the plastic. (right) Cutting the plastic.
A bag skirt is like putting an inner-tube under the hovercraft and
putting some holes in it on the bottom. Air flows out of the holes to
provide a cushion of air and the inner-tube conforms to the surface.
A wall skirt (the type we will be using, shown in
Figure 2) is basically a flexible wall going
around the hovercraft that keeps the air in and conforms to the
surface. A finger skirt consists of large number of small triangular
segments and is similar to the wall skirt except it is able to handle
a more varied terrain as each segment of the skirt is more flexible
and independent of the other segments.
To construct a wall skirt we will use 5mil plastic sheeting. Through
experimentation I found that this particular type and thickness
plastic resulted in a good skirt for this size hovercraft. Start by
laying the foam you cut on top of the plastic. Create a spacer out of
scrap foam to help you guide drawing a circle that is approximately
0.75 inches larger than foam circle as show in
Figure 3. Then cut out the plastic circle.
 Figure 4: Taping the plastic disk to the hovercraft base.
The next step is to tape the plastic to the bottom of the hovercraft.
Place the foam over your plastic cutout and center it. Now, fold up
the plastic, it should come about half way up the edge of the foam.
As shown in Figure 4, tape the skirt all around
the hovercraft. The tape will extend slightly higher than the top of
the foam, fold this down all around. Assure that the tape is well
adhered to the foam all the way around. The plastic should now
completely cover the bottom of the hovercraft. When taping, the
plastic does not need to be completely tight to the base, but it
should have relatively even tightness all the way around.
Figure 4: Taping the plastic disk to the hovercraft base.
The next step is to tape the plastic to the bottom of the hovercraft.
Place the foam over your plastic cutout and center it. Now, fold up
the plastic, it should come about half way up the edge of the foam.
As shown in Figure 4, tape the skirt all around
the hovercraft. The tape will extend slightly higher than the top of
the foam, fold this down all around. Assure that the tape is well
adhered to the foam all the way around. The plastic should now
completely cover the bottom of the hovercraft. When taping, the
plastic does not need to be completely tight to the base, but it
should have relatively even tightness all the way around.
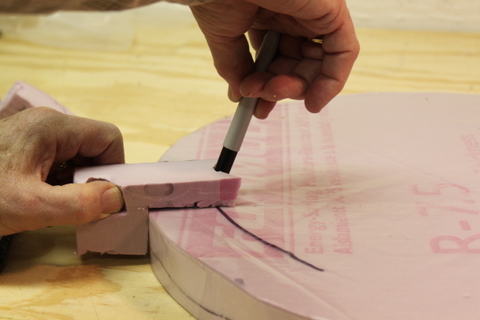
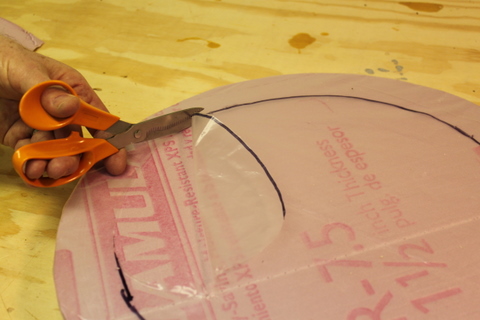 Figure 5: (left) Marking the inside of the plastic with a spacer. (right) Cutting the inside of the plastic to form the skirt.
The next step is to mark and cut a circle out of the center of the
skirt. This will leave a annulus of plastic around the edge of the
hovercraft, forming the skirt. Again, create a guide using left over
foam as shown in Figure 5. You should size it
such that there will be about 1.5 inches of plastic remaining. Then
cut out the inner circle. Try to cut smoothly, as this will be the
edge of the skirt. Figure 6 shows the resultant
skirt.
Figure 5: (left) Marking the inside of the plastic with a spacer. (right) Cutting the inside of the plastic to form the skirt.
The next step is to mark and cut a circle out of the center of the
skirt. This will leave a annulus of plastic around the edge of the
hovercraft, forming the skirt. Again, create a guide using left over
foam as shown in Figure 5. You should size it
such that there will be about 1.5 inches of plastic remaining. Then
cut out the inner circle. Try to cut smoothly, as this will be the
edge of the skirt. Figure 6 shows the resultant
skirt.
 Figure 6: The resulting skirt.
Note that you may want to experiment with the efficiency of the skirt
and lift (described in Section 6) before
completing the final thruster layout in the next section. You will,
of course, have to install the lift thruster first.
Question: Describe the construction of the skirt and any problems you
encountered. Did your first skirt work as expected?
Figure 6: The resulting skirt.
Note that you may want to experiment with the efficiency of the skirt
and lift (described in Section 6) before
completing the final thruster layout in the next section. You will,
of course, have to install the lift thruster first.
Question: Describe the construction of the skirt and any problems you
encountered. Did your first skirt work as expected?
4.3 Thruster Layout
In this section we will come up with a layout for the thrusters. The
hoverboard supports a total of six thrusters. One will be used as the
lift thruster. The remaining five can be positioned in any
configuration.
4.3.1 Lift Thruster
Start by installing the lift thruster. To do so, find the center of
your hovercraft. Hold the small end of the thruster over the center
of the hovercraft. Trace this using a pen or marker and cut out the
foam. Note that the hole should be slightly small so that friction
will hold the thruster in the hole. It is best to start with a
smaller hole, as it is easier to make it larger later1. Slide the
small end of the thruster into the hole. At this point you should
probably verify that your skirt works properly by doing
Section 6.
4.3.2 Motion Thrusters
You have 5 remaining thrusters to use to control the hovercraft. The
layout of these is up to you. However, your hovercraft must be
omni-direction (must be able to translate in any direction without
needing to rotate first). In addition, you should have rotational
control. Note that the thrusters can only operate in one direction
(they can only push, not pull).
There are a couple of configurations you can use to achieve
omni-directional and rotational control. One idea is to have three
translational thrusters (120° separation) and two opposing
rotational thrusters. To move in some directions, you will have to
use multiple thrusters. You could also use four translational
thrusters (±x, ±y) and one rotational thruster. With this
configuration you may only be able to rotation in one direction
quickly, but you could potentially utilize the torque from the lift
thruster to rotate in the other direction. Finally, you could place
some of the translational thrusters at a slight angle so they would
exert a torque on the craft and produce a rotation. The choice is up
to you. It is easy to reconfigure the thrusters, so you can try a
variety of setups.
Question: What thruster configuration did you decide to use? Why did
you choose this? Include a picture showing your final configuration,
make sure to label the thrusters.
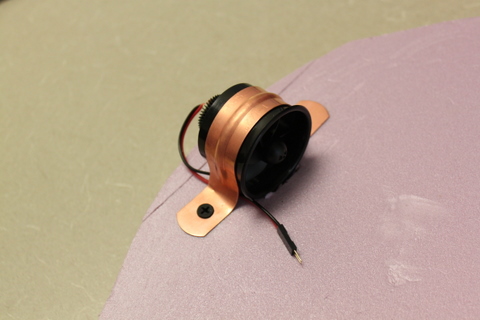 Figure 7: The mounted thruster.
To mount the thrusters we will use 1.5 inch copper pipe hangers and
screws as shown in Figure 7. These to not fit
exactly, however, you can pliers to form them to the thrusters. You
should make sure that they hold the thrusters tight against the
hovercraft, but that they do not deform the thruster housing as this
will impede the thruster. You can cut a small channel or press the
lip of the thruster into the foam to help lock it in place. Use the
1.25 inch drywall screws to secure the bracket. Do not tighten them
too much as the foam is soft and you will easily strip the hole. Make
sure that each thruster is able to freely rotate by spinning the blade
with your finger, just make sure that it is not connected to the
hoverboard! If it binds in any location try reshaping your bracket.
Once you have soldered extension wires onto the thrusters (in
Section 4.5), you can bury the wires in the foam to
keep them out of the way. To do so, cut a small channel in the foam.
Place the wires in the channels and then tape over them to keep them
inside.
Figure 7: The mounted thruster.
To mount the thrusters we will use 1.5 inch copper pipe hangers and
screws as shown in Figure 7. These to not fit
exactly, however, you can pliers to form them to the thrusters. You
should make sure that they hold the thrusters tight against the
hovercraft, but that they do not deform the thruster housing as this
will impede the thruster. You can cut a small channel or press the
lip of the thruster into the foam to help lock it in place. Use the
1.25 inch drywall screws to secure the bracket. Do not tighten them
too much as the foam is soft and you will easily strip the hole. Make
sure that each thruster is able to freely rotate by spinning the blade
with your finger, just make sure that it is not connected to the
hoverboard! If it binds in any location try reshaping your bracket.
Once you have soldered extension wires onto the thrusters (in
Section 4.5), you can bury the wires in the foam to
keep them out of the way. To do so, cut a small channel in the foam.
Place the wires in the channels and then tape over them to keep them
inside.
4.4 Mounting the Hoverboard
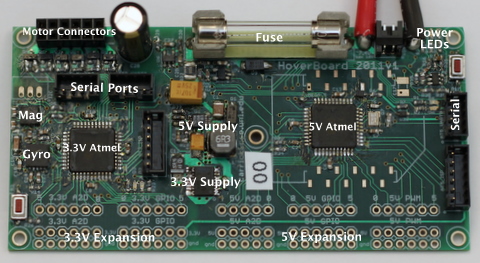 Figure 8: A picture of the hoverboard electronics
Before mounting the hoverboard to your hovercraft, we will review some
of the major features of the hoverboard. Figure 8
shows a picture of the hoverboard. The main components of the board
are labeled. The left side of the board contains the 3.3V processor
and all of the 3.3V sensors and peripherals, while the right side has
the 5V processor and peripherals. The bottom edge of the board
contains a number of expansion ports that can be used to add sensors
and servos to the hoverboard. Again, those on the left side are 3.3V,
while on the right side they are 5V. We will not use the expansion
ports in this lab, but will in future labs.
At the top left of the board, next to the large capacitor, there are
0.1 inch headers that allow connection of the motors.
Question: If you connected a motor to the hoverboard, would the black
(ground) wire of the motor be towards the top or bottom of the
hoverboard? Note, do not connect any motors yet.
At the top of the board, near the center, is a large fuse. This fuse
is largely intended to protect the battery from shorts, not the board.
This is because the normal operating current for running a couple of
motors (5 to 10 amps) is more than enough to burn most things on the
board. However, if the power indicator LEDs do not turn on, it is
possible that you have blown your fuse (by shorting something or
running too many motors at once). Contact the instructor if this occurs.
To the right of the fuse is the power cables and then a set of three
power indicator leds. The green LED will be on if power is connected
and the battery voltage is good. The yellow and green light will both
be on if the battery voltage is below 7.0V. The red and yellow LED
turn on, if the battery voltage drops below 6.6V. When the yellow
light turns on steadily, it is time to charge your battery. If the
red LED is on, the power to the rest of the components on the board is
disabled to help prevent the battery from over discharge. If the red
LED turns on, you should replace your battery immediately. Note that
when the motors are running the yellow and/or red LED may flicker as
the resistance in the wires and battery cause a drop in voltage. This
is ok, when the red LED starts to be on fairly steadily with the
motors on, it is probably time to replace the battery.
Now you will mount the hoverboard onto your hovercraft. Start by
choosing a location for your hoverboard. It is possible to adjust the
position later, but you should try to minimize the number of times you
move it as it will result in additional holes in your hovercraft base.
When choosing a location to mount your hoverboard, consider the
location of the battery, how thruster power wires will be routed to
connect to the hoverboard, and the weight distribution needed to
balance the hoverboard (with the battery weighing significantly more
than the hover board). Once you have decided on a position for the
hoverboard, simply press the screws down into the foam base. You can
remove the hoverboard at any time by just pulling it up. You should
be careful when removing and inserting the hoverboard so that you
don't enlarge the holes too much. While the fit may be loose, the
length of the screws should be sufficient to prevent unwanted motion
of the board.
You have also been giving some Velcro. You can use this to affix the
battery to the board. If your battery does not have Velcro on it
already, please make sure to attach the fuzzy side of the Velcro to
the battery.
Question: Where did you mount your hoverboard and battery? Why?
Figure 8: A picture of the hoverboard electronics
Before mounting the hoverboard to your hovercraft, we will review some
of the major features of the hoverboard. Figure 8
shows a picture of the hoverboard. The main components of the board
are labeled. The left side of the board contains the 3.3V processor
and all of the 3.3V sensors and peripherals, while the right side has
the 5V processor and peripherals. The bottom edge of the board
contains a number of expansion ports that can be used to add sensors
and servos to the hoverboard. Again, those on the left side are 3.3V,
while on the right side they are 5V. We will not use the expansion
ports in this lab, but will in future labs.
At the top left of the board, next to the large capacitor, there are
0.1 inch headers that allow connection of the motors.
Question: If you connected a motor to the hoverboard, would the black
(ground) wire of the motor be towards the top or bottom of the
hoverboard? Note, do not connect any motors yet.
At the top of the board, near the center, is a large fuse. This fuse
is largely intended to protect the battery from shorts, not the board.
This is because the normal operating current for running a couple of
motors (5 to 10 amps) is more than enough to burn most things on the
board. However, if the power indicator LEDs do not turn on, it is
possible that you have blown your fuse (by shorting something or
running too many motors at once). Contact the instructor if this occurs.
To the right of the fuse is the power cables and then a set of three
power indicator leds. The green LED will be on if power is connected
and the battery voltage is good. The yellow and green light will both
be on if the battery voltage is below 7.0V. The red and yellow LED
turn on, if the battery voltage drops below 6.6V. When the yellow
light turns on steadily, it is time to charge your battery. If the
red LED is on, the power to the rest of the components on the board is
disabled to help prevent the battery from over discharge. If the red
LED turns on, you should replace your battery immediately. Note that
when the motors are running the yellow and/or red LED may flicker as
the resistance in the wires and battery cause a drop in voltage. This
is ok, when the red LED starts to be on fairly steadily with the
motors on, it is probably time to replace the battery.
Now you will mount the hoverboard onto your hovercraft. Start by
choosing a location for your hoverboard. It is possible to adjust the
position later, but you should try to minimize the number of times you
move it as it will result in additional holes in your hovercraft base.
When choosing a location to mount your hoverboard, consider the
location of the battery, how thruster power wires will be routed to
connect to the hoverboard, and the weight distribution needed to
balance the hoverboard (with the battery weighing significantly more
than the hover board). Once you have decided on a position for the
hoverboard, simply press the screws down into the foam base. You can
remove the hoverboard at any time by just pulling it up. You should
be careful when removing and inserting the hoverboard so that you
don't enlarge the holes too much. While the fit may be loose, the
length of the screws should be sufficient to prevent unwanted motion
of the board.
You have also been giving some Velcro. You can use this to affix the
battery to the board. If your battery does not have Velcro on it
already, please make sure to attach the fuzzy side of the Velcro to
the battery.
Question: Where did you mount your hoverboard and battery? Why?
4.5 Soldering Thruster Wires
The wires on the thrusters are too short to reach a single location
where the hoverboard will be mounted. You have some thrusters with
preexisting extensions, but for the rest, you will need to extend the
wires to reach a single location where the hoverboard will be mounted
(you may need to shorten some as well). The hoverboard is 2 by 4
inches and the motor connectors are located in one corner of the
board. Pick a location for the hoverboard and determine the rough
length of the each of the wires needed to reach this location.
Cut the existing thruster wires such that each end of the wires are at
least 1 inch long. We will use the existing connectors on the
thrusters and insert a segment of wire by soldering to make them
longer. Soldering is an important skill that always comes in useful
when working with embedded systems. In class you saw a demonstration
of how to solder wires. This is the basic technique that you will
use. All of the components on the hoverboards were soldered by hand
using similar techniques.
Now cut a segment of red and black wire from the spools that will be
long enough to enable the thrusters to reach the hoverboard location
(note that it is better to have it slightly too long versus too
short). Strip approximately a quarter inch of off of each end of all
wires. Now "tin" each of the ends of all the wires, as was
demonstrated in class. Tinning is the process of applying solder to
the wires.
Now place the tinned wire ends together, perhaps having someone else
hold them for you. Heat the wires and apply a little more solder so
that they are fully soldered together. Once you have soldered all the
joints, have someone else look at them and verify that the look well
soldered. Remember that there should be solder over all the wire,
there should be significant overlap of the wires, and the solder
should be smooth, without sharp points. Once someone else verifies
that the joints look good, use electrical tape to tape all of the
wires so that nothing is exposed.
It is said that robotics is the "science of cables and connectors."
Double check that all connections are good, otherwise you may run into
trouble later when a thruster stops working for an unknown reason. It
also may be a good idea to test each individual thruster before and
after adding the extension to verify that they function.
Everyone in your group should solder at least one thruster.
Once you have soldered all of the wires, you should connect all of the
thrusters to the motor connectors on the hoverboard. Make sure that
you know the proper orientation to connect the thrusters. If you are
unsure, make sure to ask the instructor.
Question: You should decide which thrusters you will connect to which
motor input. Which thruster did you connect to which input? It is a
good idea to label each wire so you can easily reconnect them in the
future when they come undone.
4.6 Netbook Mount
Use the provided lag bolts and plastic nubs to create a platform for
the netbook in the middle of the hovercraft. Make sure not to pierce
the bottom of the hovercraft. For most of these experiments, you will
not need to have the netbook mounted on the hovercraft, but in future
labs we will use the netbook on the hovercraft to perform vision
processing and other tasks.
5 ROS (25pts)
In this section, we will start to familiarize ourselves with ROS. In
this lab, we will explore the ROS interface to the hovercraft and
write code to control the hovercraft using a remote control. In class
we have discussed ROS, refer to your notes or the tutorials on
www.ros.org for more details on the commands you will use in
this lab.
5.1 Computer Setup
It is important to note that none of the data on the netbooks are
backed up. You should make sure that you keep copies of your code and
anything else on the computer elsewhere. The best option is to setup
a source control repository for your code. While this is the
recommended option, it is not required for this lab. You can also use
a usb stick, space on CSE or UNL shared drives, or other services like
Dropbox to backup your code. If your drive crashes it is not an
excuse to turn in the lab or assignment late. No extensions will be
granted. If this happens, I will hand you an different machine and
expect you to complete the assignment on time.
Use the account name and password given to you for your computer.
Please change the password to something your group will remember. In
this course we will be editing C++ code (or Python if you prefer).
You can edit code in the editor of your choice. You might try gedit,
emacs, vi, eclipse, or something else. We will compile and run ROS
code from the command line. You should familiarize yourself with the
command line if you have not used it previously (google for more info
or look at https://help.ubuntu.com/community/UsingTheTerminal).
It is also possible to setup ROS with a variety of different IDEs,
although you will also need to know the command line tools. See
http://www.ros.org/wiki/IDEs for details.
You should also feel free to setup ROS on your own computer. Ideally
you should use Ubuntu GUN/Linux which you can easily install and run
in a virtual machine (such as virtual box or vmware) if you prefer not
to run it natively. Regardless, if you have a laptop, you should plan
to bring it to lab as it is useful for each group to have multiple
computers so that you can record results and outline your lab report
as you perform experiments.
5.2 ROS Launch Files
Download the sample code from the course website. You will probably
want to extract this in your ~/ros/ directory, since this is one
of the directories that ROS will use to look for code (see the ROS
documentation on ROS_PACKAGE_PATH for how to add additional
directories to the ROS path). You can then change directories to the
sample code directory by typing in the terminal:
roscd lab1
or alternatively you can manually cd to the directory. The
command roscd is useful, however, because you can use it to go
to the source directory for any ROS module (the preinstalled modules
are mostly installed under some subdirectory in
/opt/ros/diamondback/stacks/).
Question: What is the absolute path of the roscpp module? What
does roscpp do?
Make sure you are in the lab1 sample code directory. To build
the code, run the command rosmake. In the
subdirectory launch, there is a launch file called
hovercraft.launch. Examine this file.
Question: What ROS nodes are launched by this file?
Before you launch launch this launch file, you need to connect your
radio to communicate with the hovercraft. Simply plug in the radio
into a usb port on your netbook. You should also connect the battery
to your hoverboard at this point.
Question: By examining the launch file, what port/file is the radio
located on by default?
To start the ROS nodes that control the hovercraft, run the command:
roslaunch launch/hovercraft.launch
This will start the roscore and all of the other nodes
specified in the launch file. You can kill all of these processes by
pressing ctrl+c. If, for some reason, some ROS processes are
left running (perhaps you started ROS in some terminal and forgot
about it), you can kill all ROS processes by executing:
killall python
This kills all processes that were started by python, which happens to
be all ROS processes, although you should only do this as a last
resort (before restarting which is the real last resort) as it could
kill other python programs as well.
5.3 rxgraph
Once you have launched the lab1 launch file, run the command
rxgraph in another terminal2. This command brings up a GUI that shows different nodes
and the messages that they advertise and subscribe to. You probably
want to check the "Quiet" box to hide the /rosout node that
is used for debugging.
You can also click the "All topics" box to show all messages that
the nodes publish and subscribe to. If you hover over a node or
topic, the right pane displays information on that message or node.
Question: What topics are used to control the LEDs? What are their
message types?
5.4 rostopic and rosmsg
The command rostopic lets you examine messages that have been
advertised and are being published. Use the command
rostopic list to show all active message topics. Use
rostopic echo to display the output of the gyroscope.
Question: What command did you use to do this? And what information
do you get from the output? How fast is this published and how did
you determine this?
The command rostopic can also be used to publish messages. Use
the command rostopic pub --help to determine how to publish
messages, you can also refer to the ROS online tutorials.
Question: Publish a command to toggle the LEDs on the hoverboard.
Describe how you figured out how to do this, you can use the command
rosmsg to determine parameters for messages.
Question: There are two messages that report the gyroscope3 data. What is the
difference between these messages? What are the units? How did you
determine this?
5.5 rxplot
The command rxplot is a command you can use to quickly
visualize and plot values in published message topics. You can plot
the gyro data, for instance, by doing:
rxplot /hovercraft/Gyro/angle,/hovercraft/Gyro/rate
If you separate fields by commas they will be plotted on one graph, if
you use spaces instead, they will be plotted in different graphs.
Question: What is the maximum rotational rate that the gyroscope can
measure? Is it the same for positive and negative rotations? How did
you determine this?
5.6 Writing a ROS Joystick Node
We are now going to going to write a new ROS node to control the
hovercraft with the xbox controllers. Note, you may want to write
this node after or concurrently with Section 6.
The ROS node that reads the
joystick is called joy. You can start this node by running
rosrun joy joy_node, however, before you do this you may need
to start roscore if it is not already running.
Question: What messages does the joy node publish? What are the
mappings from the different buttons and joysticks on the controller to
various joy messages?
We will now create a new ROS node to control the hovercraft using the
joystick. Recall what we covered in class and also refer to the
online tutorial at
http://www.ros.org/wiki/joy/Tutorials/WritingTeleopNode for
writing a joystick node. However, instead of publishing a
turtlesim/Velocity message, you should publish a
hovercraft/Thruster message with the proper values.
For consistency: (1) Use the "start" button on the controller to
start and stop the hovercraft; (2) Use the left joystick to control
the rotation of the hovercraft; (3) Use the right joystick to control
the forward and sideways translation; and (4) Use the red and green
buttons to turn on the red and green LEDs when held.
Question: How did you make the "start" button start and stop the
hovercraft without rapidly turning on and off when held?
Question: What messages did you connect the joystick node to? Include
a picture of the rxgraph of your configuration and describe why you
chose the configuration you did.
6 Hovercraft Experiments (25pts)
Now that you have designed and assembled your hovercraft, it is time
to test how well it lifts and moves. Note that you may find that you
need to redo your skirt if the performance is not very good. Typical
problems include loud vibrations, high friction, or air gushing out of
one side or another. Sometimes it is possible to fix these problems
by adding or removing weight from the hovercraft or adjusting the
balance.
6.1 Powering Thrusters
Note, the thrusters are somewhat inexpensive and I have found
that they may die if run consecutively for longer than 10 minutes at
a time. Try to limit using the thrusters to times when you actually
need to use them. Do not leave them running if you are not actively
performing experiments. The symptoms you will see if you do run
them for too long are that the thrust output will decrease
significantly. I suspect that this is due to motor overheating,
although it could be caused by other problems (e.g. worn brushes).
Let me know if any of your motors fail and please try to describe
the usage characteristics.
You can test the thrusters in a number of ways. The 3.3V Atmel button
will run all thrusters at a low level. This is a good way to verify
that all thrusters are functional 4. There is also a power supply in the lab that you
can use to power a single thruster. This is useful when you are
trying to see if your skirt works well. Finally, you can manually
publish messages to set the thruster power by publishing to the
/hovercraft/Thruster message, which takes an input between 0.0
(off) to 1.0 (full on).
Question: What power setting is needed to provide good lift on the
lift thruster with and without the netbook computer? Make sure to
start at a low value and work your way up. Also, it is important to
note that as the battery voltage decreases, you will need to increase
thrust to maintain lift.
Question: Report on how well the skirt of your hovercraft works. Did
the first version work? If not, what were the problems and how did
you overcome them?
6.2 Rotational Experiments
We will now perform some experiments to determine how well the
hovercraft rotates.
Question: What is the maximum rotational rate you can achieve?
It is likely that the maximum rotational rate is faster than the
gyroscope can measure. Create a new node that limits the rotational
thrust to keep it within the measurement accuracy of the gyroscope.
Hint: instead of having your joystick node publish directly to the
/hovercraft/Thruster message, have it publish to another
message that this node processes.
Question: How did you limit the maximum rotational rate?
Question: Perform experiments to characterize the accuracy of the
gyroscope. Does the gyroscope drift over time? Does the gyroscope
report angles accurately? If you return to the zero angle, does it
always end up in the same spot? Report your findings and support them
by detailing the experiments you performed. Back up your experiments
with tables and graphs as needed.
6.3 Translational Experiments
In this section, we will characterize how well the hovercraft
translates in X and Y.
Question: What thrusters do you need to use to translate only along
the x-axis? And the y-axis? If it requires using more than one, what
is the ratio of thrust you should use?
Question: Derive an equation that allows you to translate along an
arbitrary vector (you can also write it in terms translating along a
particular angle). What assumptions did you make about the thrusters
when coming up with this equation?
Modify the node you created in Section 6.2 to include
these equations. Modify the message that this node subscribes to (and
that the joystick publishes) to accept X, Y, and rotational messages
instead of the individual thruster commands. Each of X, Y, and
rotation should take a value between -1.0 and 1.0. This node will
then act as an abstraction for the hovercraft so that if you change
your thruster configuration, this is the only node that needs to be
modified.
Question: Perform an experiment trying to translate along various
vectors (perhaps every 45°) using the node you developed above
and the equations you derived for translational motion. Describe and
analyze the results.
In all likelihood the results were not as good as you may have hoped.
Manually calibrate the system to account for the worst errors,
although do not spend forever on this.
Question: How did you attempt to fix the problems? How well does the
new, manually calibrated, method work? Describe some other ideas that
may improve the ability to translate along particular vectors.
7 To Hand In
You should designate one person from your group as the point person
for this lab (each person needs to do this at least once over the
semester). This person is responsible for organizing and handing in
the report, but everyone must contribute to writing the text. You
should list all group members and indicate who was the point person on
this lab. Your lab should be submitted by email before the start of
class on the due date. A pdf formatted document is preferred.
Your lab report should have an introduction and conclusion and address
the various questions (highlighted as Question: ) throughout the lab in
detail. It should be well written and have a logical flow. Including
pictures, charts, and graphs may be useful in explaining the results.
There is no set page limit, but you should make sure to answer
questions in detail and explain how you arrived at your decisions.
You are also welcome to add additional insights and material to the
lab beyond answering the required questions. The clarity,
organization, grammar, and completeness of the report is worth 10
points of your lab report grade.
In addition to your lab report, you will demonstrate your system and
what you accomplished up to this point to the instructor at the
beginning of lab on the due date. This is worth 15 points of
your overall lab grade. You do not need to prepare a formal
presentation, however, you should plan to discuss and demonstrate what
you learned and accomplished in all sections of the lab. This
presentation should take around 10 minutes.
Question: Please include your code with the lab report. Note that you
will receive deductions if your code is not reasonably well commented.
You should comment the code as you write it, do not leave writing
comments until the end.
Question: You should make sure to include a picture of your final hovercraft.
Question: Robots like to have names, what are you going to call your hovercraft?
Question: For everyone in your group how many hours did each person
spend on this part and the lab in total? Did you divide the work, if
so how? Work on everything together?
Question: Please discuss and highlight any areas of this lab that you
found unclear or difficult.
Footnotes:
1If you
do happen to make it too large, you can create another hole in a
different location as the lift thruster does not need to be exactly
in the center. Cover over your old hole with tape
2ctrl-shift-tab is
a useful command in gnome-terminal, as it creates a new tab in the
terminal. You will find that you will need lots of terminals open
when you are working with ROS. If you use GNU/Linux a lot, you can
also try out my favorite terminal multiplexer GNU Screen
http://www.gnu.org/s/screen/. Or you can try installing the
Ubuntu package terminator, which is a little more mouse
friendly.
3On
startup the gyroscope is calibrated, however, the calibration level
changes as the gyroscope heats up. If you notice it drifting
significantly you can restart the hovercraft (unplug and then plug
in the battery) to cause it to re-calibrate.
4If a motor output doesn't
work at all with different thrusters, it is likely that one of the
mosfets on the hoverboard broke, please inform the instructor if
this happens.
File translated from
TEX
by
TTH,
version 3.89.
On 9 Sep 2011, 15:19.