CSCE 120 Learning to Code: JavaScript
JavaScript
This section will cover the following
-
Introduction to JavaScript
- Introduction to JavaScript
- Introduction to Development Tools
- Semantics, Syntax, and Types
- Numbers, Expressions, and Operators
- String and Dates
- Program & Control Flow
- Loops and Iteration
- Functions
- Arrays
- Objects & Collections
- Web Programming with JavaScript
- Modules
- Promises and Error Handling
- Introduction to Design Patterns
- Introduction to JavaScript Security
- Introduction to JavaScript Libraries and Frameworks
Introduction to JavaScript
Developed by Netscape in mid 1990s for adding dynamic elements to HTML.
Originally known as "LiveScript"; later changed to JavaScript.
JavaScript Versions: Both ECMAScript 5 (ES5) and ECMAScript 6 (ES6) versions are widely used. Some features of ES6 are not supported by all browsers.
JavaScript is a high-level and interpreted programming language.
High-level means it has all the functionalities of well-received language. It has high abstraction from the users, which makes it easy to use.
In contrast, C programming language is a low-level language, which is more complicated but gives you more control over low-level processing like memory management.
Interpreted means it does not need to be compiled before it's executed, it is interppreted at runtime.
JavaScript is NOT Java
JavaScript is a cross-platform scripting language
JavaScript is object-oriented
JavaScript is used to make webpages interactive such as animations, clickable / touchable elements and more
One of the most popular programming language in the world
JavaScript is used to develop these type of applications
- Web
- Desktop (using Electron)
- Smartphone and Tablet (Cordova, Ionic, ReactNative, more)
- Server Side Apps (using NodeJS)
- Games
Introduction to Development Tools
Online Tools
Online tools are great for demonstrations, proof of concepts, and sharing solutions.
- jsfiddle.net
- CodePen
- Plunker (new version next.plnkr.co)
- More online...
Demos
Development Environment and Tools
There are many editors and tools that help accelerate software development; some tools are specifically targeted for web development. Within the web development, some tools are geared toward front-end development and some toward back-end (server side) development. In this class, we will use the latest version of Visual Studio (VS), which is free. VS is designed for full-stack development where both front-end and back-end development can be done. We will also use several tools, such as jQuery and Bootstrap when necessary.
Additional tools
Demo
Semantics, Syntax, and Types
JavaScript uses the Unicode character set and is case-sensitive. If you are familiar with one of the C based languages, you will recognize JavaScript code easily. According to Mozilla Developer Network (MDN), "JavaScript borrows most of its syntax from Java, C, and C++, but is also influenced by Awk, Perl and Python"
Variable Declaration
JavaScript presents three keywords for variable declaration: var, let, const
    var firstName; // OR var firstName, lastName;
    let firstName; // OR let firstName, lastName;

    // When using var and let, the variable may be optionally initialized i.e: let firstName = "John";
The var statement declares a variable, while let declares a block scope local variable and was introduced with ES6.
Demo
Which one do I use?
Using let is less error prone, however, some older browser may not support let because it was introduced with ES6. Developers need to know where the JavaScript will run before they use new ES6 features. If possible, use let.
Consult
const
const stands for constant and are block-scoped, much like variables defined using the let statement. The value of a constant can't be changed through reassignment, and it can't be redeclared. const variables are read-only.
Demo
variable names must start with a letter, underscore (_), or the dollar sign ($); subsequent characters can also be digits (0-9)
JS is case-sensitive
    // Three different variable names
    var firstName;
    var FirstName;
    var FürstName; // uses the Unicode character set - ü
Comments in JavaScript
Comments are discarded during script execution
    // a one line comment

    /* this is a longer,
    * multi-line comment
    */
undefined
When a variable is declared with no assigned value specified has the value of undefined
Demo
Variable Hoisting
Variable hoisting is an unusual thing about variables in JavaScript. Hoisting makes it possible to refer to a variable declared later, without getting an exception. Variables declared using var are, in a sense, "hoisted" or lifted to the top of the function or statement. Variables that are hoisted always return a value of undefined, even if they are declared and initialized after referencing the variable.
Demo
let and const are hoisted but not initialized. Referencing the variable in the block before the variable declaration results in a ReferenceError not undefined With let and const variables are in a "temporal dead zone" from the start of the block until the declaration is processed.
Function hoisting will be covered in the Functions section
Semantics, Syntax, and Types
JavaScript categorizes data types into two:
- Primitive Types
- Object
Object is a subject that will be covered later
Primitive Types are as follows:
- Number. An integer or floating point number
- String. A sequence of characters that represent a text value
- Boolean. true and false
- undefined. A top-level property whose value is not defined
- null. A special keyword denoting a null value
- BigInt. An integer with arbitrary precision
- Symbol. A data type whose instances are unique and immutable. Introduced by ES6
Numbers, Expressions, and Operators
According to MDN, "In JavaScript, numbers are implemented in double-precision 64-bit binary format IEEE 754 (i.e., a number between ±2−1022 and ±2+1023, or about ±10−308 to ±10+308, with a numeric precision of 53 bits). Integer values up to ±253 − 1 can be represented exactly."
Also, the number type has three symbolic values: +Infinity, -Infinity, and NaN (not-a-number). And Number can also be used as an object (objects will be covered later in this class)
BigInt was introduced by ES6, provides the ability to represent integers that may be very large. BigInt and Number values cannot be mixed and matched in the same operation.
Binary, Octal numbers, and Hexadecimal numbers can also be represented in JavaScript.
Demo
JavaScript math operations follow the same order of precedence as algebra. The order in which mathematical operations must be executed: Parentheses, Exponents, Multiplication, Division, Addition, Subtraction.
Operators
JavaScript has several types of operators. Below are the most frequently utilized types of operators
- Assignment operators
- Arithmetic operators
- Comparison operators
- Logical operators
- Conditional (ternary) operator
- String operators
- Unary operators
- Relational operators
Assignment operators
An assignment operator assigns a value to its left operand based on the value of its right operand.
let name = "John";
x = y;
Arithmetic operators
An arithmetic operator takes numerical values (either literals or variables) as their operands and returns a single numerical value.
JavaScript uses the following operators for arithmetic;
- Addition
(+) - Subtraction
(-) - Multiplication
(*) - Division
(/) - Modulus (division remainder)
(%) - Increment
(++) - Decrement
(--)- operands are equal and of the same type. - Unary negation
(-) - Unary plus
(+)
Arithmetic operators follow the operator precedence, determined in algebra.
Demo
Comparison operators
A comparison operator compares its operands and returns a logical value based on whether the comparison is true.
JavaScript uses the following operators for comparison;
- Equal
(==) - Not Equal
(!=) - Strict Equal
(===)- operands are equal and of the same type. - Strict Not Equal
(!==) - Greater than
(>) - Greater than or equal
(>=) - Less than
(<) - Less than or equal
(<=)
Demo
Logical operators
Logical operators are used to determine the logic between variables or values
JavaScript uses the following logical operators;
- Logical AND
(&&) - Logical OR
(||) - Logical NOT
(!)
Demo
Conditional (ternary) operator
condition ? val1 : val2
let status = (age >= 18) ? "adult" : "minor";
String operators
    console.log("John " + "Smith"); // console logs the string "John Smith".
    var name = "John";
    name += " Smith";
    console.log(name); // console logs the string "John Smith".
Unary operators
Unary operators have only one operand. The most common used unary operator is typeof
Demo
Other unary operators are delete and void
Relational operators
A relational operator compares its operands and returns a Boolean value based on whether the comparison is true.
There are two main relational operators: in and instanceof
Demo
Expressions
An expression is a valid unit of code that resolves to a value. JavaScript expressions can be separated into two categories: Assigned expressions and Evaluated expressions.
Assigned expressions are self-explanatory. A value is assigned to a variable x = 5 The value of the variable becomes 5.
Evaluated expressions are more involved. These types of expressions use more than one operation and operators to evaluate the result, which may or may not be assigned to a variable. In other words, evaluated expressions are code snippets that result in a single value. JavaScript has several expression categories: Arithmetic, String, Logical, Left-hand-side, and Primary expressions.
We will dig deep into expressions in the the functions section.
String and Dates
Strings
JavaScript treats strings as a sequence of characters that represent a text value. A string can be any text inside double or single quotes. Each element in the String occupies a position in the String. The first element is at index 0, the next at index 1, and so on. Any data type can be converted to string.
Demo
JavaScript treats strings as objects, which gives "string" methods and properties. The most commonly used String Properties are
- length: Returns the length of a string
- prototype: Makes it possible to add properties and methods to a string(object)
JavaScript string has a large list of methods. Below are some of the most common use methods
- charAt() --> Returns the character at the specified index (position)
- concat() --> Concatenate two or more string to make new string
- includes() --> Checks whether a string contains the specified string/characters
- indexOf() --> Returns the position of the first found occurrence of a specified value in a string
- replace() --> Searches a string for a specified value, or a regular expression, and returns a new string where the specified values are replaced
- slice() --> Extracts a part of a string and returns a new string
- split() --> Splits a string into an array of substrings
- substr(), substring() --> Extracts a substring from a string
- toLocaleLowerCase() --> Converts to lowercase letters, according to the host's locale
- toLocaleUpperCase() --> Converts uppercase letters, according to the host's locale
- toLowerCase() --> Converts to lowercase letters
- toUpperCase() --> Converts to uppercase letters
- trim() --> Removes whitespace from both ends of a string
- toString() --> Converts to a string(String object)
Dates
JavaScript does not have a Date Type, however Date Object provides the functionality to work with dates. Date objects contain a number that represents milliseconds since January 1, 1970 UTC. When used in browsers, JavaScript will use the browser's time zone and display a date as a full-text string:
Date Object
Date objects are created with the new Date() constructor. When an object is created, its default method is called.
Some objects may have more than one default method. These methods are known as a constructor.
Which constructor gets called is based on the constructors' signature.
JavaScript Date object has several constructors:
    new Date()
    new Date(year, month, day, hours, minutes, seconds, milliseconds)
    new Date(milliseconds)
    new Date(date string)
Every instance of Date object inherits from Date.prototype. The prototype object of the Date constructor can be modified to affect all Date instances.
There are also several methods provided with the date object. These methods allow date operations and manipulations.
Demo
To the full list of properties and methods on Date object, check ou MDN or open your .js file in Visual Studio, create an instance of Date object as seen in the following image.

Program & Control Flow
JavaScript programs run top to bottom; every instruction is executed. However, most programs include statements or blocks of code which alters the execution sequence. In this section, we will cover JavaScript statements.
Block statement
Block statements are the most basic and easy to understand. Block is identified by a pair of curly brackets
    statement 1;
    statement 2;
    statement 3;
    var nameES5 = "John";
    {
       var nameES5 = "James";
    }
    console.log(nameES5); // outputs "James"

    let nameES6 = "John";
    {
       let nameES6 = "James";
    }
    console.log(nameES6); // outputs "John"  -- What? I axpected "James"
Another easy to understand statement is used with loops
    //while loop
    while (x < 10) {
       displayValue();
       x++;
    }
Important: block scope was introduced to JavaScript via ES6 (ECMAScript2015). In ES5, variables introduced within a block are scoped to the containing function or script, and the effects of setting them persist beyond the block itself. In other words, block statements do not define a scope (Source: MDN)
Conditional statements
The if statement is a straightforward example
    if (person.age > 34) {
        eligibleForDiscount();
        addToGolfTeam();
    }
What's going on: As JavaScript executes instructions top to bottom, it will run into the if statement.
The eligibleForDiscount(); will only be executed when the if the condition is true.
if block can included in one or more statements. if may have one or more statements for the condition being false. This is known as else condition.
Also, the if statement may include multiple conditions. Each of which may have one or more statements. There may also be nested if.
    if (person.age > 34) {
       eligibleForDiscount();
       addToGolfTeam();
    }
    else if (person.age > 25 && person.age < 34)
    {
       if (person.age < 30) {
       addToSoccerTrainer(); // will help other player in the team
       }
       addToSoccerTeam();
    }
    else {
       addToFootballTeam();
    }
switch
The switch statement works very similarly to the if statement: It a program to evaluate an expression and attempt to match the expression's value to a case label.
    switch (expression) {
       case label_1:
          statements_1
          [break;]
       case label_2:
          statements_2
          [break;]
       default:
          statements_def
          [break;]
    }
Loops and iteration
A loop in programming describes functionality that repeats a set of instructions. Often a set of functionality will iterate a statement based on specified boundaries.
For example, repeat the phrase "Good Day!" 5 times. It is clear from the example that the phrase will repeat 5 times, then it will stop. To make it a little more challenging, let's figure out the following statements:
Count 1 to 10, when the number is even, write "Good Day!"
Read the name of all states, if the name contains more than one word, write "Name Split!"
JavaScript supports several kinds of loops.
- for loop
- while loop
- do...while loop
- for...in loop
- for...of loop
for loop
JavaScript for loops follows C-family style statement
    for (initialization; testing condition; increment / decrement;)
    {
        statement(s)
    }
for loop executes as follows:
- Mark the start of the loop - initialization
- Test the exit condition - go through the loop only if true
- Execute statement(s)
- Update the variable for next iteration - increment / decrement
- Terminate loop - when the exit condition is false
    let i;

    for (i = 1; i < 5; i++)
    {
    console.log("Value of i is " + i );
    //alert("Value of i is " + i );
    }
while loop
while loop executes its statement (or block statement) until the condition evaluates to true
    while (testing condition)
    {
        statements(s)
    }
while loop executes as follows - Almost identical to for loop
- Initialization occurs outside of the loop
- Test the exit condition - go through the loop only if true
- Execute statement(s)
- Update the variable for next iteration - increment / decrement
- Terminate loop - when the exit condition is false
    let i = 1;

    while (i < 5)
    {
    console.log("Value of i is " + i );
    //alert("Value of i is " + i );
    i++;
    }
do while loop
do while is similar to while loop except do wile checks for condition after the statement, not before. do loop is also known as Exit Control Loop: The execution occurs at least one iteration.
    do
    {
    statement(s)
    }
    while (condition);
    let i = 5;
    do
    {
        console.log("Value of i is " + i );
        i++;
    } while (i < 4);
infinite loop
This is the type of a loop that should be avoided.
infinite loop occurs when the condition in a loop never becomes false.
    let i = 2;
    let j = 5;
    while (i < j ) {
      console.log("I will loop forever!...");
      //i++; // This statement will make the statement --> NON infinite
    }
for...in loop
for...in loop is very useful while working with objects. It provides a mechanism to iterate over user-defined properties of an object. We will revisit for...in loop when we learn objects.
    for (variable in Object)
    {
       statement(s)
    }
    //object
    var mainSubjects = {
    first : "HTML",
    second : "CSS",
    third : "JavaScript"
    };
    //counter variable
    let i = 0;
    //for...in loop
    for (var subject in mainSubjects) {
       i++;
       console.log(i + " - " +  mainSubjects[subject]);
    }
for...of loop
for...of loop is useful iterating over all collections and collections of objects such as objects, Array, Map, Set, arguments object. We will revisit for...of loop when we learn objects.
    for (variable of Object)
    {
       statement(s)
    }
    //let animals = ['🐈', '🐔', '🐕'];
    let animals = ['Cat', 'Bird', 'Dog',];

    for (let animal of animals) {
    console.log("Animal is " + animal);
    }
Functions
In programming, a function is a smaller program or a "subprogram" that completes a task. Functions are executed when they are called (or invoked). Functions can be called by code within the larger program, often external to the function code. A function can also be called by its own code, which is known as recursion. These type of functions are called recursive functions. Like the program itself, a function is composed of a sequence of statements called the function body. Values can be passed to a function, and the function may return a value.
Contrary to most C based languages, JavaScript treats functions as objects. In other words, JavaScript functions can have their own properties and methods just like any object. Moreover, ES6 introduced classes to JavaScript. While a JavaScript class is a type of function, "classes" are declared with the class keyword. Typically classes are the blueprint for creating an object.
Defining Functions
JavaScript provides two different ways to define a function
Function declaration
This method defines a named function. Below are the basic components of a function:
- Function Name
- Zero or more parameters. The parameters are enclosed in parentheses and separated by commas
- Statements that define the function, enclosed in curly brackets, { }
    function name(parameters){
       statements
    }

    // ------Example: -------------
    function square(number) {
       return number * number;
    }
square is the name of the function. number is the parameter. This example has just one parameter.
The word argument is also used instead of parameter however, there are important distinctions between the two.
In this class, we can use the two terms interchangeably.
return number * number; is the statement. Function declaration is the method used for creating functions by most C based programming languages.
Function expression
Using Function Expressions, we can define named or anonymous functions. An anonymous function is a function that has no name.
    let name = function(parameters){
       statements
    }

    // ------Example: -------------
    let square = function (number) {
       return number * number;
    }
ES6 introduced Arrow Function Expression which is a shorter syntax for writing function expressions. The above functions can be written as follows
    let name = (parameters) => {
       statements
    }

    // ------Example: -------------
    let square = (number) => {
       return number * number;
    }
Calling (Invoking) a Function
When a function is called, the code inside the function gets executed. Defining a function does not execute it. Calling a function is also known as function invocation.
To call a function: Reference the function name, followed by an open and closed parenthesis (). If there are any parameters, include them in the parentheses, separated by comma.
The order of the parameters matter
square(2); // calls the function (square) which will execute the code in the square function.
It is clear we can call the square function whenever we like: square(3); or square(24) so on.
JavaScript provides the notion of function expressions that are invoked as soon as the function is declared, without explicitly being called.
This idea is very useful when functions are used only once.
These types of functions are known as Immediately Invokable Function Expression (IIFE).
    (function() {
        statements
    })();

    // OR May use the following syntax (ES6)
    (() => {
        statements
    })();
Example of Recursive function
    function factorial(n) {
       if ((n === 0) || (n === 1))
       {
          return 1;
       }
       else
       {
          return (n * factorial(n - 1));
       }
    }
Function Scope
Prior to ES6, JavaScript had two scopes: Global scope and Function scope.
Global scope: Variables that are declared outside of a function have global scope, which is accessible from anywhere in the code.
Function scope: Variables that are declared within a function have function scope, which is accessible from that function (and any nested function) only.
ES6(ES2015) introduced Block Scope local variables using let or const keywords.
    // global scope
    var age = 90,
    height = 5.11,
    name = "Jim Miller";

    // This function is defined in the global scope
    function getPersonalInfoGlobal() {
       return name + " is " + age + "years old and " + height + "ft tall";
    }

    getPersonalInfoGlobal(); // Returns ???

    //function example
    function getPersonalInfo() {
       var age = 20,
       height  = 6;
       return name + " is " + age + "years old and " + height + "ft tall";
       //A nested function example
       //function info() {
       //  return name + " is " + age + "years old and " + height + "ft tall";
       //}
       //
       //return info();
    }

    getPersonalInfo(); // Returns ???

    // describe let and const scope as well.
Closures
JavaScript scope is built around functions. A function can access variables outside of it, but not the ones inside. In the case of nesting of functions, JavaScript grants the inner function full access to all the variables and functions defined inside the outer function. The inner function also has access to all other variables and functions that the outer function has access to. However, the outer function does not have access to the functions and variables defined inside the inner function. This is very similar to the notion of encapsulation in object oriented programming languages such as C++, Java or C#. A closure gives the inner functions the ability to have access to the outer functions's scope even after the outer function goes out of scope.
    // Method 1: Nested function
    function manageStudent() {
    var name = "John";        // local variable (local to manageStudent function)
    function displayName() {  // displayName() is the inner function, a closure
    alert(name);              // use variable declared in the parent function
    }
    return displayName;
    }
    manageStudent();

    // Method 2: Closure - The same result
    function manageStudent() {
    var name = "John";        // local variable (local to manageStudent function)
    alert("in manageStudent but outside of displayName");

    function displayName() {  // displayName() is the inner function, a closure
    alert(name);              // use variable declared in the parent function
    }
    return displayName;
    }

    var student = manageStudent(); // executes manageStudent function. done
    student();                     // executes displayName function because that's what was returned by manageStudent
In Method 2, the outer function returns the inner function (displayName). However, once the outer function is executed, it goes out of scope, not when the inner function is executed using
student();, it displays the student name ("John"). This is the behaviour made possible by closure. In most programming language, this behaviour is not possible.
Closures also provide emcapsulation, the ability to declare variables and methods that can only be accessed by other methods in the same function. These variables and methods are known as private variables and methods.
Classes
In almost all programming languages, Classes are a template for creating objects. They encapsulate data with code to work on that data. While this statement is true, in JavaScript Classes are are also function, more like "special functions", and just as you can define function expressions and function declarations, the class syntax has two components: class expressions and class declarations. There are however some differneces between functions and classes. The noticeable difference between the two is the fact that functions are hoisted while classes cannot be hoisted. Developers need to declare their class and then access it, otherwise code like the following will throw a ReferenceError.
Class Declaration
To declare a class, you use the class keyword with the name of the class
    class Rectangle {
        constructor(height, width) {
            this.height = height;
            this.width = width;
        }
    }

    class Circle {
        constructor(x, y, r) {
            this.x = x;
            this.y = y;
            this.r = r;
        }
    }
The body of a class is the part that is in curly brackets {}. This is where you define class members, such as methods or constructor.
JavaScript classes provide three type of methods
The Constructor Method
The constructor method is a special method for creating and initializing an object created with a class. There can only be one special method with the name "constructor" in a class. A SyntaxError will be thrown if the class contains more than one occurrence of a constructor method. A constructor can use the super keyword to call the constructor of the super class.
    class Circle {
        constructor(x, y, r) {
            this.x = x;
            this.y = y;
            this.r = r;
        }
    }
Static Methods
The static keyword defines a static method for a class. Static methods are called without instantiating their class and cannot be called through a class instance. Static methods are often used to create utility functions for an application.
    class Point {
      constructor(x, y) {
        this.x = x;
        this.y = y;
      }

      static distance(a, b) {
        const dx = a.x - b.x;
        const dy = a.y - b.y;

        return Math.hypot(dx, dy);
      }
    }

    const p1 = new Point(5, 5);
    const p2 = new Point(10, 10);
    p1.distance; //undefined - cannot be used this way
    p2.distance; //undefined - cannot be used this way

    console.log(Point.distance(p1, p2)); // Use the name of the class directly
Prototype Methods
    class Rectangle {
      constructor(height, width) {
        this.height = height;
        this.width = width;
      }
      // Getter
      get area() {
        return this.calcArea();
      }
      // Method
      calcArea() {
        return this.height * this.width;
      }
    }

    const square = new Rectangle(10, 10);

    console.log(square.area); // 100
You may implement classes with static and non-static methods as well
    class Animal {
      speak() {
        return this;
      }
      static eat() {
        return this;
      }
    }
Instance properties
    class Circle {
        constructor(x, y, r) {
            this.x = x;
            this.y = y;
            this.r = r;
        }
    }
x, y, and r are instance properties and must be defined inside of the class.
Arrays
In computer science, arrays are a collection of data, which are compartmented in a separate cell and each cell is identified by an index. JavaScript does not have an explicit array data type, however, arrays are treated as objects and have predefined methods for manipulating arrays. There's more than one way that JavaScript allows us to create arrays.
    var elementArray = new Array(element-0, element-1, ..., element-N);
    var elementArray = Array(element-0, element-1, ..., element-N);
    var elementArray = [element-0, element-1, ..., element-N];
In the code above, elementArray is created in three different ways and initialized. When array elements are specified at creation time, it's said that the array is initialized. The most important property of an array is length which sets the number of arguments.
The following syntax is called an "array literal" or "array initializer." It's shorter than other forms of array creation and is generally preferred.
var elementArray = [element-0, element-1, ..., element-N];
Often, developers would create arrays with a known length but without any items.
    var elementArray = new Array(arrayLength);
    var elementArray = Array(arrayLength);

    // Or the preferred method
    var elementArray = [];
    elementArray.length = arrayLength;
In the above code, arrayLength must be a number https://developer.mozilla.org/en-US/docs/Web/JavaScript/Guide/Indexed_collections
Techniques for Creating an Array
    // Creates an array with three element: 4, 5, 6
    var myarray = [4, 5, 6];

    // Creates an array with no elements and myarray.length set to 42;
    var myarray = Array(42);
    //This is equivalent to the following two lines
    var myarray = [];
    myarray.length = 42;
Creating an empty array, then populating
    let employees = []; // Create an empty array
    employees[0] = "John Smith";
    employees[1] = "Muhammed Ali";
    employees[2] = "Jane Tarzan";

    employees.length; // will return 3
Important: hote that the indexes are numeric and integer values. If we supply a non-integer value to the array operator in the code above, we will transform the array into an object. The array length will remain the same.
    let employees = []; // Create an empty array
    employees[0] = "John Smith";
    employees[1] = "Muhammed Ali";
    employees[2] = "Jane Tarzan";
    employees[3.8] = "Princess Fiona";

    alert(employees.length);     // return 3
    or
    alert(employees['length']);  // return 3

    //object notation
    alert(employees.hasOwnProperty(1));    // return true
    alert(employees.hasOwnProperty(3.8)); // return true
    //
    alert(employees[1]);                 // return "Muhammed Ali"
    alert(employees[3.8]);              // return "Princess Fiona"
Create and populate an array at the same time
    let name = "John";
    let randomStuff = new Array("CSCE 120", name, 3.14159);

    let fruits = ["Apple", "Orange", "Banana"];
Reading (Traversing) array elements
In JavaScript, we refer to an array's elements by using the element's index or ordinal number.
For example, using the fruits array above, we can refer to the first element of the array as fruits[0]
and the second element of the array as fruits[0]. The index of the elements begins with zero.
In order to read all the elements of an array and perform operations, we iterate over the elements of the array referencing the index of the element. The process is accomplished using loop(s).
The following snippet iterates over the values of the fruits array and alerts each value
    let fruits = ["Apple", "Orange", "Banana"];
    for (var i = 0; i < fruits.length; i++) {
      //Alert each element in the fruits array
      alert(fruits[i]);
    }
The forEach() method provides another way of iterating over an array:
    let fruits = ["Apple", "Orange", "Banana"];
    fruits.forEach(function(fruit) {
    alert(fruit);
    });

    // ES2015 (ES6) introduced the Arrow Functions. The above forEach can be written as follows, using the arrow function
    fruits.forEach(fruit => alert(fruit));
Array Methods
JavaScript Arrays have many methods. In order to understand Array methods, we should have a solid understanding of functions. Review the functions section if you need to. In this section we will cover the most commonly used methods.
concat()
This method joins two or more arrays and returns a new array.
    let fruits = ["Apple", "Orange", "Banana"];
    let vegetables = ["Beets", "Asparagus", "Spinach"];
    let fruitsandvegetables = fruits.concat(vegetables);
    // fruitsandvegetables is ["Apple", "Orange", "Banana", "Beets", "Asparagus", "Spinach"]
join()
This method joins all elements of an array into a string.
    let fruits = ["Apple", "Orange", "Banana"];
    let fruitsJoined = fruits.join(' - ');
    // fruitsJoined  is "Apple - Orange - Banana"
push()
This method adds one or more elements to the end of an array and returns the resulting length of the array.
    let fruits = ["Apple", "Orange", "Banana"];
    fruits.push("Pear");
    // fruits is now ["Apple", "Orange", "Banana", "Pear"]
pop()
This is the opposite of push() method.
Removes the last element from an array and returns that element
    let fruits = ["Apple", "Orange", "Banana"];
    let last = fruits.pop();
    // last is "Banana"
    // fruits is now ["Apple", "Orange"]
shift()
This method removes the first element from an array and returns that element.
    let fruits = ["Apple", "Orange", "Banana"];
    let first = fruits.shift();
    // first is "Apple"
    // fruits is now ["Orange", "Banana"]
unshift()
This method is not necessarily the opposite of shift().
unshift() adds one or more elements to the front of an array and returns the new length of the array.
    let fruits = ["Apple", "Orange", "Banana"];
    fruits.unshift("Apricot", "Avocado");
    // fruits is now ["Apricot", "Avocado", "Apple", "Orange", "Banana"]
slice(start_index, end_index)
Extracts a section of an array and returns a new array.
    let fruits = ["Apricot", "Avocado", "Apple", "Orange", "Banana"];
    let sliced_fruits = fruits.slice(1, 4); // starts at index 1 and extracts 3 elements (4 - 1 is 3)
    // sliced_fruits is  ["Avocado", "Apple", "Orange"];
splice(index, count_to_remove, addElement1, addElement2, ...)
This method removes elements from an array and replaces them with new items. The replacement is optional. It then, returns the items which were removed from the array.
    let fruits = ["Apricot", "Avocado", "Apple", "Orange", "Banana"];
    fruits.splice(1, 3, "Cherry", "Clementine", "Cucumber", "Dates");
    // fruits is now ["Apricot", "Cherry", "Clementine", "Cucumber", "Dates", "Banana"];
    // This code started at index one which refers to "Avocado",
    // removed 3 elements there, and then inserted all consecutive elements in its place.
indexOf(searchElement[, fromIndex])
This method searches the array for searchElement and returns the index of the first match.
    let fruits = ["Apricot", "Avocado", "Apple", "Apricot", "Orange", "Banana", "Apricot", "Apple" ];
    let first_apricot = fruits.indexOf("Apricot");      //first_apricot is the index of first "Apricot" which is 0
    let second_apricot = fruits.indexOf("Apricot", 2); //second_apricot is the index of second "Apricot" which is 3
    let non_existance = fruits.indexOf("CSCE120");    //non_existance is -1. Indication of not found
lastIndexOf(searchElement[, fromIndex])
worked similar to indexOf(searchElement[, fromIndex]) however it starts at the end and searches backwards.
forEach(callback[, thisObject])
This method processes every array item.
Within forEach, there is a function that processes every item (in this case alert),
JavaScript uses the word callback for such functions.
Therefore, forEach(callback[, thisObject]) performs callback on every array item.
    let fruits = ["Apricot", "Avocado", "Apple", "Orange", "Banana"];
    fruits.forEach(function(item) {
    alert(item);
    });
map(callback[, thisObject])
map method is similar to forEach but it returns a new array.
In other words, the map, returns a new array of the return value from executing callback on every array item.
    let fruits = ["Apricot", "Avocado", "Apple", "Orange", "Banana"];
    let big_fruits = fruits.map(function(item) {
    return item.toUpperCase();
    });
    alert(big_fruits); // big_fruits is now ["APRICOT", "AVOCADO", "APPLE", "ORANGE", "BANANA"];
filter(callback[, thisObject])
Returns a new array containing the items for which callback returned true.
    let fruits = ["Apricot", 10, "Avocado", 20, "Apple", 30, "Orange", 40, "Banana"];
    let number_list = fruits.filter(function(item) {
    return typeof item === 'number';
    });
    alert(number_list); // number_list is now [10, 20, 30, 40];
every(callback[, thisObject]) returns true if callback returns true for every item in the array.
some(callback[, thisObject]) returns true if callback returns true for at least one item in the array.
reverse() and sort() are self-explanatory.
Objects & Collections
In JavaScript, almost everything is an object, which is a collection of properties, and a property is an association between a name (or key) and a value. A property's value can be a simple type or it can be a complex type such as another object or even a method. Subsequently, while JavaScript does not the fit the norm of Object Oriented Programming languages, it is designed on a simple object-based paradigm.
Object definition and initialization
JavaScript provides more than one way to create objects.
    var car = new Object(); // car object. This method uses constructor function
    const person = {};     // person object.
Once an object is created, we create its properties or we associate properties to it. JavaScript allows us to use more than one to set and get object properties.
Below, we use dot-notation for setting the object's properties.
    var car = new Object(); // car object
    car.make = 'Ford';
    car.model = 'Mustang';
    car.year = 1999;
Bracket notation can be used as well. The result is the same.
    var car = new Object(); // car object
    car["make"] = 'Ford';
    car["model"] = 'Mustang';
    car["year"] = 1999;
Often, we will initilize or polupate our object at the creation time, as follows. This method is known as creating the object "using object initializer".
    const person = {
    name: ["John", "Smith"],
    age: 32,
    gender: "Male",
    interests: ["Playing Soccer", "Skiing"],
    bio: function() {
    alert(this.name[0] + " " + this.name[1] + " is " + this.age + " years old. He likes " + this.interests[0] + " and " + this.interests[1] + ".");
    },
    greeting: function() {
    alert("Hi! I'm " + this.name[0] + ".");
    }
    };
Accessing or reading object and its properties and methods is the same. objectName.propertyName
Example:
    person.name[0]; // outputs "John""
    person.age; // outputs 32
As we can create nested objects, we can also create array of objects.
this
In JavaScript, this keyword refers to the current object the code is being written inside.
For example, if you are using this in a function, it refers to the function.
If you are outside of the all functions then it refers to the windows object.
    const person = {
    name: ["John", "Smith"],
    age: 32,
    gender: "Male",
    interests: ["Playing Soccer", "Skiing"],
    bio: function() {
    alert(this.name[0] + " " + this.name[1] + " is " + this.age + " years old. He likes " + this.interests[0] + " and " + this.interests[1] + ".");
    },
    greeting: function() {
    alert("Hi! I'm " + this.name[0] + ".");
    }
    };
In the above alert(person.greeting()); will alert
Hi! I'm John..
In this example,
this refers to person. We can say this is replacement of person
When more than one person object is created using constructor notation, this will always ensure that the correct
values are used when a member's context changes.
For example, two different person object instances may have different names,
but each will want to use their own name when saying their greeting.
Collections
JavaScript divides Collections into two main categories:
- Indexed collections
- Keyed collections
Arrays are a good example of indexed collections. Review the Arrays section for details.
JavaScript also provides collections of data which are ordered by a key such as Map and Set objects.
This type of collection contains elements which are iterable in the order of insertion.
Map
The Map object is a collection of unique keyed data items, holds key-value pairs and remembers the original insertion order of the keys.
The Map object can be treated like any other JavaScript object and it allows keys of any type; however, each key has to be unique.
The Map has several built-in methods. The example below demonstrates how to create Map, set, get, delete items
    let departments = new Map();
    departments.set("Computer Science", "Prepares students for the most innovative, challenging and promising careers of the 21st Century");
    departments.set("Chemistry", "Research aims to prevent resistance to staph infection treatment");
    departments.set("Music", "Music Education and Performance at its best!");
    departments.set(5, "The most referenced digit");

    departments.size; // 4

    departments.get("Chemistry"); // "Research aims to prevent resistance to staph infection treatment"
    departments.get("Biology"); // undefined

    departments.has("Chemistry"); // true
    departments.has("Biology"); // false

    departments.delete("Chemistry"); // false

    departments.size; // 3
Looping through the items in the Map object can easily be accomplished using JavaScript loop statements
Example: using for...of loop to return an array of [key, value] for each item.
    for (var [key, value] of departments) {
    alert(key + " => " + value);
    }

    // using forEach:
    departments.forEach( (value, key, map) => {
    alert(`${key} => ${value}`);
    });
Sets
A Set is a special collection of values or "set of values". Set is different from maps in that set is without keys.
Each value in a Set may only occur once.
    let toys = new Set();
    toys.add("Mr. Potato Head");
    toys.add("Buzz Lightyear");
    toys.add("Sheriff Woody");
    toys.add(5);

    toys.size; // 4

    toys.has(1); // false
    toys.has(5); // true
    toys.has("Sheriff Woody"); // true

    toys.delete("Mr. Potato Head"); // true

    toys.size; // 3

    // iterating over each item
    for (let item of toys) {
    alert(item);
    }
Map and Set objects have their respective WeakMap and WeakSet objects. Read more on MDN
Web Programming with JavaScript
Web programming requires detail knowledge of every item that makes and serves a web application. In this section, we will learn how to program large objects like The Browser Object Model (BOM), The Document Object Model (DOM) as well as JavaScript APIs that interact with HTML elements
The Browser Object Model (BOM)
BOM provides JavaScript with the ability to manage and to interact with the web browser, not the content of the page.
There is no standard defined for BOM, hence each browsers may have their own implementation.
The main object is the window object which is the very root element,
everything else is attached to it either directly or indirectly. Java Script has a direct access to it.
Browser instances or tabs do not share window object, each has their own.
The window is the most global JavaScript object; any global variables become properties and any global functions become methods of the window object.
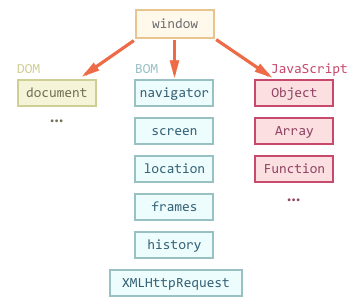
When an HTML page loaded into a browser window, it becomes a Document object (hence DOM) which is an object in the BOM. Therefore, BOM comprise DOM (Document Object Model).
The window object has a many objects, methods and properties.
Below are the important BOM objects:
- document
- location
- history
- navigator
- screen
- timing
- cookies
- frames
The document will be covered in next section.
Size Properties
    window.innerHeight
    window.innerWidth
Basic Methods
    window.alert() // no need to use windows
    //alert("Hello CSCE 120");
    //Confirm Box
    if (confirm("Press a button!")) {
    alert("You pressed OK!");
    }
    else
    {
    alert("You pressed Cancel!");
    }

    //more ..
    window.open();
    window.close();
    window.resizeTo();
The most frequently used methods are timing functions. setTimeout and setInterval
    ///setTimeout. Runs only one time.
    function timeoutFunction()
    {
    setTimeout(function () {
    alert("Hello CSCE after 1 sec");
    }, 1000);
    }
    timeoutFunction();

    // You can make it to keep running after every (interval)
    // Important: The counter functions get called two times.
    const elem = document.getElementById("display");
    var i = 0;
    var counter = function test() {
    i++;
    if (i > 10) {
    i = 0;
    }
    elem.innerHTML = i.toString();
    setTimeout(counter, 1000)
    }
    counter();

    //setInterval. Runs after every interval
    var i = 0;
    var intervalId = setInterval(function(){
    if(i === 10){
    clearInterval(intervalId);
    }
    console.log(i);
    i++;
    }, 1000);
We will cover other objects and methods using examples.
The Document Object Model (DOM)
DOM is an application programming interface (API) for HTML and XML documents. When a web page is loaded, the browser constructs the Document Object Model (DOM), which is a tree like representation of elements in the page. JavaScript accesses and manipulates the DOM via a series of APIs.
Accessing the DOM
Once JavaScript is references in an HTML page, it has immediate access to document, window objects.
These objects provide a array of interfaces for accessing and manipulating the document.
The important objects are as follows:
Document: This object is the root document object itselfNode: Every object located within a document is a node which can be an element node, a text node or an attribute node.Element: The element object is based on node. Often used interchangeablyNodeList: A nodeList is an array of elementsAttribute: An interface for exposing attributesNamedNodeMap: A namedNodeMap is like an array, but the items are accessed by name and/or index
The following is the most commonly used APIs for manipulating DOM.
- document.getElementById(id)
- document.getElementsByTagName(name)
- document.createElement(name)
- parentNode.appendChild(node)
- element.innerHTML
- element.style.left
- element.setAttribute()
- element.getAttribute()
- element.addEventListener()
- window.content
- window.onload
- console.log()
- window.scrollTo()
Read and Update Element
In order to read or make updates to an element, one needs to read the element first. getElementById("elementID") will find the element in the document and returns it as Element object
According to MDN, the Document method getElementById() returns an Element object representing the element whose id property matches the specified string. Since element IDs are required to be unique if specified, they're a useful way to get access to a specific element quickly.
Syntax
var element = document.getElementById(id);
Example
document.getElementById returns the DOM element, if the element exist. null if there is no match (element is not found).
    <html>
    <head>
    <title>getElementById example</title>
    </head>
    <body>
    <p id="loremIpsum">Lorem ipsum dolor sit amet, consectetur adipiscing elit. Etiam ac metus consectetur, efficitur libero vitae, efficitur velit.</p>
    </body>
    </html>
    function changeColor(betterColor) {
    var elem = document.getElementById("loremIpsum");
    elem.style.color = betterColor; // "blue"
    }
Also, JavaScript has access to the querySelector() family of interface which are commonly used get access to an element that does not have an ID.
querySelector() can be utilized to find the element using any selector.
By default, querySelector() returns the first Element within the document that matches the specified selector, or group of selectors.
If no matches are found, null is returned
Syntax
var element = document.querySelector(selectors);
Example:
    //Return (get) the first element in the document with the class "myclass"
    var element = document.querySelector(".myclass");

    // Return the first <input> element with the name "login" (<input name="login" />)
    located inside a <div>
    whose class is "user-panel main" (<div class="user-panel main">)
    var element = document.querySelector("div.user-panel.main input[name='login']");
In order to get a list of the document's elements that match the specified group of
selectors querySelectorAll() is utilized. The syntax is similar to querySelector()
Examples
    //To obtain the NodeList of all of the <p> elements in the document
    var elements = document.querySelectorAll("p");

    //Get the list of all <div> elements within the document with a class of either note or alert
    var matches = document.querySelectorAll("div.note, div.alert");

    //Get the list of <p> elements whose immediate parent element is a <div>
    //with the class highlighted and which are located inside a container whose Id is "test"
    var container = document.querySelector("#test");
    var matches = container.querySelectorAll("div.highlighted > p");

    //Get the list of the list items contained within a list whose ID is "userlist" which
    //have a "data-active" attribute whose value is "1"
    var container = document.querySelector("#userlist");
    var matches = container.querySelectorAll("li[data-active='1']");
Once we have the NodeList of matching elements, we can examine it just like any array. Use standard array notation to access the contents of the list.
    var matchedItems = userList.querySelectorAll(".highlighted");

    matchedItems.forEach(function(userItem) {
       // process each item
       alert(userItem);
    });
Create an Element
The document object provides us with createElement() method to create an HTML element in the DOM.
We can create a particular element (tag) if we specify a tag name at the time of creattion.
Otherwise we will create an unknown element.
Syntax
var element = document.createElement(tagName[, options]);
Example
    var div = document.createElement("div");
    div.textContent = "CSCE 120 is the cool";
    div.setAttribute('class', 'colorfulbackground');
    document.body.appendChild(div);
In the code above, createElement is used to create an element (div tag).
After creating div, we use textContent property to for setting text content.
Then we add a class to the div using setAttribute
At this time we may set more properties if we need to.
Once we are done setting all of the properties,
we need to append our tag to an existing tag using appendChild property.
In this example, we append to the body element.
Removing an Element
The removeChild() method removes a child element(node) from the DOM and returns the removed element.
Example:
    <div id="parentelement">
    <div id="childelement"></div>
    </div>

    let par = document.getElementById("parentelement");
    let chld = document.getElementById("childelement");
    let removedElement = par.removeChild(chld);
Check out MDN for the comprehensive list of document object, methods and properties.
JavaScript Events
Events are an transformations that occurs as a result of the user action or as result of state change of some components. Web developers often handle varies events, most of which are HTML DOM events. JavaScript interacts with HTML events, in other word, JavaScript can be executed when an event occurs.
Example of DOM events:
clicks event: when a user clicks the buttonload event: when a web page has loadedmouse event: when the mouse moves over an elementchange event: when an input field is changedsubmit event: when an HTML form is submittedkey event: when a user strokes a key
Common HTML Events
By far, the most commonly used event is the click event.
Methods to introduce Events
1. Inline
The click event may be used inline, similar to css inline.
    <h1 onclick="this.innerHTML = 'Hello, You just clicked me'">Click on this text!</h1>

    // or you can use a function
    <h1 onclick="changeText(this)">Click on this text!</h1>

    function justClickedMe(elem) {
    elem.innerHTML = "Hello, You just clicked me";
    }
2. Assign functionality to an event in JavaScript
    <h1 id="clickableHeader" >Click on this text!</h1>

    document.getElementById("clickableHeader").onclick = justClickedMe;

    function justClickedMe() {
    var elem = document.getElementById("clickableHeader");
    elem.innerHTML = "Hello, You just clicked me";
    }
Clearly the 2nd method is superior than than the 1st one, in terms of seperating the html code from html code.
3. Using addEventListener method
The addEventListener() method sets up a function that will be called whenever the specified event is delivered to the target. The addEventListener() may be setup for HTML Elements, Document and window. The important distinction is that the target need to be an object that supports XMLHttpRequest. We will cover XMLHttpRequest in Data Access Using HTTP section.
Syntax for using addEventListener() method
    //The common Syntax
    target.addEventListener(type, listener, useCapture);

    //The official syntax from MDN(https://developer.mozilla.org)
    target.addEventListener(type, listener[, options]);
    target.addEventListener(type, listener[, useCapture]);
    target.addEventListener(type, listener[, useCapture, wantsUntrusted  ]); // Gecko/Mozilla only
target: is often a DOM element but it could be Document or windowtype: is a case-sensitive string representing the event type to listen for. Example: "click"listener: is function that implements the logic when the event occursuseCapture: is a boolean value specifying whether to use event bubbling or event capturing. This parameter is optional.
    <h1 id="clickableHeader" >Click on this text!</h1>

    var elem = document.getElementById("clickableHeader");
    element.addEventListener("click", justClickedMe);

    function justClickedMe() {
    elem.innerHTML = "Hello, You just clicked me via addEventListener";
    }
    //window event
    window.addEventListener("resize", justStrachedMe);

    function justStrachedMe() {
    elem.innerHTML = "Hello, You just Strached the window";
    }
A Good Example
    <!DOCTYPE html>
    <html>
    <head>
        <meta charset="utf-8" />
        <title>JavaScript addEventListener()</title>
        <style>
            * {
                text-align: center;
            }
        </style>
    </head>
    <body>
        <h2>addEventListener()</h2>

        <p>This example demonstrates how addEventListener() method is setup and used.</p>

        <p>Square - this function was in assigment 7.</p>
        <p>Enter a number in the text field below, then click the button to perform a calculation.</p>

        <div><input type="text" id="txtInput" /></div>
        <div><button id="btnCalculate">Calculate</button></div>

        <p id="result"></p>

        <script>

            var input = document.getElementById("txtInput");
            var btn = document.getElementById("btnCalculate");
            var result = document.getElementById("result");

            //Method 1: Not so clean
            //btn.addEventListener("click", square);

            //function square() {
            //    var number = parseInt(input.value);
            //    result.innerHTML =  number * number;
            //}

            //Method 2: cleaner
            btn.addEventListener("click", function () {
                var number = parseInt(input.value);
                if (isNaN(number)) {
                    result.innerHTML = "Input should be a numeric value";
                    return;
                }
                var squared = square(number);
                result.innerHTML = "The square of " + number + " is " + squared;
                //result.innerHTML =  "The square of " + number + " is " + square(number);
            });

            function square(number) {
                return number * number;
            }

        </script>

    </body>
</html>
Forms
Forms are utilized to collect data from the users. Forms consist of a subset of special HTML elements which allow users to enter data. The data, collected from the user input, is sent to a server for processing
In this section, we will demonstrate a web form and how it can be coded using JavaScript.
    <form class="contact_form" action="" method="post" name="contact_form" id="contact_form">
        <ul>
            <li>
                Requered Fields
            </li>
            <li>
                <label>Username:</label>
                <input type="text" required pattern="\w{5,90}" name="username" id='username' placeholder="TonyArslan" />
                <span class="form_hint">Minimum 5 characters long, no spaces</span>
            </li>
            <li>
                <label>Email:</label>
                <input required type="email" name="email" id='email' placeholder="tony@arslan.com" />
                <span class="form_hint">should be email adress</span>

            </li>
            <li>
                <label>Password:</label>
                <input pattern="\w{5,90}" type="password" name="passwordOne" id="passwordOne" />
                <span class="form_hint">Minimum 5 characters long</span>
            </li>
            <li>
                <label>Confirm Password:</label>
                <input type="password" name="passwordTwo" id="passwordTwo" />
            </li>
            <li>
                Optional Fields
            </li>
            <li>
                <label>First Name</label>
                <input pattern="\w{1,90}" placeholder="Tony" type="text">
            </li>

            <li>
                <label>Last Name</label>
                <input pattern="\w{2,10}" placeholder="Arslan" id="lastname" optional type="text">
            </li>
            <li>
                <label>Phone</label>
                <input type="tel" placeholder="(402) 456-7891" pattern="^\(?\d{3}\)?[-\s]\d{3}[-\s]\d{4}.*?$" />
            </li>
            <li>
                <label>Adress</label>
                <input placeholder="" id="adress" type="text">

            </li>

            <li>
                <label>Programing Language</label>
                <input optional list="PrograminLanguage" name="PrograminLanguage" />
            </li>
            <li>
                <datalist id="PrograminLanguage">
                    <option value="JavaScript">
                    <option value="Phthon">
                    <option value="Java">
                    <option value="C#">
                    <option value="C++">
                </datalist>
            </li>
        </ul>
        <input type="submit" value="Send Request">
        <!--<button type="submit">Send Request</button>-->
    </form>
Forms are often accompanied with a css and a JavaSript file.
Below are the css and JavaScript companian files for the form above.
css file: <link rel="stylesheet" href="../css/css-form.css" />
js file : <script src="../js/js-form.js"></script>
HTML <form> action Attribute
The action attribute specifies where to send the form-data when a form is submitted.
    <form action="{url}" method="get">
        <label for="username">Name:</label>
        <input type="text" id="username" name="username">
        <input type="submit" value="Submit">
    </form>
Value of the {url}:
The method attribute
The GET method
The GET method is the method used by the browser to ask the server to send back a given resource. Using this method the data sent to the server is appended to the URL. The body of the message is empty This method is great for retrieving data.
The POST method
The POST method is the method the browser uses to talk to the server when asking for a response that takes into account the data provided in the body of the HTTP request. Using this method the data is included in the request body instead of appended to the URL. The body of the message is not empty The HTTP request looks like the following
    POST / HTTP/2.0
    Host: foo.com
    Content-Type: application/x-www-form-urlencoded
    Content-Length: 13

    say=Hi&to=Mom
The Content-Length header indicates the size of the body, and the Content-Type header indicates the type of resource sent to the server
JavaScript APIs
In general, Application Programming Interfaces (APIs) are constructs made available, by technology providers or software vendors, in programming languages to allow developers to build complex functionality more easily and without knowing the detail implementation. The implementation may be in another programin language than the consumer language. For example, an API may be developed in C++ and has some methods or properties exposed to JavaScript.
There are many APIs that are available to JavaScript. Most APIs are not part of the JavaScript language itself, rather they are built on top of the core JavaScript language.
In JavaScript world, the APIs are classified into two categories:
- Browser APIs: Functionality built into the browser that sit on top of the JavaScript language and allow developers to implement functionality more easily.
- Third party APIs: Functionality built into third-party platforms (e.g. Twitter, Facebook) that allow developers to use some of those platform's functionality in their own web applications.
In addition, there are also libraries and frameworks developed to help rapid development. Libraries such as jQuery, Mootools and React hepled developers to quickly construct their application and not worry about the short coming of browsers.
In this section, we will focus on Browser APIs which is seperated into several categories.
-
APIs for manipulating documents :
We have already seen and used
documentobject which allows us to manipulate HTML and CSS — creating, removing and updating HTML and CSS on the page. - APIs that fetch data from the server : We will cover this API in Asynchronous JavaScript section.
- Device APIs : These are the APIs for manipulating and retrieving data from device hardware.
- Client-side storage APIs : We use Storage APIs for storing and retrieving data on the client-side .
- Audio and Video APIs : These APIs allow developers to create custom UI controls for playing audio and video, display text tracks like captions and subtitles. Text-to-Speach and speach recognition are some of the most interesting applications
-
APIs for drawing and manipulating graphics :
The two main APIs in this category are Canvas and WebGL.
Both are widely supported by modern browsers. These APIs
allow developers to programmatically update the pixel data to create 2D and 3D scenes.
These APIs are often used for creating animation loops such as
window.requestAnimationFrame(). A lot of HTML games are developed using these APIs. In the rest of this section, we will studycanvasAPI
animation, canvas API, drawing
The <canvas> element was introduced by HTML5 to replce Flash.
Flash is not supported by major browsers anymore, therefore all drawing, and animations should be done using HTML native technologies
such as canvas, WebGL, Scalable Vector Graphics (SVG), CSS and JavaScript.
It's important to know that the canvas has been designed for pixel-based graphics, while SVG (Scalable Vector Graphics) is for vector-based graphics.
This course will focus on the fundamental drawing capabilities of the HTML5 canvas element.
Canvas is great fit for writing 2D graphics and games and it performs well.
To use canvas in HTML, we need to place the following element in HTML page, anywhere within the body tag.
    <canvas id="gamecanvas" width="400" height="300">
    Sorry canvas is not supported. Either your web browser
    does not support the canvas element or JavaScript is disabled. Do you have pop-up blockers?
    </canvas>
This example defines an area of 400 by 300 pixels on which content can be rendered with JavaScript.
by default canvases are "transparent", users should see nothing as a result on an empty canvas. It's fair to treat canvas element similar
to other HTML interm of appying CSS.
canvas is essential.
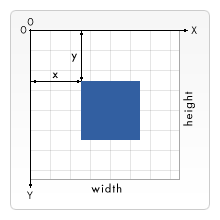
The canvas coordinate system
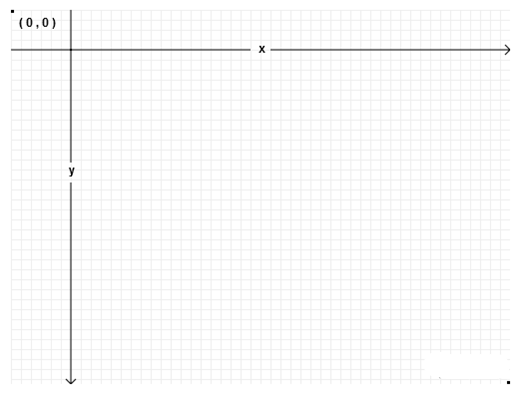
Once canvas element is placed on our page, we are ready to access and use it via JavaScript API.
    var canvas = document.getElementById("gamecanvas");
    //OR
    var canvas = document.querySelector("#gamecanvas");
getElementById() or querySelector() method may be used to gain access to the canvas element.
In JavaScript, the next necessary step is to get a "2D context" associated with the canvas. This will enable us to be able to do drawing and/or setting drawing properties (color, etc.). This should be done only once.
var context = canvas.getContext('2d');
In Summary
In order to use canvas, do the following
-
Add the
canvaselement into an HTML page -
Select the
canvaselement for use from JavaScriptvar canvas = document.getElementById("gamecanvas"); -
get a "2D context" associated with the canvas
var context = canvas.getContext('2d');
Basic Example
There are three functions that draw rectangles on the canvas:
fillRect(x, y, width, height)
strokeRect(x, y, width, height)
clearRect(x, y, width, height)
    function draw() {
    var canvas = document.getElementById("canvas");
    if (canvas.getContext) {
    var context = canvas.getContext("2d");

    context.fillRect(10, 10, 100, 100);
    context.clearRect(45, 45, 60, 60);
    context.strokeRect(50, 50, 50, 50);
    }
    }
Drawing paths
A path is a list of points similar to strings are list of characters.
Below are the steps to make shapes using paths
- Step: Create the path
- Step: Draw into the path use drawing commands. A complete list of drawig commands can be found at MDN
- Step: Stroke or fill the path to render
    Here are the functions used to perform these steps:

    beginPath()
    Creates a new path. Once created, future drawing commands are directed into the path and used to build the path up.
    Path methods
    Methods to set different paths for objects.
    closePath()
    Adds a straight line to the path, going to the start of the current sub-path.
    stroke()
    Draws the shape by stroking its outline.
    fill()
    Draws a solid shape by filling the path's content area.
Example
    function draw() {
    var canvas = document.getElementById("canvas");
    if (canvas.getContext) {
    var context = canvas.getContext("2d");

    context.beginPath();
    context.moveTo(75, 50);
    context.lineTo(100, 75);
    context.lineTo(100, 25);
    context.fill();
    }
    }
    moveTo(x, y)
    Moves the pen to the coordinates specified by x and y.

    lineTo(x, y)
    Draws a line from the current drawing position to the position specified by x and y.
Arcs
To draw arcs or circles, we use the arc() or arcTo() methods.
    arc(x, y, radius, startAngle, endAngle, anticlockwise)
    Draws an arc which is centered at (x, y) position with radius r starting at startAngle and ending at endAngle going in the given direction indicated by anticlockwise (defaulting to clockwise).

    arcTo(x1, y1, x2, y2, radius)
    Draws an arc with the given control points and radius, connected to the previous point by a straight line.
Introduction to Web Animation
Animation is a great way to make your web application cheerful and striking to a larger audiance. Developers have several distinct ways to implement animatios. Some animation may not need any programming at all, CSS transitions may be sufficient for most cases, while more complicated animations will require more complex user interaction. JavaScript is the best tool for such tasks. JavaScript makes applying CSS to DOM elements dynamicall, very easy. In this section, we will intoduce some of the most practiced methods.
Basic Game Development in JavaScript
The
<canvar></canvar>element is the most popular and a resolution-dependent tool that is used for rendering game graphics, graphs and/or other visual images on the fly. We will use
canvas for drawing images, graphs and doing animations.
There can be more than one canvas on a single page. Some may be stacked on top of one another to provide layers.
Each canvas on the page, behaves like any other html element in DOM
Previously we used canvas to draw in this example: Drawing using canvas API.
We also used canvas to animate in this example: Animation using canvas API.
The "game loop"
The game loop, separates the game logic and the visual layer from a user's input and actions, and is the main structure of any game. For example, in web form, if the user does not enter the "submit" button, nothing will happen. The form waits for an action from the user.
On the other hand, games behave differently. It must continue to operate some action regardles of the user action, hence loop. Some of the operations that may occur in our game are draw graphics, play sounds, calculate new positions fot each object, update core board etc. There are various methods and tools available to JavaScript for developing the game loop.
Tools for implementing the Game Loop
setInterval(...) function
We covered setInterval in this section. Below is reminder of the syntax and another example
Syntax
setInterval(function, ms);
The setInterval function, evaluates a set of statements for a specified interval.
It returns a unique id of the action which can be used the stop the execution.
    function display_greeting() {
    var div = document.createElement("div");
    div.textContent = "Hello there!";
    document.body.appendChild(div);
    };
    //this will add one line of greeting message every 1000ms (1s)
    intervalId = setInterval(display_greeting, 1000);

    //Implement logic to stop displaying greeting message
    function stop_display_greeting() {
    clearInterval(intervalId);
    }
    //invoke stop action
    stop_display_greeting();
The setInterval executes when the interval time is reached. It does not wait unltil all the code is executed.
If the execution of the code take more time than the interval time, it will run into Unpredictable behavior.
Click Animation using the setInterval for complete implementation
setTimeout(...) function
setTimeout works similar to setInterval. The difference is that setTimeout it executes after a given amount of time.
Unlike setInterval, setTimeout waits for the function to finish everything inside before calling it again.
This is a great improvement over the setInterval
Syntax
setTimeout(function, ms);
The setTimeout does not returns a unique id of the action. Developers will find another way to stop execution. Below, we demonstrate one solution.
    function display_greeting() {
    var div = document.createElement("div");
    div.textContent = "Hello there!";
    document.body.appendChild(div);
    };
    //this will add one line of greeting message every 1000ms (1s)
    isplaying = true;
    setTimeout(display_greeting, 1000);

    //Implement logic to stop displaying greeting message
    function stop_display_greeting() {
    //Will Stop
    isplaying = false;
    }
    //invoke stop action
    stop_display_greeting();
Click Animation using the setTimeout for complete implementation.
For many years, game loops were developed using setTimeout until requestAnimationFrame API became available.
requestAnimationFrame API
When we work with either setTimeout or setInterval, we set the execution time up front, the browser has no knowledge of what we are doing.
The browser doesn't know if we want to repaint the DOM structure and when or do we even want to work with canvas.
This created un-smooth animations. If browser engine did have some knowledge, it could optimize the loop.
requestAnimationFrame will help us resolve this problem
According to developer.mozilla.org (MDN):
The requestAnimationFrame tells the browser that you wish to perform an animation and requests
that the browser calls a specified function to update an animation before the next repaint.
The method takes a callback as an argument to be invoked before the repaint.
Similar to setTimeout the callback routine must itself call requestAnimationFrame()
to animate another frame at the next repaint.
Syntax
    requestAnimationFrame(callback);
    //or
    window.requestAnimationFrame(callback);
callback is the function to call when it's time to update your animation for the next repaint.
The requestAnimationFrame returns a unique id, known as request id which can be
passed to cancelAnimationFrame() to cancel the refresh callback request.
Developers will find another way to stop execution. Below, we demonstrate one solution.
    function display_greeting() {
    var div = document.createElement("div");
    div.textContent = "Hello there!";
    document.body.appendChild(div);

    requestAnimationFrame(display_greeting);
    };
    //this will asks the browser to call the display_greeting function every 16.6 ms: this corresponds to 60 times per second (16.6 ms = 1/60 s).
    requestAnimationFrame(display_greeting);

    //Implement logic to stop displaying greeting message
    function stop_display_greeting() {
    //Will Stop
    isplaying = false;
    }

    //invoke stop action
    stop_display_greeting();
Click Animation using the setTimeout for complete implementation.
JavaScript Design Patterns
The study of Design Patterns is beyond the scope of this class however it is imperative to recognize the importance of maintainable code which requires noticing recurring themes in the code and optimizing them. In this section, we will study one of the design pattern - The Revealing Module Pattern to demonstrate code reuseability, encapsulation and composition.
Click Animation using the setTimeout for complete implementation.
Game Module
When creating a game, we cannot do it all at once; we need to divide it into smaller tasks or components or modules. We should be able to test each task individually. We should not expose the detail implementation of our game however we should have public methods and properties through which each component will communicate. In other word, we will expose our game through a controlled set of methods and properties.
Lets's start with the skeleton of the game, this is sometimes called Framework. We will follow the Revealing Module Pattern. For details on JavaScript Patterns, read this resource .
Lets name our game CSCE120Game
    var CSCE120Game = function(){

    function mainLoop(time) {
    //Main function, called each frame
    requestAnimationFrame(mainLoop);
    };
    function start() {
    requestAnimationFrame(mainLoop);
    };

    // Our GameFramework returns a public API visible from outside its scope
    // Here we only expose the start method, under the "start" property name.
    return {
    start: start
    };
    };
Time-based animation
This technique is used nearly all game developments. All animations follow the steps below
- Erase the canvas
- Move the shapes
- Draw the shapes
- Go to step 1
The above concept is know as "animation loop" or "game loop". Step 2, and 3 may be swapped.
In this section, I will demonstrate an example that does NOT use time-based animation and an example that does use time-based animation
A example that does not use time-based animation
animation-non-time-based-canvas
The animation seem fairly smooth however we may not see the same smoothness insome smartphones with less resources. The images will move faster on the desktop computer screen than on smartphones. Because the frame rate differs between the computer and the smartphone. While it runs 60 frames per second (fps) on a laptop computer it may run 25 fps on the smartphones. As we only move the objects in the animationLoop, in one second the rectangle will be moved 25 times on the smartphone compared with 60 times on the computer. Since we move the rectangle the same number of pixels each time, the rectangle moves faster on the computer.
We, as developers, may can artificially slow down the animation to make it look similar motion in all devices. But this method will waste our recources. The best solution would be measuring time between frames to achieve a constant speed on screen, even when the frame rate changes.
There are a few methods in our arsenal for dealing with device differences.
Time based animation : Using the JavaScript Date object
Measure the time at the beginning of each animation loop, and store it. Compute the delta of times elapsed between two consecutive loops. Then apply some simple maths to compute the number of pixels we need to move the shape to achieve a given speed (in pixels/s).
animation-non-time-based-canvas
SVG: Scalable Vector Graphics
SVG is special version of Extensible Markup Language (XML) designed for describing vector graphics, often two dimensional. SVG images and animations are defined in XML files which means they can be searched, indexed, scripted and compressed. SVG works with other web standards such as CSS, DOM similar to HTML elements.
Example: svg linear motion
Simulating Collisions
Object collisions, collisions detections and behaviours after the collosion occurs are the bases of most physics similation games. In your game, you will check for overlap between objects, apply collision detection and calculate new directions and velocities. A more natural game will also consider object mass, gravity and other properties.
We will construct our game in several steps:
JavaScript Libraries and Frameworks
Library: Offers functions to be called by its parent code
Framework: defines the entire application design. Developer code does not call a framework; instead the framework calls and uses the code in some particular way
TypeScript : {Better} JavaScript
Accoring to wikipedia.org, TypeScript is an open-source programming language developed and maintained by Microsoft. It is a strict syntactical superset of JavaScript, and adds optional static typing to the language.
When TypeScript code is compiled, the compiler will transcompile the code to JavaScript. Basically the compiler will read the TypeScript code, parse it, analyze it, and translate it into JavaScript.
https://www.typescriptlang.org
React code is also transcompile into JavaScript.
Babel is a very popular transcompiler