Connecting to the Windows Terminal Server from Mac OS
- On your Mac, open the "App Store" application and install the "Microsoft Remote Desktop" application.
- Launch Microsoft Remote Desktop.
- From the main menu bar, select File -> New
- Complete the pop-up connection dialog as described below:
- Name the connection with a descriptor of your choice.
- The "PC name" will be: csnt-ts.unl.edu.
- A gateway is not required.
- Use your School of Computing (SoC) credentials. Please Note how the login is prefixed with "CS.UNL.EDU\".
- If "Native" Resolution does not work, select one that is suitable to your device.
- Uncheck "Start session in full screen" if you would rather have the windows desktop appear in a window.
- Uncheck "Use all monitors" if you have a multi-monitor Mac and would like the windows desktop to be on one screen.
- Close the dialog by clicking on the "x" on the upper left on the dialog.
- The new connection will now appear on the main "Microsoft Remote Desktop" pane.
- Double click on the created connection to establish a remote connection to the terminal server.
A sample new connection dialog is shown below.
How to setup your first PHP page on cse.unl.edu
- Make sure you have read and setup the required directories and permission as described in FAQ section on Prerequisites for hosting a web page on cse.unl.edu.
- Change your working directory to the public_html directory.
> cd ~/public_html
- Open a command line session to cse.unl.edu.
- Use an editor like vi or pico to create the index.php file. Refer to the FAQ pages on editors on cse.unl.edu. Pico being the simple Unix editor to use.
> pico index.php
- Use the editor to insert some HTML into the file, a simple HTML content is shown below.
<html> <head> <title> This is my first page </title> </head> <body> <h1> My first page</h1> <?php echo "<p>Hello World </p>" ?> </body> </html> - Save the file and return to the command line.
- Grant everyone (others) read access to the file you just created.
> chmod o+r index.html
- Open a browser and point it to: http://cse.unl.edu/~login/index.php and you should see the file you just created.
- If you get an error, tail the /var/log/apache2/error_log (the tail command shows any new lines added to a file) while you try to access your page to see if there are any errors. If you don't see errors in error_log, you should tail /var/log/apache2/suphp.log as well and then try to access your page again to see if any errors are reported.
> tail -f /var/log/apache2/error_log
- If you still can't get your PHP program working, see if the student resource center can be of any assistance or send an email to support@cse.unl.edu and someone will help you identify the problem.
Common problem with setting up home pages
- Your home directory and public_html directory must have world execute permissions.
- Your html documents must be given world read access
- Any images enclosed should have a path relative to your public_html directory. The image load will fail if you specify a full path to the image
- To point to another file in your public_html directory, use a hypertext link of the following form
- Tail the /var/log/apache2/error_log (The tail command shows any new lines added to a file) while you try to access your
page to see if there are any errors.
> tail -f /var/log/apache2/error_log
Setting up a basic web page on cse.unl.edu
- Make sure you have read and setup the required directories and permission as described in FAQ section on Prerequisites for hosting a web page on cse.unl.edu
- Change your working directory to the public_html directory
> cd ~/public_html
- Open a command line session to cse.unl.edu
- Use an editor like vi or pico to create the index.html file - refer to the FAQ pages on editors on cse.unl.edu. Pico being
the simple unix editor to use.
> pico index.html
- Use the editor to insert some HTML into the file, a simple html content is shown below.
<html> <head> <title> This is my first page </title> </head> <body> <h1> My first page</h1> <p> Hello World </p> </body> </html> - Save the file and return to the command line
- Grant everyone(others) read access to the file you just created
> chmod o+r index.html
- Open a browser and point it to: http://cse.unl.edu/~login/index.html and you should see the file you just created.
Printing from Mac via SMB
Printing from University-Owned (faculty/staff) Macs
For Student or BYOD Instructions, click here.-
Install the print driver package using Launchpad to select the Self Service application:


From within Self Service use the left-side menu to select Printer Drivers. Then select Install of the Canon UFR II Printer Driver package: or the HP Legacy Print Drivers depending upon the printer you are connecting to.
- Use the instructions below to add the printer using System Settings -> Printers & Scanners.
- The added printer should now be shown in the System Settings -> Printers and Scanners configuration page. You may be prompted for your MyUNL credentials the first time you print to the printer.
List of Printers
| SoC_Avery12 * | SoC_Avery12color * | SoC_Avery15 * |
|---|---|---|
| SoC_Avery104 | SoC_Avery122 |
SoC_Avery123 |
| SoC_Avery250 | SoC_Avery256 | SoC_Avery258 |
| SoC_Avery258color | SoC_Avery354 | SoC_Avery354color |
| SoC_Schorr101 | SoC_Schorr209 | SoC_Schorr209color |
Printing from a BYOD (personal) Macs using Apple Menus
Open System Preferences. Either click on the Apple Menu on the main menu bar at the top of the screen and then select System Preferences, or bring up spotlight by holding down ⌘-space and then typing System Preferences
- Then click Printers & Scanners (or Printers & Fax). Note: Your System Preferences may look different.
 Click on the "+" button on the lower left to start the process of adding a new printer
 In the "Add" dialog, right click the bar at the top, and select the Customize Toolbar option. This opens a toolbar customization menu. Use the toolbar customizing menu to drag the Advanced option onto the menu bar. You may skip this step if you already have the Advanced options symbol on the Add dialog toolbar.
 The printer Type is "Windows printer via spoolss". In the URL, type in smb://its-acadprt-unl.unl.edu/PRINTER. Replace PRINTER with one of the printer names shown above. For example, if you wanted to print to the printer in Avery 12, you'd use SoC_Avery12. See all the printers in the list above. In the dialog box, for Printer Name, replace
its-acadprt-unlwith something that better identifies the printer. Finally for the Print Using option, select either generic postscript or the appropriate driver from the list if you have installed drivers from Self Service or the manufacturers support website.-
Click add. Your printer should now be added. Print a test page to make sure everything works.
-
When you print to this printer for the first time, you will be prompted for your login and password. Use your UNL MyRed login. Check the "Remember this password in my keychain" checkbox as shown.
If you change your UNL MyRed password, you will need to launch the keychain utility and delete the stored old password for this printer. The keychain record, will be found in the "Login" keychain, in the "Passwords" category and will be named the same as the printer name, simply select this record and delete this entry. The next time you print you will be prompted for the new password which must be entered as described above.
How many pages am I allowed to print each semester?
Printer quotas are assigned by the number of School of Computing classes (CSCE/SOFT/RAIK) you are enrolled for each semester. For each class you enroll in, you get $12.00 worth of printing or 200 pages of B&W printing at $0.06 per page.
In addition, if you are enrolled for thesis or dissertation hours, you will receive an additional $20.00 added to their printer quota each semester.
Purchasing Additional Print Quota
- Students can purchase additional pages in 100 page increments for $6.00.
- Pages can be purchased at Room 27 Avery Hall.
- Purchased quota does not expire at the end of the semester.
How to I check my printer quota and balances?
Your remaining printer quota along with the printers you have access to, is displayed on the main page of the School of Computing (SoC) Account Management Utility (AMU) page at https://cse.unl.edu/account.
Additional printer quota can be purchased from the system administration offices in Avery 27C. The current cost is $6.00 per 100 pages. The cost is charged to your NCard charge account, so you will need to present your NCard at time of purchase.
How to Format Your Thesis Using LaTeX
The Office of Graduate Studies dictates the style and format for a thesis at the University of Nebraska-Lincoln. Information about these standards can be found on their website for current students at http://www.unl.edu/gradstudies/current/, and specifically in a publication titled "Guidebook For Preparation and Submission of a Thesis".
The Department of Mathematics maintains a LaTex class file that helps format your thesis to Nebraska's guidelines. This template may be helpful to Computer Science and Engineering students as well. Look for the "NU Thesis LaTeX Class File" under the Resources section of this page: https://math.unl.edu/current-graduate
Compilers and Interpreters available on cse.unl.edu
Compilers
gcc GNU CcCompiler g++ GNU C++ compiler javac Java compiler gfortran GNU Fortran compiler clisp Common Lisp alisp Allegro Common Lisp
Interpreters
perl Perl command line scripting language php Command line and web scripting language ruby Command line and web scripting language pyton Command line scripting language
A simple unix text editor - pico
To use pico, type "pico filename" where filename is the file you with to create or edit. Once in pico, you will see a list of pico commands you can use, shown on the bottom of the screen. The '^' symbols means <CTRL>. To view the pico help screen the command shown on the bottom of the screen is "^G" which means <CTRL>-G.
Basic Unix Commands
- Note on systax used in document:
- items in [] are optional
- items in {} can be repeated 0 or more times.
- fn = filename (possible with wildcards)
- dir = directory name
File System:
- cat fn {fn}
- concatenate, can be used to display a file.
- more fn {fn}
- displays file(s) one screenful, at a time. At MORE prompt enter: space bar - for next screenful <cr> - for next line, q - to quit more command.
- cp fn1 fn2
- copy file - fn1 to fn2, fn1 remains.
- mv fn1 fn2
- move (rename) file - fn1 to fn2, fn1 no longer exists.
- rm fn
- remove (delete) file.
- lpr -Pprinter_name fn
- print a file, printer_name = ps16 or ps17.
- ls [fn]
- list files in current directory option filename is usually used to display files matching wildcards. (ie. ls *.s will list all assembly language source files.)
- ls -lgRa
- Recursive listing of all files within all subdirectories. Longest, most descriptive format.
- cd [dir]
- change working directory, ``home directory" if not specified. cd .. will backup one level in the directory structure.
- pwd
- print working directory path.
- mkdir dir
- make a new directory, giving it the name dir (within the current directory)
- rmdir dir
- remove (delete) the directory named dir (the directory must be empty)
- file fn
- Tries to determine what kind of information is in a file by consulting the file system index and by reading the file itself.
- du
- Prints a summary of total space occupied by all files in a hierarchy.
- sort fn
- Sorts ASCII files line-by-line.
- chmod
- Change file permissions. See the man pages for a complete description of settings. Use this command to determine whether files can be readable by other people.
- find . -name filename
- In it's most simple form find will display all files in this and any subdirectories which name matches filename. See the man page for find for a complete description of this command. Find can be use to find files matching name patters, dates, owners, sizes, etc. and to perform action on matched files.
- gzip fn
- Use this to compress files not needed immediately to conserve disk space. A ``.gz" will be appended to the filename.
- gzip -d
- Uncompresses files with ``.Z" at end of filename.
- head {-n} fn
- Prints first n lines of a text file. If no number is specified, the default is 10.
- tail {-n} fn
- Prints last n lines of a text file. If no number is specified, the default is 10.
- tail {-n} fn
- Prints last n lines of a text file. If no number is specified, the default is 10.
- grep string fn
- Print occurrences of string in file
Remote Connection:
- ssh remote_host
- Launch a secure shell to the remote host specified.
Communication:
- finger
- list users currently on the system.
- who
- list users currently on the system.
- w
- what, similar to who but includes what they are doing.
- pine
- Email message utility.
- pine username
- will send Email to username.
- talk username
- allows two users to have an interactive conversation over the computer.
- write username
- allows a user to put a message on another users screen.
- mesg n
- Makes it so other users cannot interrupt you with talk requests, and write messages.
Help:
- man command
- manual, returns the manual for the given command from the UNIX on-line manual. If you cannot find a man page for a command, there may be one in a directory that isn't in your MANPATH. Your MANPATH is setup in the .login file and a command's man page is usually in a man directory off the same parent directory as the command. For example, if the command is located in /usr/local/bin, its man page is probably in /usr/local/man.
- man -k keyword
- display manual headings containing the word keyword.
Miscellaneous:
- alias name def
- Assigns ``def'' to the alias ``name''. Usually found in the .cshrc file. For example ``alias dir ls -la''.
- clear
- Clears screen.
- history
- List history of commands used.
- !!
- re-execute the last command entered.
- !x
- re-execute the last command that started with the given letter, eg !c will re-execute the last command that began with the letter c.
- jobs -l
- list all currently stopped or background jobs with job numbers and process ID's.
- kill [-signal] %jobnumber
- kill the given job number. Use the "jobs" command to show running jobs. You might need to kill a job to logout if you have accidentally put a job into the background or stopped a job. Use -TERM or -KILL singlas to force quite jobs.
- kill PID
- kill the given Process. refer the "ps" command to find running processes. Use -TERM or -KILL singlas to force quite jobs.
- ps -fa
- list all your current processes. See the man page for a full description.
- <control>C
- kill the current process - the one in the foreground
- <control>Z
- suspend foreground process.
- bg
- put a suspended job in the background.
- fg
- put a suspended or background job in the foreground.
- date
- display time and date.
To find out about more commands, click here.
Setting up a VPN connection to campus
Some websites and servers are secured by a firewall that only allows connections from on campus. To access these restricted resources from off campus, you will need a VPN connection. Most students don't require access to systems that aren't available from off campus, so a VPN connection is only needed by students when connecting to their CSE home directory through the SAMBA (smb:) network protocol. A VPN connection is used to make files stored on remote systems appear as local files from the perspective of your local (PC/Mac/Linux) system. This local perspective is necessary for local applications to access the remote files.
Information Technology Services now operates a VPN service for faculty, staff and students. More information about their service is available at https://services.unl.edu/service/virtual-private-network-vpn-global-protect.
How do I access a command line session on the SoC Unix server?
For certain classes you will be required to access a command line session on the School of Computing (SoC) Unix server: cse.unl.edu.
Connecting to cse.unl.edu from a Windows personal laptop
Search for "putty win32" using a search engine (Google/DuckDuckGo/Bing). Download and install the PuTTY application on your computer. Then follow the steps in the next section.
Connecting to cse.unl.edu from a Lab Windows machine
- Launch PuTTY - there should be a desktop icon for PuTTY, or look for it in the start menu.
- In the "PuTTY Configuration" dialog that pops up, enter "cse.unl.edu" in the Host Name field, click on "SSH" as the Connection type, and click the "Open" button.
- If this is the first time you're connecting to cse.unl.edu, there will be a Security Alert popup asking you if you want to accept the server's host key. Click on "Yes."
- Login with your SoC login user name and password when prompted. If you do not know your SoC login or password, visit the SoC Account Management Utility page, https://cse.unl.edu/account.
If you are prompted for a Verification code: after entering your password, examine the login user name you supplied to the login: prompt. Login user names containing a digit at the end, e.g. fred4, are not valid user names for SoC systems. If you supplied the wrong user name you will need to start a new PuTTY SSH session using the correct login user name.
How do I access my home directory from off campus from Windows?
For occasional transfer of file between your home directory on the departmental server and your personal computer, we recommend using a SFTP (Secure File Transfer Protocol) client. One such client is FileZilla.
You will need to download the FileZilla client, not the FileZilla server. Install and launch the FileZilla client. In the "Quick Connect" bar in the main FileZilla window, enter sftp://cse.unl.edu as the Host, along with your School of Computing (SoC) CSE server username and password and click on 'QuickConnect'. The Port field can be left empty if you specified the "sftp://" prefix as part of the host name.
How do I access my CSE home directory from a Windows PC on campus?
If you are working on campus from a computer lab or on your personal laptop, you might wish to map your home directory from the school server directly onto your laptop, so as to not have to transfer files up and down.
The instructions given are for Windows 10:
- Launch File Explorer, there are many way to do this: From the start menu, select the Documents item to open the "File Explorer".

Or you can select the "File Explorer" from the Windows System menu.
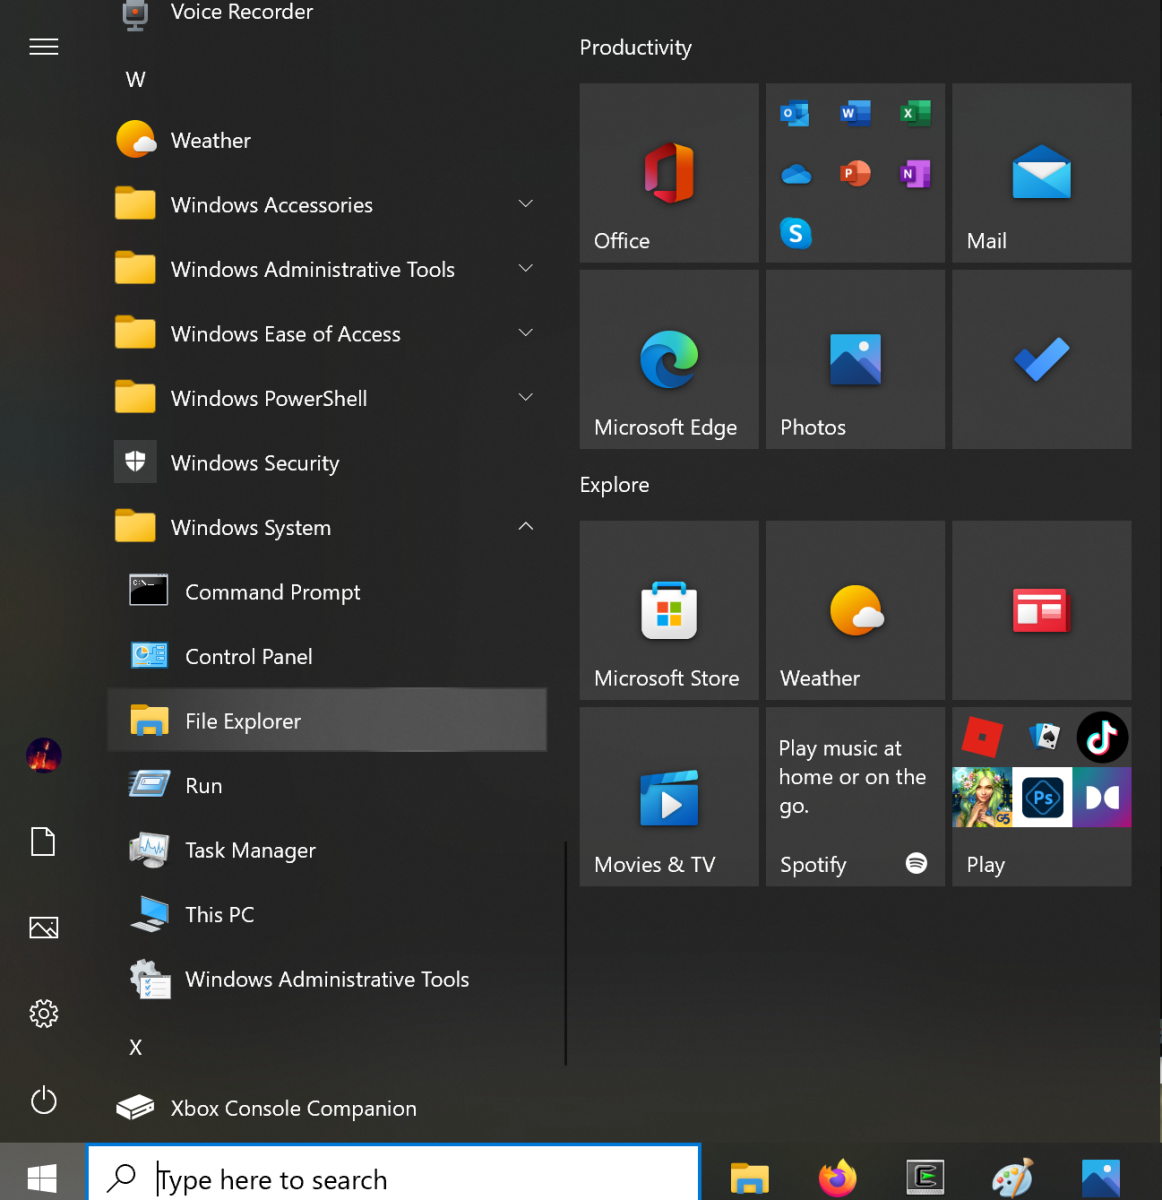
If you have a "My Computer" or "My PC" icon on the desktop, you can double click on the icon to launch File Explorer. - In the File Explorer window, click on the Computer tab on the top of the window to display a ribbon, then click the Map network drive icon if shown:
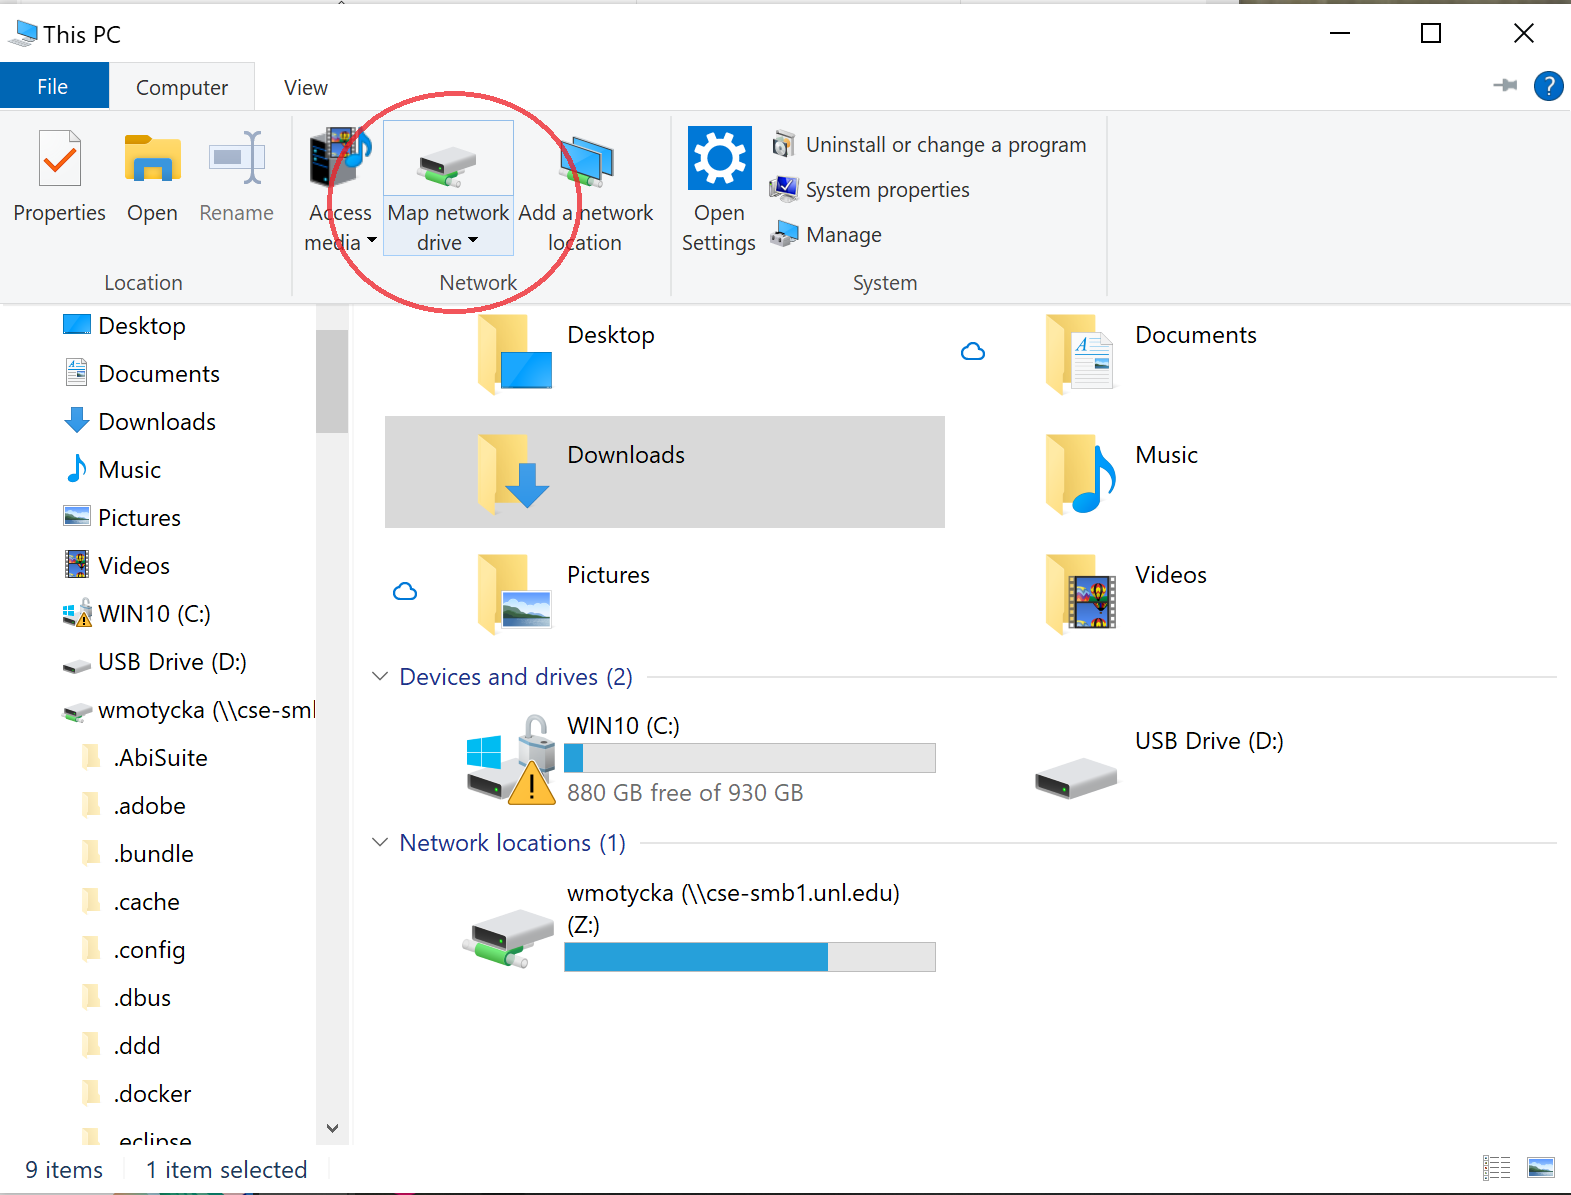
or right-click on "My PC" to show the 'map network drive' option.
This will open a "Map Network Drive" dialog.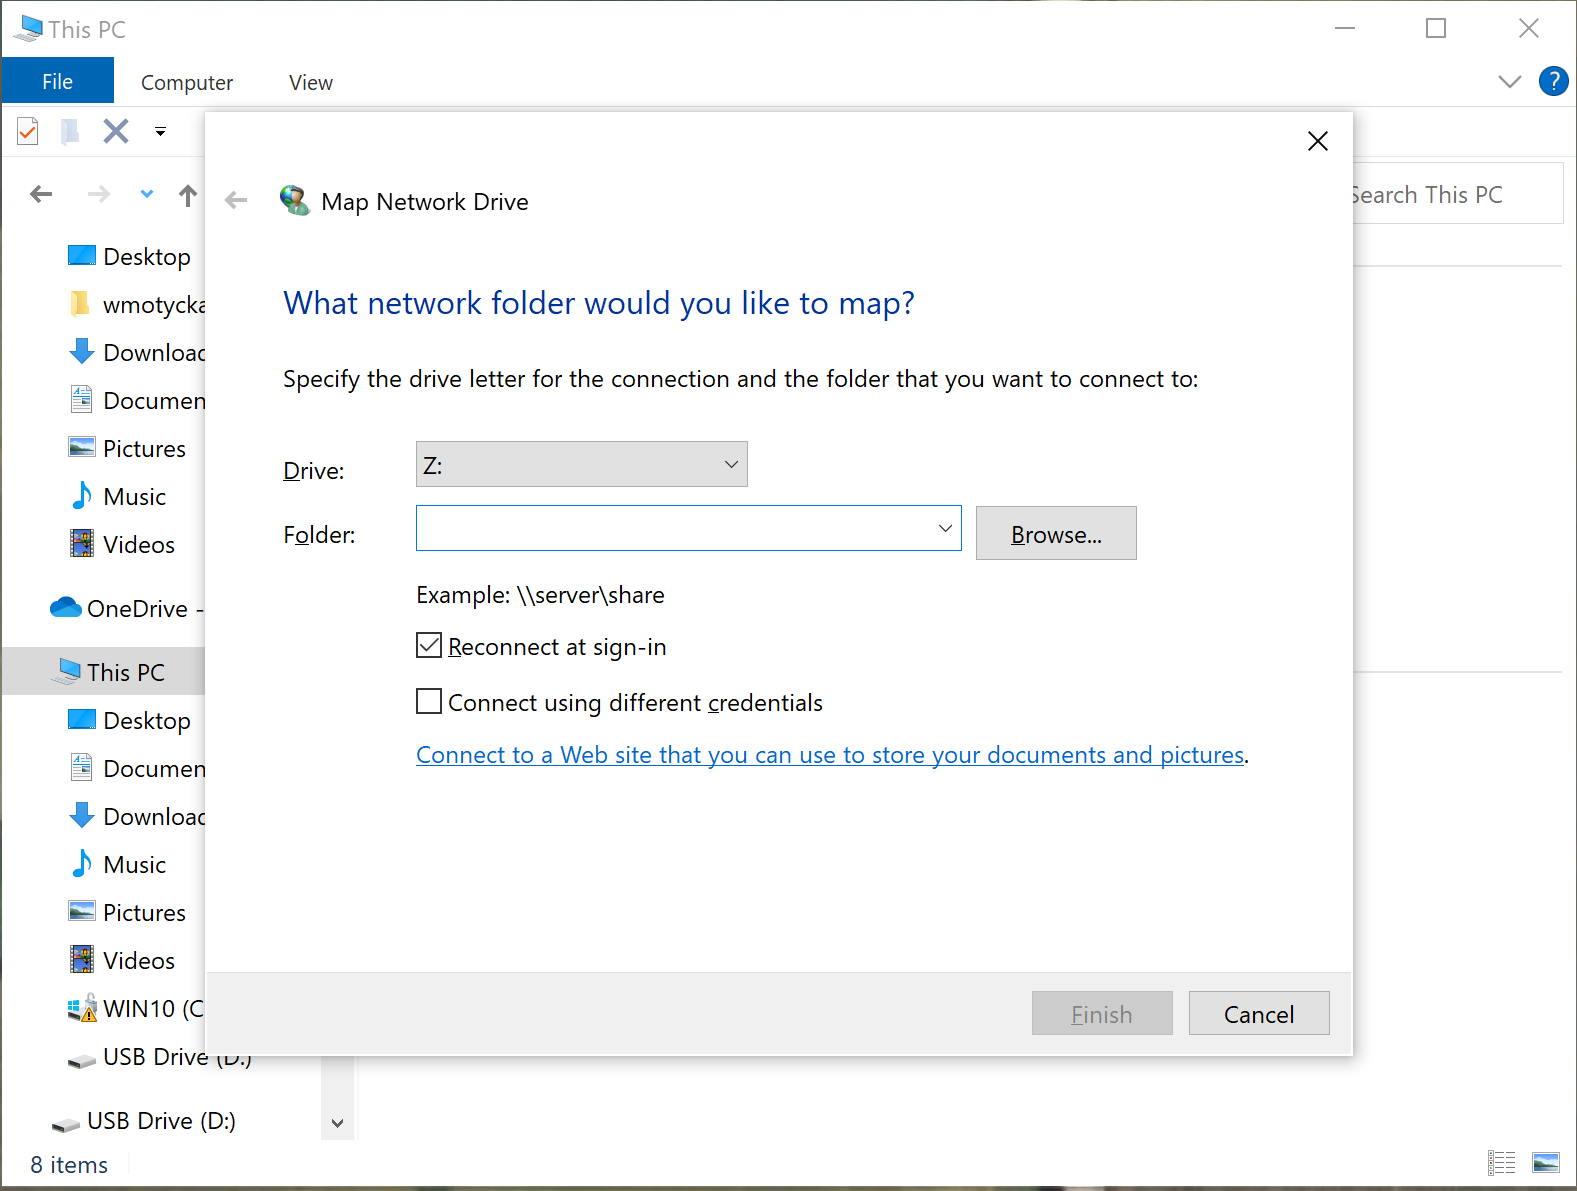
- In the dialog, type in "\\cse-smb1.unl.edu\login_id" without the quotes and where login_id would be your School of Computing CSE login ID. For example if your CSE login was csmith, your folder path would be: \\cse-smb1.unl.edu\csmith
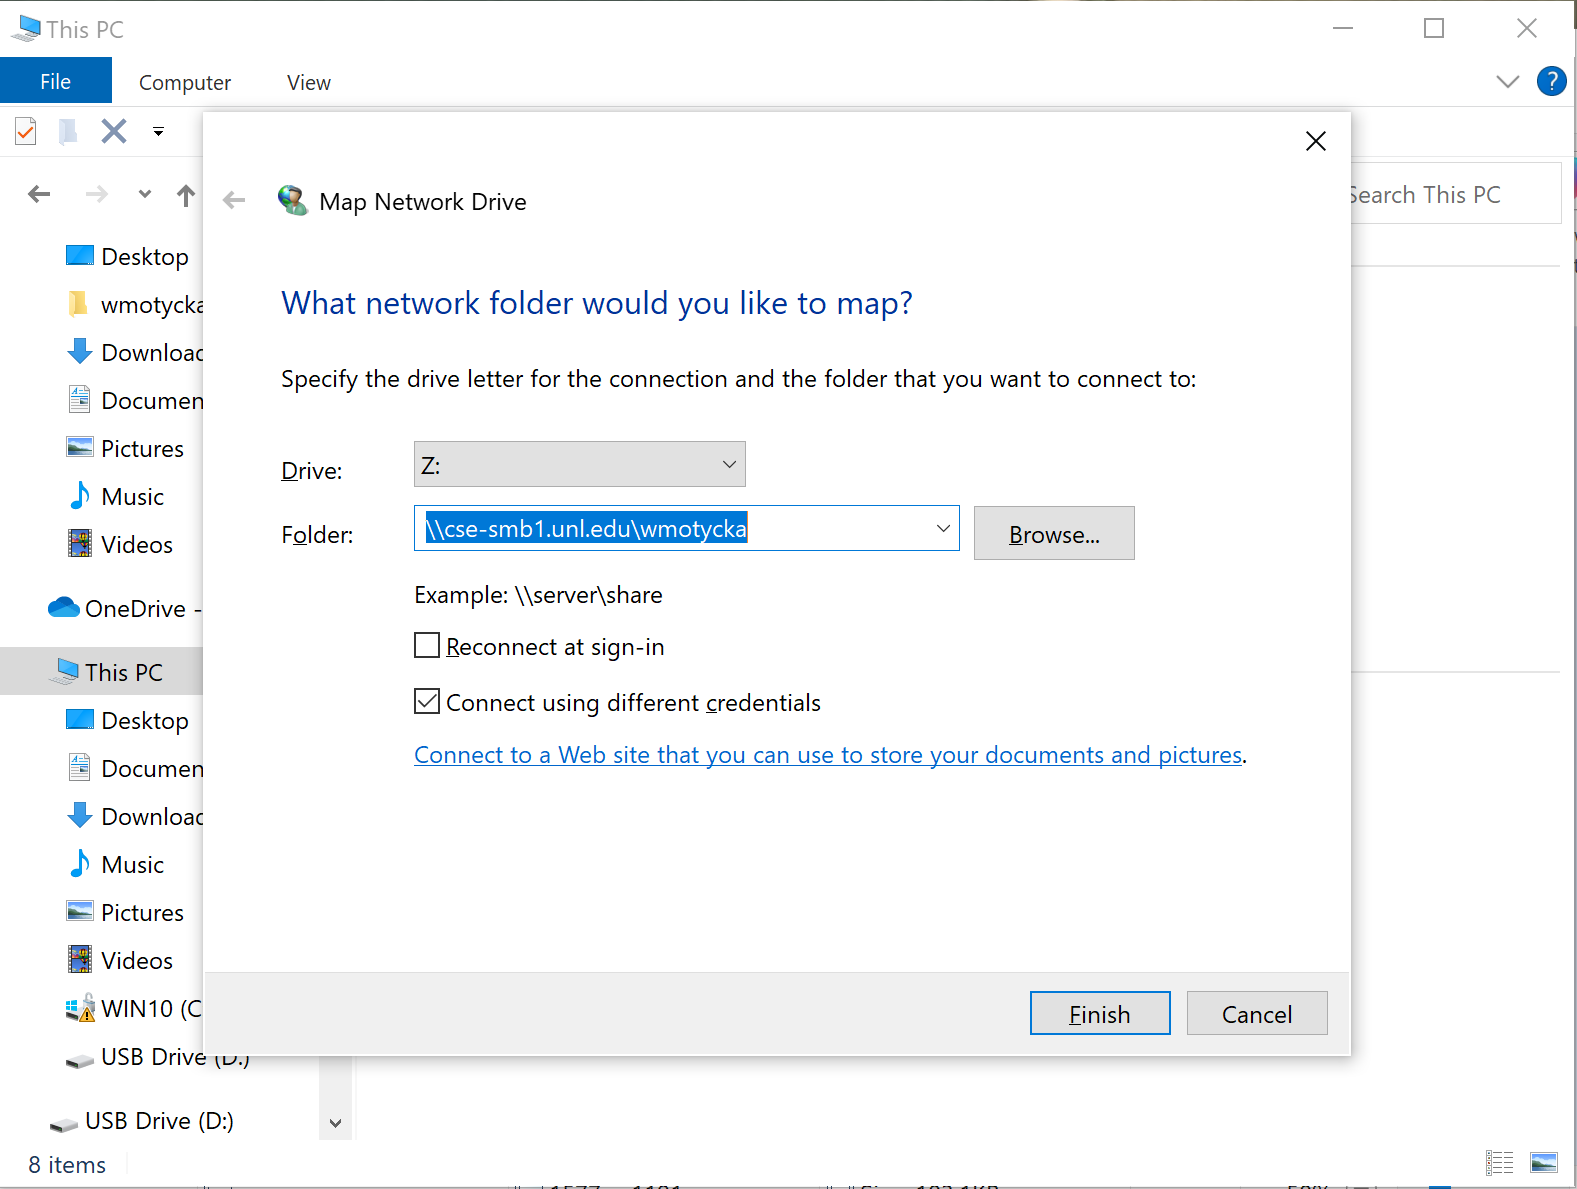
- Check on the "Connect using different credentials" checkbox, uncheck "re-connect at sign-in" and click on the "Finish" button.
- When you are asked to enter your network credentials, you will need to login with your SoC credentials. Your user name must be provided as "CS.UNL.EDU\username". As in the example above, if your CSE username (login) was csmith, the user name value would be: CS.UNL.EDU\csmith
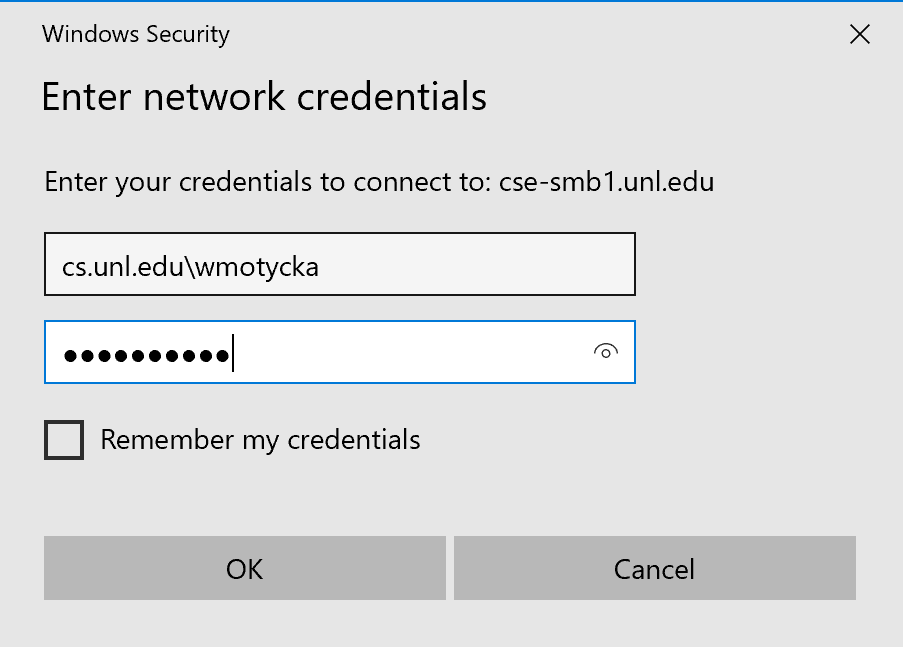
- Provide your CSE password and Click "OK". You should see your home directory from the departmental server mapped as a drive in the File Explorer window.
If you are not offered the option to enter credentials or Windows returns an error indicating it cannot communicate or find the cse-smb1.unl.edu server, ensure you are connect to the eduroam network, and the eduroam network is private network. You can verify that you have the required Windows client service enabled using these instructions on Windows SAMBA settings.
How do I register my wireless device? (Students, Faculty, and Staff)
The wireless network on campus is managed by Information Technological Services. Visit their wireless page on claiming your My.UNL identity and authenticating with your My.UNL credentials to the eduroam wireless network on campus.
Visitor Registration for University Wireless Network
The wireless network on campus is managed by Information Technology Services. Visitors to the Univerisity of Nebraska needing wi-fi access can register for 14-day, limited wi-fi access by visiting the ITS page on NU-Guest setup. Please note that the NU-Guest wi-fi network is restricted in services that can be accessed and services such as SSH will not be accessible when connected to the NU-Guest wi-fi network.
Setting up Mac Mail on OSX 10.8+ (legacy users)
- Launch Apple Mail (which will be known as Mail).
-
Select "Mail" from the menu bar, then select preferences. Or use the keyboard command. "cmd+,"
 This brings up the preferences dialog. Select the "Accounts" tab on the top of the window. When presented with the accounts window click the plus button in the lower left corner to add a new account.
 Select "Add other mail account" and click on "Continue."
 Fill in the required information. Please use your full name, School of Computing (SoC) email address, SoC password and click on "Create".
 Make sure "Account Type" of IMAP is selected and the mail server is "cse-mail.unl.edu". Enter your SoC login for the User Name and click on "Next". Note that the login does not have the "@cse.unl.edu" specified.
 On the next screen enter "Mail" as the path prefix and make sure "use SSL" is selected then click "Next". Note The "Path Prefix" is a subfolder on your home directory where mail fodlers are kept. If not specified, your mail folders will be kept on your home directory.
 For the outgoing mail server, again enter cse-mail.unl.edu and your SoC login and password and click "Create."
- A new mail account will be shown on the preferences tab. Close the preferences tab to complete setup on your mail.
- If you have issues, contact support@cse.unl.edu for further assistance.
Message Size Limits (Legacy users)
The maximum message size is 10MB for outgoing email messages sent through SMTP on cse.unl.edu and cse-mail.unl.edu. This limit applies to the entire size of the message, which includes the message body, headers, and any attachments.
If you absolutely need to send a message that is larger than 10MB, you can send a request via email to support@cse.unl.edu to have the message size limit temporarily increased on the server. However, large files should not normally be sent as attachments in email messages. Instead, please consider using OneDrive to share files.
When does my School of Computing account expire?
For information on when your School of Computing (SoC) account expires, if you passwords are still valid or expired, and other SoC account related settings, visit the School of Computing Account Management Utility (AMU) page at https://cse.unl.edu/account.
I forgot my CSE password or login
If you have forgot your password, visit the School of Computing (SoC) Account Management Utility (AMU) page at https://cse.unl.edu/reset_password. Enter your email account, for students this would be your @huskers.unl.edu email. An email with a link to reset your password will be sent to your email.
To recover your CSE login id, visit the AMU login recovery page at https://cse.unl.edu/lost_login and enter your email. This will send an email to you containing your CSE systems login id.
Who should I contact for account related problems?
If you are unable to find a solution to your problem in this FAQ, your next step is to consult the School of Computing (SoC) Student Resource Center in Avery Hall (room 12). The Student Resource Center is generally open from 9 a.m. to 7 p.m. Monday–Friday. If the Student Resource Center is unable to address your problem, email support@cse.unl.edu. When you send an email to support@cse.unl.edu, please include your SoC login and provided as much detail as possible. When applicable, include the system you are using (a Windows system in the lab, the cse.unl.edu server, a Linux system in the lab, your personal laptop, etc.), the operating system on your personal device, the task you are trying to accomplish (date and time may help if you were using cse.unl.edu), the command you are running, any error messages returned, and any other information that would assist in focusing the diagnostics on your problem.
How do I check my disk quota?
If you are having issues saving file to your home directory (Unix) or your Z: Drive (Windows), you might have exceeded your disk quota.
Quotas are used to limit the amount of disk space used and the total number of files of each user. Disk space used is measured in blocks, where 1 block equals 1024 bytes(1KB).
There are two values (called limits) — a soft limit and a hard limit — for both the disk space used quota and the number of files quota. You can continue to increase your usage over the soft limit until you either reach the hard limit or the established time limit (usually a week). Once the hard limit has been reached, all further attempts at file creation will fail with an error message.
The simplest way to view your disk quota is to visit the School of Computing Account Management Utility (AMU) page at https://cse.unl.edu/account. After login, the AMU page shows various details about your account including your disk quota and usage.
To check your disk quota under Unix, use the command "quota -v" at the Unix command shell prompt.
Connecting to your home directory from a Mac from off campus
The simpler method to access your home directory (Z: drive) from off-campus is to use an SFTP client like Cyberduck. This will allow you to easily transfer files between your cse.unl.edu account to your local computer. While a free version of Cyberduck is available online, users are cautioned to be mindful to download Cyberduck from a reputable source, as the source code is readily available online and can thus be easily modified and made vunerable. A version is also available through the Mac App Store as a paid app. We recommend the paid app store version as it ensures the source as reputable.
To actually mount your files from an off-campus account you will need to configure a VPN client and then follow the instructions on mounting your drive from on campus. Both of these topics are discussed in other sections of this FAQ.
Editing a File on Unix with vi - Basic Commands.
What is
vi?
The default editor that comes with the UNIX operating system is called
vi (
visual editor). [Alternate editors for UNIX environments include
pico and
emacs, a product of GNU.]
The UNIX
vi editor is a full screen editor and has two modes of operation:
- Command mode commands which cause action to be taken on the file, and
- Insert mode in which entered text is inserted into the file.
In the command mode, every character typed is a command that does something to the text file being edited; a
character typed
in the command mode may even cause the
vi editor to enter the insert mode. In the insert mode, every character typed is added to the text
in
the file; pressing the
<Esc> (
Escape) key turns off the Insert mode.
While there are a number of
vi commands, just a handful of these is usually sufficient for beginning
vi users. To assist such users, this Web page contains a sampling of basic
vi commands. The most basic and useful commands are marked with an asterisk (
* or star) in the tables below. With practice, these commands should become automatic.
NOTE: Both UNIX and
vi are
case-sensitive. Be sure not to use a capital letter in place of a lowercase letter; the results will not be
what
you expect.
To Get Into and Out Of
vi
To Start
vi
To use
vi on a file, type in
vi filename. If the file named
filename exists, then the first page (or screen) of the file will be displayed; if the file does
not
exist, then an empty file and screen are created into which you may enter text.
| * |
vi filename
|
edit
filename starting at line 1
|
vi -r filename
|
recover
filename that was being edited when system crashed
|
To Exit
vi
Usually the new or modified file is saved when you leave
vi. However, it is also possible to quit
vi without saving the file.
Note: The cursor moves to bottom of screen whenever a colon (
:) is typed. This type of command is completed by hitting the
<Return> (or
<Enter>) key.
| Basic Command | Command | Description |
|---|---|---|
| here |
:x
<Return>
|
quit
vi, writing out modified file to file named in original invocation
|
:wq
<Return>
|
quit
vi, writing out modified file to file named in original invocation
|
|
:q
<Return>
|
quit (or exit)
vi
|
|
| * |
:q!
<Return>
|
quit
vi even though latest changes have not been saved for this
vi call
|
Moving the Cursor
Unlike many of the PC and MacIntosh editors,
the mouse does not move the cursor within the
vi editor screen (or window). You must use the the key commands listed below. On some UNIX
platforms,
the arrow keys may be used as well; however, since
vi was designed with the Qwerty keyboard (containing no arrow keys) in mind, the arrow keys
sometimes
produce strange effects in
vi and should be avoided.
If you go back and forth between a PC environment and a UNIX environment, you may find that this dissimilarity in methods for cursor movement is the most frustrating difference between the two.
In the table below, the symbol
^ before a letter means that the
<Ctrl> key should be held down while the letter key is pressed.
| Basic Command | Command | Description |
|---|---|---|
| * |
j
or
<Return> [
or down-arrow]
|
move cursor down one line |
| * |
k [
or up-arrow]
|
move cursor up one line |
| * |
h
or
<Backspace> [
or left-arrow]
|
move cursor left one character |
| * |
l
or
<Space> [
or right-arrow]
|
move cursor right one character |
| * |
0 (zero)
|
move cursor to start of current line (the one with the cursor) |
| * |
$
|
move cursor to end of current line |
w
|
move cursor to beginning of next word | |
b
|
move cursor back to beginning of preceding word | |
:0
<Return>
                or 1G
|
move cursor to first line in file | |
:n
<Return>
                or nG
|
move cursor to line
n
|
|
:$
<Return>
                or G
|
move cursor to last line in file |
Screen Manipulation
The following commands allow the
vi editor screen (or window) to move up or down several lines and to be refreshed.
| Basic Command | Command | Description |
|---|---|---|
^f
|
move forward one screen | |
^b
|
move backward one screen | |
^d
|
move down (forward) one half screen | |
^u
|
move up (back) one half screen | |
^l
|
redraws the screen | |
^r
|
redraws the screen, removing deleted lines |
Adding, Changing, and Deleting Text
Unlike PC editors, you cannot replace or delete text by highlighting it with the mouse. Instead use the commands in the following tables.
Perhaps the most important command is the one that allows you to back up and undo your last action. Unfortunately, this command acts like a toggle, undoing and redoing your most recent action. You cannot go back more than one step.
| * |
u
|
UNDO WHATEVER YOU JUST DID; a simple toggle |
The main purpose of an editor is to create, add, or modify text for a file.
Inserting or Adding Text
The following commands allow you to insert and add text. Each of these commands puts the
vi editor into insert mode; thus, the
<Esc> key must be pressed to terminate the entry of text and to put the
vi editor back into command mode.
| Basic Command | Command | Description |
|---|---|---|
| * |
i
|
insert text before cursor, until
<Esc> hit
|
I
|
insert text at beginning of current line, until
<Esc> hit
|
|
| * |
a
|
append text after cursor, until
<Esc> hit
|
A
|
append text to end of current line, until
<Esc> hit
|
|
| * |
o
|
open and put text in a new line below current line, until
<Esc> hit
|
| * |
O
|
open and put text in a new line above current line, until
<Esc> hit
|
Changing Text
The following commands allow you to modify text.
| Basic Command | Command | Description |
|---|---|---|
| * |
r
|
replace single character under cursor (no
<Esc> needed)
|
R
|
replace characters, starting with current cursor position, until
<Esc> hit
|
|
cw
|
change the current word with new text, starting with the character under cursor, until
<Esc> hit
|
|
cNw
|
change
N words beginning with character under cursor, until
<Esc> hit; e.g.,
c5w changes 5 words
|
|
C
|
change (replace) the characters in the current line, until
<Esc> hit
|
|
cc
|
change (replace) the entire current line, stopping when
<Esc> is hit
|
|
Ncc
or
cNc
|
change (replace) the next N lines, starting with the current line, stopping when
<Esc> is hit
|
Deleting Text
The following commands allow you to delete text.
| Basic Command | Command | Description |
|---|---|---|
| * |
x
|
delete single character under cursor |
Nx
|
delete N characters, starting with character under cursor | |
dw
|
delete the single word beginning with character under cursor | |
dNw
|
delete
N words beginning with character under cursor; e.g.,
d5w deletes 5 words
|
|
D
|
delete the remainder of the line, starting with current cursor position | |
| * |
dd
|
delete entire current line |
Ndd
or
dNd
|
delete
N lines, beginning with the current line; e.g.,
5dd deletes 5 lines
|
Cutting and Pasting Text
The following commands allow you to copy and paste text.
| Basic Command | Command | Description |
|---|---|---|
yy
|
copy (yank, cut) the current line into the buffer | |
Nyy
or
yNy
|
copy (yank, cut) the next N lines, including the current line, into the buffer | |
p
|
put (paste) the line(s) in the buffer into the text after the current line |
Other Commands
Searching Text
A common occurrence in text editing is to replace one word or phase by another. To locate instances of particular sets of characters (or strings), use the following commands.
| Basic Command | Command | Description |
|---|---|---|
/string
|
search forward for occurrence of
string in text
|
|
?string
|
search backward for occurrence of
string in text
|
|
n
|
move to next occurrence of search string | |
N
|
move to next occurrence of search string in opposite direction |
Determining Line Numbers
Being able to determine the line number of the current line or the total number of lines in the file being edited is sometimes useful.
| Basic Command | Command | Description |
|---|---|---|
:.=
|
returns line number of current line at bottom of screen | |
:=
|
returns the total number of lines at bottom of screen | |
^g
|
provides the current line number, along with the total number of lines, In the file at the bottom of the screen |
Saving and Reading Files
These commands permit you to input and output files other than the named file with which you are currently working.
| Basic Command | Command | Description |
|---|---|---|
:r filename
<Return>
|
read file named
filename and insert after current line (the line with cursor)
|
|
:w
<Return>
|
write current contents to file named in original
vi call
|
|
:w newfile
<Return>
|
write current contents to a new file named
newfile
|
|
:12,35w smallfile
<Return>
|
write the contents of the lines numbered 12 through 35 to a new file named
smallfile
|
|
:w! prevfile
<Return>
|
write current contents over a pre-existing file named
prevfile
|